| As of August 2020 the site you are on (wiki.newae.com) is deprecated, and content is now at rtfm.newae.com. |
Difference between revisions of "V3:MATLAB Control of CW-Lite"
(Adding V3 page) |
(added warning box) |
||
| Line 1: | Line 1: | ||
| + | {{Warningbox|For the older V3.x tools, see [[V3:MATLAB Control of CW-Lite]]}} | ||
| + | |||
The following is designed to demonstrate how to control the CW-Lite directly from MATLAB. | The following is designed to demonstrate how to control the CW-Lite directly from MATLAB. | ||
Revision as of 08:11, 1 March 2018
For the older V3.x tools, see V3:MATLAB Control of CW-Lite
The following is designed to demonstrate how to control the CW-Lite directly from MATLAB.
Contents
About MATLAB to Python Interface
This system relies on the Mathworks Python interface, which is built in as of R2014B. See MathWorks Reference Page for more details.
The code is currently held in a separate repository at [1]. You'll have to clone that repository (or use the download link inside of GITHub) to copy the files into your own local working directory.
Python/ChipWhisperer Setup
You will need to first install Python 2.7 + ChipWhisperer. Note you'll need match the type of Python to your MATLAB install (i.e., 64-bit Python if using 64-bit MATLAB). Specific steps follow:
- Download WinPython 2.7.10.3, most likely you will require the 64-bit version (most recent MATLAB installs will be 64-bit).
- Run the installer - it will actually just extract this somewhere, I suggest to use a location such as c:\WinPython-64bit-2.7.10.3 rather than the default which will just install in a subdirectory of whereever you downloaded the installer to.
- Run the 'WinPython Command Prompt' - this will be in the directory you installed WinPython to.
- Run
pip install chipwhispererin the WinPython prompt which should install ChipWhisperer. - Plug in CW-Lite, when prompted for drivers you'll have to download the driver zip-file and extract that somewhere, then point the installer to this location.
- Once drivers are installed, you should be able to run the examples from the WinPython command prompt. To do run the command
pythonto start Python interpreter, then run:
  >>> import chipwhisperer
  >>> chipwhisperer.capture_gui()
- This should open the capture GUI. From the 'Project' and 'Example Scripts' menu, select 'ChipWhisperer-Lite: AES SimpleSerial on XMEGA'.
- Hopefully you see some waveforms show up on the screen!
MATLAB Setup
MATLAB will need to be told about your Python location most likely. You can check this by seeing the value of the pyversion variable at the MATLAB command prompt:
 >> pyversion

        version:
     executable:
        library:
           home:
       isloaded: 0
This indicates it does not have a valid Python environment. Simply point to your Python binary:
>> pyversion 'C:\WinPython-64bit-2.7.9.5\python-2.7.9.amd64\python.exe'
Where you will need to adjust the path for your local version/install. You can confirm with pyversion this worked. You shouldn't need to do any more setup now, it should remember this Python environment.
Running Examples
To run the examples, you will need to ensure you set the MATLAB working directory to the location of the .m script files. The following shows my example setup:
The matlab files internally will reference a .py file in that same directory. You should be able to simply connect to the ChipWhisperer-Lite with the following:
>> cw = cwconnect()
If this works it should print the information about the 'cw' object:
cw =

 Python CWCoreAPI with properties:

                sigNewProject: [1x1 py.chipwhisperer.common.utils.util.Signal]
                    valid_aux: [1x1 py.collections.OrderedDict]
                     auxParam: [1x1 py.chipwhisperer.common.utils.parameter.Parameter]
             sigConnectStatus: [1x1 py.chipwhisperer.common.utils.util.Signal]
           sigNewTextResponse: [1x1 py.chipwhisperer.common.utils.util.Signal]
                valid_attacks: [1x1 py.collections.OrderedDict]
                 sigTraceDone: [1x1 py.chipwhisperer.common.utils.util.Signal]
                   traceParam: [1x1 py.chipwhisperer.common.utils.parameter.Parameter]
             executingScripts: [1x1 py.chipwhisperer.common.utils.util.Observable]
                   scopeParam: [1x1 py.chipwhisperer.common.utils.parameter.Parameter]
             sigCampaignStart: [1x1 py.chipwhisperer.common.utils.util.Signal]
              sigNewInputData: [1x1 py.chipwhisperer.common.utils.util.Signal]
                       params: [1x1 py.chipwhisperer.common.utils.parameter.Parameter]
                     settings: [1x1 py.chipwhisperer.common.api.settings.Settings]
            valid_acqPatterns: [1x1 py.collections.OrderedDict]
                 valid_scopes: [1x1 py.collections.OrderedDict]
                  targetParam: [1x1 py.chipwhisperer.common.utils.parameter.Parameter]
                 valid_traces: [1x1 py.collections.OrderedDict]
                valid_targets: [1x1 py.collections.OrderedDict]
             sigAttackChanged: [1x1 py.chipwhisperer.common.utils.util.Signal]
              sigCampaignDone: [1x1 py.chipwhisperer.common.utils.util.Signal]
   valid_preprocessingModules: [1x1 py.collections.OrderedDict]

   <chipwhisperer.common.api.CWCoreAPI.CWCoreAPI object at 0x000000013312FD30>
If this FAILS, you may need to simply unplug/replug the ChipWhisperer-Lite. You may have not closed the connection from the previous test. Note you can actually interact directly with the 'cw' object as in Python. For example we can get information about the current scope module:
>> cw.getScope()
But you probably just want to run an AES test. To do this, simply perform the following:
[cipher, trace] = measure_AES(cw, [0 1 2 3 4 5 6 7 8 9 10 11 12 13 14 15],[0 1 2 3 4 5 6 7 8 9 10 11 12 13 14 15]);
The measure_AES() function passes both the plaintext and key. In this example they are both set to the same array value. It returns the ciphertext resulting & the power trace.
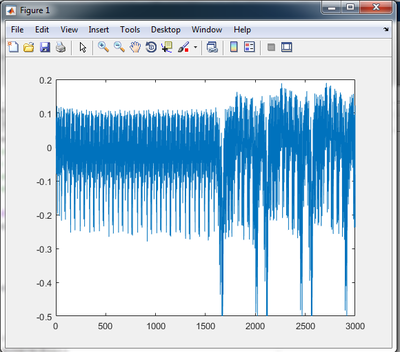
You can plot this power trace with:
plot(trace)
You can run a number of measure_AES() calls with the same cw object without running cwconnect() again. Note if you want to reconnect, you will first need to run cw.disconnect() to close the USB connection.
If you receive 'device in use' error messages, this is likely the problem. You can also simply unplug/replug the USB connection to force-close any existing connections.
Usage Notes
Most of the capture parameters are set inside of the 'cwapi.py' Python file. For example sample rate is fixed at 4x the clock frequency, and the clock frequency is fixed at 7.37 MHz. However the sample offset from trigger & length of capture can be set on the call to 'cwconnect'. By default the CW-Lite starts recording at 1250 samples after the trigger (1250 / 4 = 312.5 target device clock cyles), and records for 3000 samples (3000 / 4 = 750 target device clock cycles). These are suitable for the example AES in C, but you may need to reduce the offset if running AES in assembly for example.
The ChipWhisperer-Lite has a maximum capture length of about 24000 samples. The maximum offset is 4294967294.

