| As of August 2020 the site you are on (wiki.newae.com) is deprecated, and content is now at rtfm.newae.com. |
Difference between revisions of "Manual SAM3U Firmware Update"
| (5 intermediate revisions by one other user not shown) | |||
| Line 1: | Line 1: | ||
| − | |||
| − | + | '''WARNING: THE INFORMATION IN THIS PAGE IS WOEFULLY OUT OF DATE! UPDATED DOCUMENTATION IS AVAILABLE AT: https://chipwhisperer.readthedocs.io/en/latest/firmware.html''' | |
| − | The | + | '''CONTINUE AT YOUR OWN RISK!''' |
| + | |||
| + | |||
| + | The SAM3U device has a ROM-resident bootloader. This means the bootloader is always present - unless the chip is damaged it can be run, making the device almost "unbrickable". If you have trouble running the instructions on this webpage it's most likely an issue with your host computer, and not an issue with the SAM3U being damaged. | ||
==Entering Bootloader Mode== | ==Entering Bootloader Mode== | ||
| Line 13: | Line 15: | ||
[[File:short_screwdriver.jpg|400px]] | [[File:short_screwdriver.jpg|400px]] | ||
| − | [[File:short_tweezers.jpg| | + | [[File:short_tweezers.jpg|400px]] |
Once this is accomplished, unplug and replug the micro-USB port. This will install a new driver (assuming you installed BOSSA already), and the red and blue LED should be only dimmly lit: | Once this is accomplished, unplug and replug the micro-USB port. This will install a new driver (assuming you installed BOSSA already), and the red and blue LED should be only dimmly lit: | ||
| + | |||
| + | [[File:lights_prog.jpg|400px]] | ||
| + | |||
| + | This indicates it is in bootloader mode. The device will now attach as a serial port. If you are using Windows this may take a few minutes to happen. | ||
| + | |||
| + | If using Linux, you can use ''dmesg'' to verify the serial port was connected OK. | ||
| + | |||
| + | ==Flashing Firmware Using BOSSA== | ||
| + | |||
| + | The suggested utility to program the device is BOSSA - see [http://www.shumatech.com/web/products/bossa] for details. Before proceeding, install BOSSA for your system. | ||
| + | |||
| + | Run BOSSA, and in the "File" point it to chipwhisperer\hardware\capture\chipwhisperer-lite\sam3u_fw\SAM3U_VendorExample\Debug\SAM3U_CW1173.bin from either your release or GIT. If you press the "Auto-Scan" button BOSSA should detect the ATSAM3U2 device. Note if you are using Windows it might take a few minutes to install the drivers - check the status, as until the drivers are fully loaded it won't detect the SAM3U device. | ||
| + | |||
| + | # Once this is done, press the Write button. | ||
| + | # Press Verify afterwards to confirm things worked. | ||
| + | # Press Exit to close out the program. | ||
| + | # Unplug & Replug the Micro-USB and you've got a working ChipWhisperer-Lite again, with the latest SAM3U firmware! | ||
| + | |||
| + | [[File:Bossa.png]] | ||
| + | |||
| + | ==BOSSA Command Line== | ||
| + | |||
| + | On certain systems it may be easier to use the command-line version of BOSSA, called bossac. You can also build just this version if required (see instructions below). | ||
| + | |||
| + | You can also run the BOSSA utility at the command line, with an instruction like the following: | ||
| + | |||
| + | bossac -e -w -v -b /path/to/SAM3U_CW1173.bin | ||
| + | |||
| + | If you are on Linux, you may need to either fix permissions on the serial port, or run bossac as root/sudo. See below for details. | ||
| + | |||
| + | === Linux-Specific Instructions === | ||
| + | |||
| + | You may need to give yourself write permission for the serial port. This can be done on some systems easily by adding yourself to the <code>dialout</code> user group. For example, assuming your username was <code>cwuser</code>: | ||
| + | |||
| + | # <code>$ sudo usermod -a -G dialout cwuser</code> | ||
| + | # Log out and log back in again for changes to take effect. | ||
| + | |||
| + | You may also need to build bossac from sources, as the provided binary does not work with your system. Details of how to perform this are provided next: | ||
| + | |||
| + | To build BOSSA, it is recommended to use our simplified bossac repository, which only builds the command-line version. To build this perform these steps: | ||
| + | |||
| + | # Download [https://github.com/newaetech/BOSSA/archive/master.zip a copy of the GIT repo], or clone with <code>git clone git@github.com:newaetech/BOSSA.git</code> (see github.com/newaetech/bossa for the full repo). | ||
| + | # Unzip the directory if you downloaded the zip. | ||
| + | # Run <code>make</code>. | ||
| + | # The binary should be in <code>bin\bossac</code>. | ||
Latest revision as of 10:14, 5 May 2023
WARNING: THE INFORMATION IN THIS PAGE IS WOEFULLY OUT OF DATE! UPDATED DOCUMENTATION IS AVAILABLE AT: https://chipwhisperer.readthedocs.io/en/latest/firmware.html
CONTINUE AT YOUR OWN RISK!
The SAM3U device has a ROM-resident bootloader. This means the bootloader is always present - unless the chip is damaged it can be run, making the device almost "unbrickable". If you have trouble running the instructions on this webpage it's most likely an issue with your host computer, and not an issue with the SAM3U being damaged.
Contents
Entering Bootloader Mode
The only way to enter the bootloader mode is to erase the FLASH memory. Before erasing the FLASH memory you should install the programmer tool and confirms it works (it won't connect to the device, but at least check the install works). See the next heading for details of the programming tool.
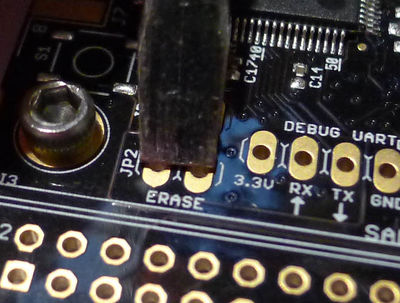
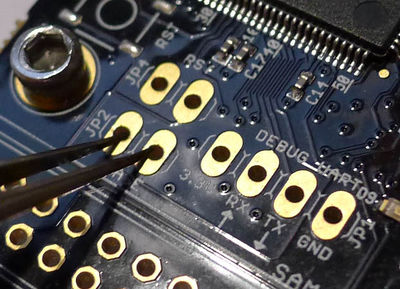
To erase the FLASH memory, simply short the jumper labeled "ERASE" on the ChipWhisperer-Lite. Do this while the device is connected via micro-USB. The blue LED should stop flashing at this point, and will stay either on or off (depending when you shorted the jumper). This can be accomplished by anything metallic - for example using a screwdriver or tweezers:
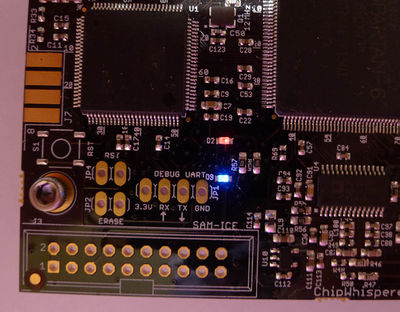
Once this is accomplished, unplug and replug the micro-USB port. This will install a new driver (assuming you installed BOSSA already), and the red and blue LED should be only dimmly lit:
This indicates it is in bootloader mode. The device will now attach as a serial port. If you are using Windows this may take a few minutes to happen.
If using Linux, you can use dmesg to verify the serial port was connected OK.
Flashing Firmware Using BOSSA
The suggested utility to program the device is BOSSA - see [1] for details. Before proceeding, install BOSSA for your system.
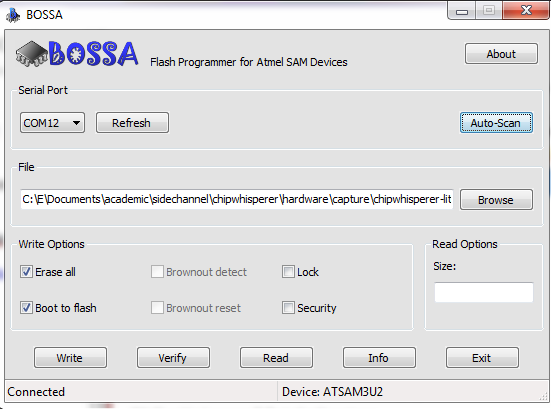
Run BOSSA, and in the "File" point it to chipwhisperer\hardware\capture\chipwhisperer-lite\sam3u_fw\SAM3U_VendorExample\Debug\SAM3U_CW1173.bin from either your release or GIT. If you press the "Auto-Scan" button BOSSA should detect the ATSAM3U2 device. Note if you are using Windows it might take a few minutes to install the drivers - check the status, as until the drivers are fully loaded it won't detect the SAM3U device.
- Once this is done, press the Write button.
- Press Verify afterwards to confirm things worked.
- Press Exit to close out the program.
- Unplug & Replug the Micro-USB and you've got a working ChipWhisperer-Lite again, with the latest SAM3U firmware!
BOSSA Command Line
On certain systems it may be easier to use the command-line version of BOSSA, called bossac. You can also build just this version if required (see instructions below).
You can also run the BOSSA utility at the command line, with an instruction like the following:
bossac -e -w -v -b /path/to/SAM3U_CW1173.bin
If you are on Linux, you may need to either fix permissions on the serial port, or run bossac as root/sudo. See below for details.
Linux-Specific Instructions
You may need to give yourself write permission for the serial port. This can be done on some systems easily by adding yourself to the dialout user group. For example, assuming your username was cwuser:
-
$ sudo usermod -a -G dialout cwuser - Log out and log back in again for changes to take effect.
You may also need to build bossac from sources, as the provided binary does not work with your system. Details of how to perform this are provided next:
To build BOSSA, it is recommended to use our simplified bossac repository, which only builds the command-line version. To build this perform these steps:
- Download a copy of the GIT repo, or clone with
git clone git@github.com:newaetech/BOSSA.git(see github.com/newaetech/bossa for the full repo). - Unzip the directory if you downloaded the zip.
- Run
make. - The binary should be in
bin\bossac.


