Tutorial CW305-1 Building a Project
The CW305 target is an FPGA target board for use with the ChipWhisperer capture hardware. This board lets you test side channel analysis techniques on an Artix-7 FPGA. With this setup, a different toolchain is required: we won't be building C firmware with a makefile. This tutorial walks through the various steps required to run an AES-128 example on the CW305 target.
CW305 Hardware
If you're used to working with the ChipWhisperer Lite XMEGA or the UFO targets, the CW305 board will feel a bit different. Rather than sending data through a UART directly from the capture hardware, we'll now use two separate connections to the target board.
Hardware Setup
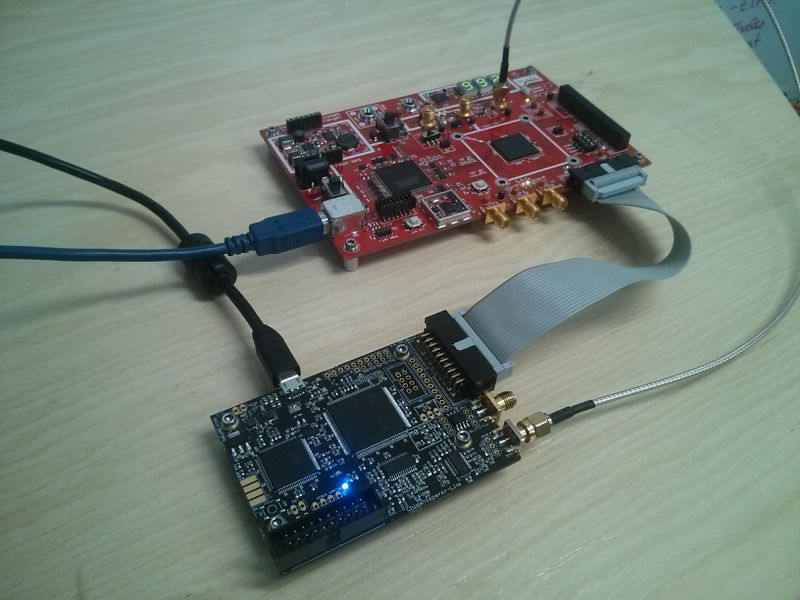
To get started, we need to make three connections to the CW305 target:
- We'll control the Artix-7 directly from the laptop via USB. This is done through the USB-B port on the left side of the board. (On the target, the Atmel SAM3U chip converts these USB packets into signals that the FPGA can understand.)
- We'll get control information for our power measurements through the 20-pin connector at the bottom of the board. This needs to be connected to your capture hardware (a ChipWhisperer Lite or Pro).
- Our power measurements will be done through an SMA cable. Depending on your capture setup, there are three SMA connectors that allow access to the power line in three ways (before the shunt resistor, after the shunt, and after a low noise amplifier). For the ChipWhisperer hardware, we'll connect the third one to our capture board.
Using a ChipWhisperer Lite, the full hardware setup looks like:
Target Firmware
In the ChipWhisperer examples, the Artix-7 FPGA is programmed using Verilog. This section describes how to open and build one of these projects. It also describes the layout of the AES-128 example, which is a good starting point for making new FPGA projects.
Opening the Project
FPGA Code Layout
Building the Project
Capture Setup
- Example script - Upload bitstream - Sample captures
