Tutorial B11 Breaking RSA
RSA Attack Theory
We won't go into what RSA is, see the RSA Wikipedia article for a quick background. What we really care about is the following pieces of sudocode from that article used in decrypting a message:
/**
 * Decrypt
 *
 * @param   {c} int / bigInt: the 'message' to be decoded (encoded with RSA.encrypt())
 * @param   {d} int / bigInt: d value returned from RSA.generate() aka private key
 * @param   {n} int / bigInt: n value returned from RSA.generate() aka public key (part I)
 * @returns {bigInt} decrypted message
 */
RSA.decrypt = function(c, d, n){
	return bigInt(c).modPow(d, n);
};
The most critical piece of information is that value d. It contains the private key, which if leaked would mean a compromise of the entire system. So let's assume we can monitor a target device while it decrypts any message (we don't even care what the message is). Our objective is to recover d.
Let's consider our actual target code, which will be the RSA implementation in avr-crypto-lib. This has been copied over to be part of the ChipWhisperer repository, and you can see the implementation rsa_basic.c of rsa_dec(). The function in question looks like this:
uint8_t rsa_dec(bigint_t* data, const rsa_privatekey_t* key){
	if(key->n == 1){
		bigint_expmod_u(data, data, &(key->components[0]), &key->modulus);
		return 0;
	}
	if(key->n == 5){
		if (rsa_dec_crt_mono(data, key)){
			return 3;
		}
		return 0;
	}
	if(key->n<8 || (key->n-5)%3 != 0){
		return 1;
	}
	//rsa_dec_crt_multi(data, key, (key->n-5)/3);
	return 2;
}
We'll consider the case where key->n == 5, so we have the rsa_dec_crt_mono() to attack. You can see that function Line 53 of that same file. I've removed all the debug code in the following so you can better see the program flow:
uint8_t rsa_dec_crt_mono(bigint_t* data, const rsa_privatekey_t* key){
	bigint_t m1, m2;
	m1.wordv = malloc((key->components[0].length_B /* + 1 */) * sizeof(bigint_word_t));
	m2.wordv = malloc((key->components[1].length_B /* + 1 */) * sizeof(bigint_word_t));
	if(!m1.wordv || !m2.wordv){
		//Out of memory error
		free(m1.wordv);
		free(m2.wordv);
		return 1;
	}
	bigint_expmod_u(&m1, data, &(key->components[2]), &(key->components[0]));
	bigint_expmod_u(&m2, data, &(key->components[3]), &(key->components[1]));
	bigint_sub_s(&m1, &m1, &m2);
	while(BIGINT_NEG_MASK & m1.info){
		bigint_add_s(&m1, &m1, &(key->components[0]));
	}

	bigint_reduce(&m1, &(key->components[0]));
	bigint_mul_u(data, &m1, &(key->components[4]));
	bigint_reduce(data, &(key->components[0]));
	bigint_mul_u(data, data, &(key->components[1]));
	bigint_add_u(data, data, &m2);
	free(m2.wordv);
	free(m1.wordv);
	return 0;
}
Note all the calls to bigint_expmod_u() with the private key material. If we could attack that function, all would be lost. These functions are elsewhere - it's in the bigint.c file at Line 812. Again we can see the source code here:
oid bigint_expmod_u(bigint_t* dest, const bigint_t* a, const bigint_t* exp, const bigint_t* r){
	if(a->length_B==0 || r->length_B==0){
		return;
	}

	bigint_t res, base;
	bigint_word_t t, base_b[MAX(a->length_B,r->length_B)], res_b[r->length_B*2];
	uint16_t i;
	uint8_t j;
	res.wordv = res_b;
	base.wordv = base_b;
	bigint_copy(&base, a);
	bigint_reduce(&base, r);
	res.wordv[0]=1;
	res.length_B=1;
	res.info = 0;
	bigint_adjust(&res);
	if(exp->length_B == 0){
		bigint_copy(dest, &res);
		return;
	}
	uint8_t flag = 0;
	t=exp->wordv[exp->length_B - 1];
	for(i=exp->length_B; i > 0; --i){
		t = exp->wordv[i - 1];
		for(j=BIGINT_WORD_SIZE; j > 0; --j){
			if(!flag){
				if(t & (1<<(BIGINT_WORD_SIZE-1))){
					flag = 1;
				}
			}
			if(flag){
				bigint_square(&res, &res);
				bigint_reduce(&res, r);
				if(t & (1<<(BIGINT_WORD_SIZE-1))){
					bigint_mul_u(&res, &res, &base);
					bigint_reduce(&res, r);
				}
			}
			t<<=1;
		}
	}

	SET_POS(&res);
	bigint_copy(dest, &res);
}
Within that file, the part is the loop at the end. This is actually going through and doing the required a**exp % r function. If you look closely into that loop, you can see there is a variable t, which is set to the value t = exp->wordv[i - 1];. After each run through the loop it is shifted left one. That t variable contains the private key, and the reason it is shifted left is the following piece of code is checking if the MSB is '0' or '1':
bigint_square(&res, &res);
bigint_reduce(&res, r);
if(t & (1<<(BIGINT_WORD_SIZE-1))){
	bigint_mul_u(&res, &res, &base);
	bigint_reduce(&res, r);
}
What does this mean? While there is data-dependent code execution! If we could determine the program flow, we could simply read the private key off one bit at a time. This will be our attack on RSA that we perform in this tutorial.
Hardware Setup
Building Example
Finding SPA Leakage
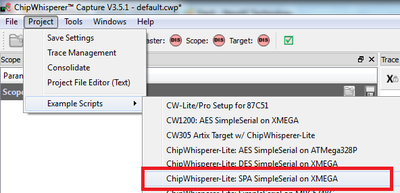
We'll now get into experimenting with the SPA leakage. To do so we'll use the "SPA Setup" script, then make a few modifications.
-
Run the SPA setup script.
-
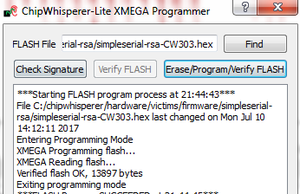
If you haven't yet, program the
simpleserial-rsaas appropriate. If using the XMEGA target on the ChipWhisperer-Lite/UFO board, this would be calledvictims/firmware/simpleserial-rsa/simpleserial-rsa-CW303.hex:
-
Under the Target Settings tab, leave only the "Go Command", and delete the other commands (Load Key and Output Format). The RSA demo does not support sending a key, and instead will use the plaintext as a fake-key.
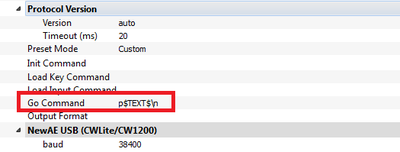
-
Change the CLKGEN to be CLKGEN x1 via DCM

-
Change the length of the trigger to be 24000 samples:
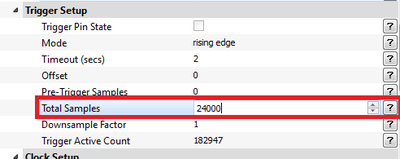
-
If you are using Capture V3.5.2 or later you will have support for the length of the trigger output being high reported back to you. If you run capture-1 for example you'll see the trigger was high for 177381 cycles:

-
This is way too long! You won't be able to capture the entire trace in your 24000 length sample buffer. Instead we'll make the demo even shorter - in our case looking at the source code you can see there is a "flag" which is set high only AFTER the first 1 is received.
Thus change (a) the plaintext to be FIXED (by default it will be random), and then (b) change the input plaintext to be all 00's (00 00 00 00 00 00 00 00 00 00 00 00 00 00 00 00):
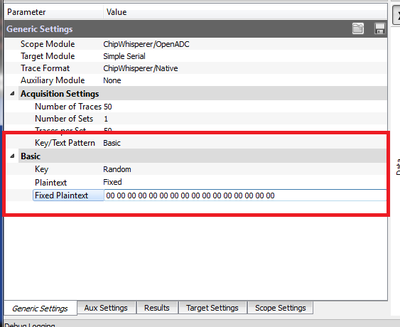
-
We'll only be able to change the LAST TWO bytes, everything else will be too slow. So change the input plaintext to
00 00 00 00 00 00 00 00 00 00 00 00 00 00 80 00
And you can see the power trace change drastically, as below:

-
Finally, let's flip another bit. Change the input plaintext as follows, such that bit #4 in the final bit is set HIGH. We can plot the two power traces on top of each other, and you see that they are differing at a specific point in time:
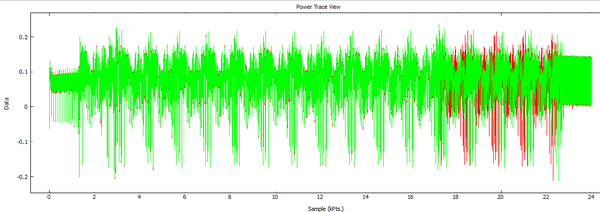
Walking back from the right, you can see this almost directly matches bit numbering for those last two bytes:
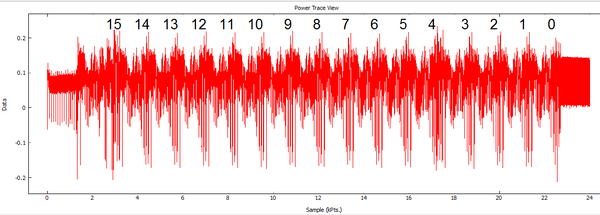
With a bit of setup done, we can now perform a few captures.
Acquiring Example Data
Assuming you have a working example, the next step is the easiest. We will record a single project with the following data:
- 2x traces with secret key of
00 00 00 00 00 00 00 00 00 00 00 00 00 00 80 00 - 2x traces with secret key of
00 00 00 00 00 00 00 00 00 00 00 00 00 00 81 40 - 2x traces with secret key of
00 00 00 00 00 00 00 00 00 00 00 00 00 00 AB E2 - 2x traces with secret key of
00 00 00 00 00 00 00 00 00 00 00 00 00 00 AB E3
We record 2x traces for each sequence to provide us with a 'reference' trace and another 'test' trace (in case we want to confirm a template match is working without using the exact same trace).
The third trace with the AB E2 key will be the most interesting, as we will use that to demonstrate a working attack. To acquire the traces required in the following section, perform the following:
-
Set the number of traces per capture to 2:

- Save the project file as rsa_test.cwp.
-
Set the fixed plaintext to
00 00 00 00 00 00 00 00 00 00 00 00 00 00 80 00, press "Capture M". -
Set the fixed plaintext to
00 00 00 00 00 00 00 00 00 00 00 00 00 00 81 40, press "Capture M". -
Set the fixed plaintext to
00 00 00 00 00 00 00 00 00 00 00 00 00 00 AB E2, press "Capture M". -
Set the fixed plaintext to
00 00 00 00 00 00 00 00 00 00 00 00 00 00 AB E3, press "Capture M".
Automating Attack
The final step is to automate this attack. There are a few ways to do this - we'll demonstrate a basic method, that you can extend to do a complete attack. In this example we're going to use a repeatable sequence, and look for the delay between this sequence. If we see a larger delay we know a square-multiply has occurred, otherwise it was only a square.
We'll simply define a "reference" sequence, and look for this sequence in the rest of the power trace. The following will be done in regular old Python, so start up your favorite Python editor to finish off the tutorial!
Our objectives are to do the following:
- Load the trace file.
- Find a suitable reference pattern.
- Using the reference pattern, find the timing information and break the RSA power trace.
Loading the Trace
Loading the trace can be done with the ChipWhisperer software. Let's first do a few steps to load the data, as follows:
from chipwhisperer.common.api.CWCoreAPI import CWCoreAPI
from matplotlib.pylab import *
import numpy as np

cwapi = CWCoreAPI()
cwapi.openProject(r'c:\examplelocation\rsa_test.cwp')

tm = cwapi.project().traceManager()
ntraces = tm.numTraces()

#Reference trace
trace_ref = tm.getTrace(0)

plot(trace_ref)
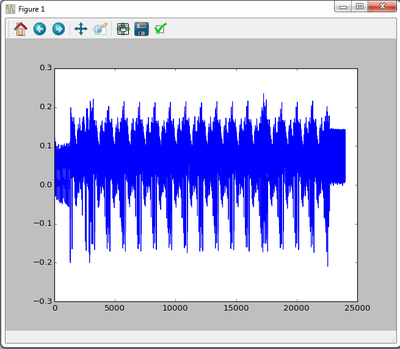
This should plot the example trace which might look something like this:
Plotting a Reference
So what's a good reference location? This is a little arbitrary, we will just define it as a suitable-sounding piece of information. You could get a reference pattern with something like the following:
start = 3600
rsa_ref_pattern = trace_ref[start:(start+500)]
Finally, let's compare the reference plot.
from chipwhisperer.common.api.CWCoreAPI import CWCoreAPI
from matplotlib.pylab import *
import numpy as np

cwapi = CWCoreAPI()
cwapi.openProject(r'c:\examplelocation\rsa_test.cwp')

tm = cwapi.project().traceManager()
ntraces = tm.numTraces()

#Reference trace
trace_ref = tm.getTrace(0)

#plot(trace_ref)

#The target trace we will attack
target_trace_number = 3

start = 3600
rsa_one = trace_ref[start:(start+500)]

diffs = []

for i in range(0, 22999):

    diff = tm.getTrace(target_trace_number)[i:(i+len(rsa_one))] - rsa_one
    diffs.append(np.sum(abs(diff)))

plot(diffs)
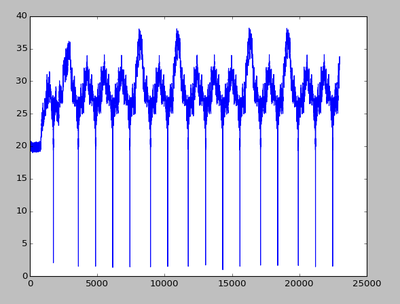
The result should be a difference plot. Note the "difference" falls close to zero at a number of times. Depending on which trace you compare this with the exact pattern might vary, but you should see something roughly like the following:
Automating the Attack
The last step is almost the easiest. We'll now count the timing difference between locations we find the template. If we see a longer delay, we know that the system performed a square+multiply, instead of just a square.
You could find the location where it falls below some number (say 10) in a variety of ways. Let's do something like this:
last_t = -1
for t,d in enumerate(diffs):

    if d < 10:
        if last_t > 0:
            delta = t-last_t
            print delta
        last_t = t
Which should give you an output like the following (specific numbers will vary):
<syntaxahighlight> 1855 1275 1275 1275 1275 1275 1275 1286 1275 1275 1275 1528 1275 1275 1275 </syntaxhighlight>
Not there is a pretty long delay in the first run through, but later runs have roughly a constant time. There is three possible delays used in later bits:
- 1275 - The standard delay, indicating a square only ('0' in key-bit).
- 1286 - The standard delay with a little extra since it has finished processing an 8-bit chunk ('0' in key-bit still).
- 1528 - A much longer delay resulting from a square+multiply.
We can recover the complete key by simply looking at the delay value. We will arbitrarily choose a delay of longer than 1500 cycles indicating that a '1' has occurred, meaning we can recover the complete key using something like the following piece of code:
recovered_key = 0x0000
bitnum = 17

last_t = -1
for t,d in enumerate(diffs):

    if d < 10:
        bitnum -= 1
        if last_t > 0:
            delta = t-last_t

            print delta

            if delta > 1300:
                recovered_key |= 1<<bitnum


        last_t = t

print("Key = %04x"%recovered_key)
Note the following problems with this code:
- Requires you to specify bit-length.
- Does not determine if last bit is a '1' (as has nothing after the last bit to compare to).
You can try to extend the above code by (1) counting the number of matches of the template, and (2) attempting to template the processing of the '1' bit instead, and directly determining where a '1' processing is occurring. This may require to to experiment with the location of the reference template.
The following shows a complete attack script which should recover the 'AB E2' key (but will fail with the AB E3 key):
from chipwhisperer.common.api.CWCoreAPI import CWCoreAPI
from matplotlib.pylab import *
import numpy as np

cwapi = CWCoreAPI()
cwapi.openProject(r'c:\users\colin\chipwhisperer_projects\tmp\rsa_test_16byte_80.cwp')

tm = cwapi.project().traceManager()
ntraces = tm.numTraces()

#Reference trace
trace_ref = tm.getTrace(0)

#plot(trace_ref)

#The target trace we will attack
#If following tutorial:
#0/1 = 80 00
#2/3 = 81 40
#4/5 = AB E2
#6/7 = AB E3 (this won't work as we don't detect the last 1)
target_trace_number = 4

start = 3600
rsa_one = trace_ref[start:(start+500)]

diffs = []

for i in range(0, 22999):

    diff = tm.getTrace(target_trace_number)[i:(i+len(rsa_one))] - rsa_one
    diffs.append(np.sum(abs(diff)))
#plot(diffs)

recovered_key = 0x0000
bitnum = 17

last_t = -1
for t,d in enumerate(diffs):

    if d < 10:
        bitnum -= 1
        if last_t > 0:
            delta = t-last_t

            print delta

            if delta > 1300:
                recovered_key |= 1<<bitnum


        last_t = t

print("Key = %04x"%recovered_key)
Extending the Tutorial
The previous tutorial is a basic attack on the core RSA algorithm. There are several extensions of it you can try. As mentioned you can improve the automatic key recover algorithm. You can also try performing this attack on longer key lengths -- this is made much easier with the ChipWhisperer-Pro, as it can use "streaming mode" to recover an extremely long key.
The ChipWhisperer-Pro has a unique analog trigger feature. This can also be used to break the RSA algorithm by simply performing the pattern match in real-time, and measuring the time delay of triggger locations. This is demonstrated in the next section.
Use of SAD Trigger in ChipWhisperer-Pro
Performing the capture & post-processing of data may be difficult on a long capture. Instead we can use the hardware pattern matching block inside the ChipWhisperer-Pro to perform this attack, and avoid needing to carefully trigger the capture or even record the analog data at all.
This will require you to:
- Perform an example capture to program the SAD block.
- Configure the trigger out to be routed to an I/O pin.
- Using an external device (logic analyzer, scope, etc) record the trigger pattern.
- From the trigger pattern, directly read off the RSA secret key.
