Common Tool Information
Loading/Saving the Project
The save option inside the file menu of both the Capture and Analyzer tools creates the project directoryes and the .cwp file with traces information that is shared between both tools. The exact content of this file can be viewed and edited in the "Project Text Editor" widget.
The traces data is captured to the tmp directory if no project was created. In this case, the "Consolidate" option in the Project menu can be used to copy/move this files to the current Project directory as soon as you create one. This option may also be usefull if you manually added existing traces (editing the .cwp file or using the import option in the Trace Manager) to the project.
Loading/Saving the Settings
The settings are not saved with the project (we may improve it in the future), but instead, you can use the "Save Settings" option (inside the Project menu) to dump this information to the "settings.cwset" file, inside the project directory. Once saved, the settings can be re-loaded using the load button in the settings tabs (general, scope, traget,...). Another possibility would be to use the Save Button and choose different filenames for each settings profile that you wanto to use.
Using the Analyzer
After loading the project, you will need to setup the analysis environment. In the analyzer, the settings tabs are used to automatically generate the analysis script (shown in the "Analysis Script" dock) that is executed when the attack is started. This way, the user can manually edit the code having even more flexibility. This code can also be saved and loaded both through the console (python filename) or the GUI. You can also copy this file to the analyzer/scripts folder so it will appear in the Project->Example Scripts menus in the next time you execute the tool.
In the "Analysis Script" dock, the constructor is called automatically every time a new script is generated. It is done because widgets like the waveform viewer should update the trace output of the preprocessing modules when the user modify its settings. The run() method is executed when the start analysis button is pressed. Custom methods can be executed by selecting it in the code and right clicking: a "Run Function" option will show up.
The "Attack Script Generator" is the main settings tab. It allows the user to set the preprocessing modules that should be applied over the original traces and the Attack module. The Preprocessing and the Attack tabs will update accordingly.
The "Trace Explorer" tab enables a set of helper scripts needed by some of the analysis algorithms (like the POI detection in the Template attack).
Class Diagram
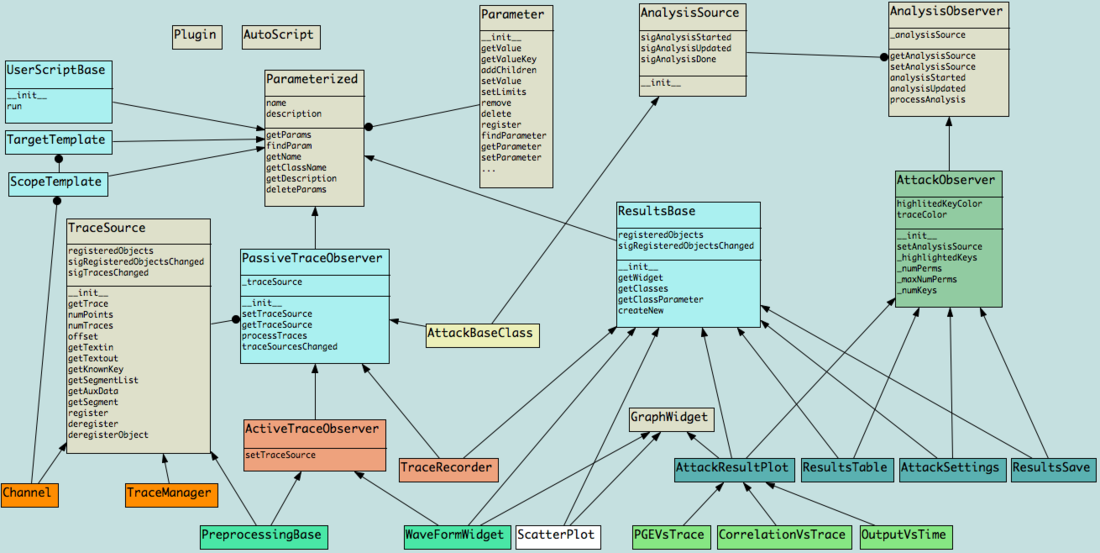
The general architectural idea is to start the Flow with a TraceSource, allow the connection of multiple preprocessing modules (that are both: ActiveTraceObserver and TraceSource) and end the chain in an TraceObserver (that can be a widget or an AnalysisSource). The sigTracesChanged signal (in the TraceSource objects) is used to propagate this notification through the chain and activate a callback method (processTraces) in the ActiveTraceObserver objects (like the WaveFormWidget) to read the new data. The PassiveTraceObservers (like the AnalysisSource and the TraceRecorder widget) will ignore this signal, so the processSignal() should be called manually.
In the diagram bellow, the arrows show the data flow (the requests are made in the opposite direction) and the vertical lines the inheritance structure:
 TraceSource -> [ActiveTraceObserver, TraceSource] -> [ActiveTraceObserver/PassiveTraceObserver]  AnalysisSource -> AnalysisObserver
       |                          |     /                  |                    |        \             /                   |
    Channel                 PreprocessingBase              |                    |        AttackBaseClass             AttackObserver
  TraceManager                      |                WaveFormWidget             |               |                          |
                                ResyncSAD                                 TraceRecorder         |                     ResultsTable
                              AddNoiseJitter                                                   CPA                 CorrelationVsTrace
                                   ...                                                       Template                     ...
Description of some other important classes:
AnalysisSource - define signals (started, updated and done) that the AnalysisObserver objects will "listen" when emitted by these objects to execute the appropriate operation.
AttackObserver - specialized class that will listen for AttackBaseClass emitted signals and update the ResultWidgets (table, plots...).
ResultsBase - have a list of registered objects. When changes in this list happen, a signal is emitted to notify the GUI to create a new dock and add it to the Window menu. This list is also largely used in the current code base to allow easy access to the existing widgets (if they exist).
Plugin - marker interface that informs that the class should be considered when importing plugins from a module.
AutoScript - helper class with methods to setup the output when the class that uses it need to have scripts as output.
Parameterized - helper class with methods to maintain (add/find/delete) the parameters when the class that extends it makes use of parameters.
