| As of August 2020 the site you are on (wiki.newae.com) is deprecated, and content is now at rtfm.newae.com. |
Difference between revisions of "CW1173 ChipWhisperer-Lite/Glitch Port"
(Created page with "The "GLITCH" port is used for voltage glitching. It's connected to two MOSFET elements, as the following figure shows: <blockquote>image <...") |
|||
| Line 1: | Line 1: | ||
| + | {{Warningbox|This section has been recently updated for ChipWhisperer 5. The previous version can be found here: https://wiki.newae.com/V4:CW1173_ChipWhisperer-Lite/XMEGA_Programmer}} | ||
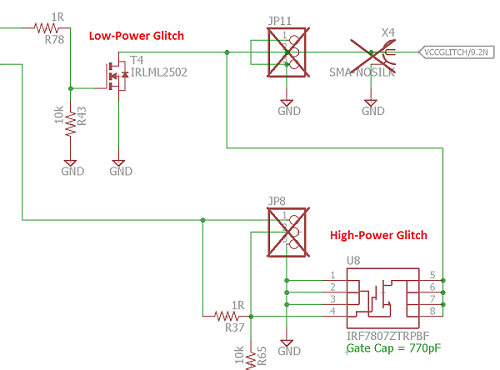
The "GLITCH" port is used for voltage glitching. It's connected to two MOSFET elements, as the following figure shows: | The "GLITCH" port is used for voltage glitching. It's connected to two MOSFET elements, as the following figure shows: | ||
<blockquote>[[File:glitch_lp_hp.png|image]] | <blockquote>[[File:glitch_lp_hp.png|image]] | ||
</blockquote> | </blockquote> | ||
| − | The CW1173 glitch output can be commanded to turn on either of those MOSFETs via | + | The CW1173 glitch output can be commanded to turn on either of those MOSFETs via <code>scope.io.glitch_hp</code> and <code>scope.io.glitch_lp</code> fields: |
| − | < | + | <syntaxhighlight lang=python> |
| − | </ | + | scope.io.glitch_hp = True #enable high power glitch |
| − | Be careful using this feature, as you don't want to short the MOSFETs for too long. It's also possible to damage the ChipWhisperer-Lite by burning these MOSFETs up if used incorrectly. See tutorial # | + | scope.io.glitch_hp = False #disable high power glitch |
| + | |||
| + | scope.io.glitch_lp = True #enable low power glitch | ||
| + | scope.io.glitch_lp = False #disable low power glitch | ||
| + | </syntaxhighlight> | ||
| + | |||
| + | Be careful using this feature, as you don't want to short the MOSFETs for too long. It's also possible to damage the ChipWhisperer-Lite by burning these MOSFETs up if used incorrectly. See tutorial Fault_2 (https://chipwhisperer.readthedocs.io/en/latest/tutorials/fault_2-openadc-cwlitearm.html#tutorial-fault-2-openadc-cwlitearm) for more information. | ||
Latest revision as of 12:24, 12 March 2020
This section has been recently updated for ChipWhisperer 5. The previous version can be found here: https://wiki.newae.com/V4:CW1173_ChipWhisperer-Lite/XMEGA_Programmer
The "GLITCH" port is used for voltage glitching. It's connected to two MOSFET elements, as the following figure shows:
The CW1173 glitch output can be commanded to turn on either of those MOSFETs via scope.io.glitch_hp and scope.io.glitch_lp fields:
scope.io.glitch_hp = True #enable high power glitch
scope.io.glitch_hp = False #disable high power glitch

scope.io.glitch_lp = True #enable low power glitch
scope.io.glitch_lp = False #disable low power glitch
Be careful using this feature, as you don't want to short the MOSFETs for too long. It's also possible to damage the ChipWhisperer-Lite by burning these MOSFETs up if used incorrectly. See tutorial Fault_2 (https://chipwhisperer.readthedocs.io/en/latest/tutorials/fault_2-openadc-cwlitearm.html#tutorial-fault-2-openadc-cwlitearm) for more information.
