| As of August 2020 the site you are on (wiki.newae.com) is deprecated, and content is now at rtfm.newae.com. |
CW303 XMEGA Target
| CW-Lite XMEGA Target | |
|---|---|
 | |
| Target Device | Atmel XMEGA128 |
| Target Architecture | 8-bit Harvard |
| Hardware Crypto | Possible |
| Supported Apps | Simple Serial Enc/Auth |
| Programmer | CW Integrated (PDI) |
| Status | Released |
The ChipWhisperer-Lite board has a break-away target board section. This target can be used attached to the CW-Lite or separated and connected via ribbon cable. The breakaway target board has a slightly different feature set than the CW308T-XMEGA target board.
Contents
LEDs
The two LEDs on the XMEGA board are active-low, which is done to reduce the impact on power consumption in the VCC power signature. The connections are as follows:
| Item | Connection | Note |
|---|---|---|
| LED9 | PORTA.5 | Active low |
| LED10 | PORTA.6 | Active low |
Connectors
The following shows several of the connectors available on the CW301.
- 20-Pin Connector
- J2 is a 20-pin connector, which uses the standard NewAE 20-pin connector pinout. See the ChipWhisperer-Lite documentation for details.
- SMA Glitch
- The SMA glitch connector allows VCC glitches be inserted into the VCC pin. This is done by shorting the resistive shunt R66. By default it connects to the SMA measure connector, but can be disconnected with the solder jumpers.
- SMA Measure
- The SMA measure connector allows power measurements to be taken across resistive shunt R66. By default it connects to the SMA glitch connector, but can be disconnected with the solder jumpers.
- JP13
- JP13 provides a pinout with several extra pins from the XMEGA device.
Solder Jumpers
- SJ2
- Selects the source of the input to the VCC filter - either the 20-pin 3.3V VCC (default), or the optional voltage regulator which derives the power from a USB-Micro connector.
- SJ3
- Connects the output of the VCC filter to the XMEGA VCC network. Soldered by default.
- SJ4
- Connects the SMA Measure header to the resistive shunt. Soldered by default.
- SJ5
- Connects the SMA Glitch header to the resistive shunt. Soldered by default.
- SJ7
- Connects the VCC of the XMEGA board to VREF on 20-pin header. Soldered by default.
Building firmware
The XMEGA uses AVR architecture and needs an AVR compiler. The target firmware can be found under the chipwhisperer/hardware/victims/firmware/ directory in their project (e.g. simpleserial-aes, basic-passwdcheck) folder.
- Atmel AVR-GCC standalone - see Atmel avr-gcc standalone (registration required)
- WinAVR. Last release - 2010, see WinAVR Page (no registration required)
To build the code, follow these steps:
-
cdto the project directory with the firmware source (.c) and makefile, and runmake:cd c:\chipwhisperer\hardware\victims\firmware\<project dir> make PLATFORM=CW303 CRYPTO_TARGET=AVRCRYPTOLIB
where the <> part is changed to the project name.
If this is successful, you'll see an output like the following:
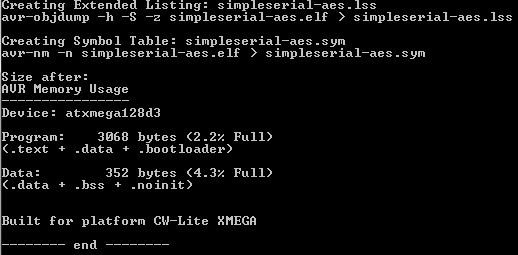
If instead you get an error something like
make: *** No rule to make target `simpleserial.elf', needed by `elf'. Stop., this means a required file was missing. -
The compiled firmware file you will use to program the target will have the format
<sourcefile name>-CW303.hex, where the <> part will change based on the project.

Setting up Communication
Sets up the ability for communication with the target using the ChipWhisperer scope.
Using GUI Scripts
Within the python console run the following scripts in order:
connect_cwlite_simpleserial.pysetup_cwlite_xmega.py
Python scripting
Execute these lines of code within a python console or script:
import chipwhisperer as cw

scope = cw.scope()
target = cw.target(scope)

scope.gain.gain = 45
scope.adc.samples = 25000
scope.adc.offset = 0
scope.adc.basic_mode = "rising_edge"
scope.clock.clkgen_freq = 7370000
scope.clock.adc_src = "clkgen_x4"
scope.trigger.triggers = "tio4"
scope.io.tio1 = "serial_rx"
scope.io.tio2 = "serial_tx"
scope.io.hs2 = "clkgen"
Programming the XMEGA
To program the device you need to have completed the Communication, and the Compiling sections. The firmware source files can be found in their directories under the chipwhisperer/hardware/victims/firmware/ directory.
Using GUI Tools
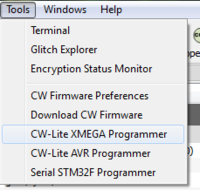
-
From the Tools menu item select CW-Lite XMEGA Programmer
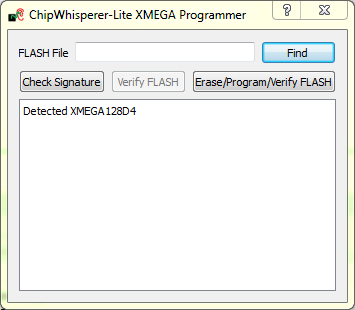
-
The Find button is used to choose the firmware file (.hex) to flash onto the device
The Check Signature button resets the device and asks for its signature, this is printed to the screen
The Erase/Program/Verify FLASH button erases, programs the device and then verifies the programmed firmware.


Python Scripting
Anything surrounded by < and > is user and project specific and needs to be changed.
from chipwhisperer.capture.api.programmers import XMEGAProgrammer

programmer = XMEGAProgrammer()
programmer.scope = scope
programmer._logging = None
programmer.find()
programmer.erase()
programmer.program("<path to xmega firmware .hex file>", memtype="flash", verify=True)
programmer.close()
Schematic
