| As of August 2020 the site you are on (wiki.newae.com) is deprecated, and content is now at rtfm.newae.com. |
Difference between revisions of "Glitch Explorer"
(Tag: VisualEditor) |
(→Using the Glitch Explorer - The Basics) |
||
| (9 intermediate revisions by 3 users not shown) | |||
| Line 1: | Line 1: | ||
| + | {{Warningbox|For the older V3.x tools, see [[V3:Glitch_Explorer]]}} | ||
| + | |||
The Glitch Explorer allows an automatic exploration of a range of one or more parameter values. It means that the user can test multiple glitch setups at the same time and see the result in a nice scatterplot, highlighting the successful attempts. | The Glitch Explorer allows an automatic exploration of a range of one or more parameter values. It means that the user can test multiple glitch setups at the same time and see the result in a nice scatterplot, highlighting the successful attempts. | ||
| − | [[File: | + | [[File:glitch_explorer_overview_v4.PNG|1100px]] |
== The Glitch Explorer Window == | == The Glitch Explorer Window == | ||
The main window of the glitch explorer looks like this: | The main window of the glitch explorer looks like this: | ||
| − | [[File: | + | [[File:glitch_explorer_window_v4.png|400px]] |
In top, the output of the system combined with the parameters of the glitch is displayed (the 'output window'). | In top, the output of the system combined with the parameters of the glitch is displayed (the 'output window'). | ||
| − | In bottom, you can adjust general parameters of the glitching system, such as what counts as a successful glitch or not and | + | In bottom, you can adjust general parameters of the glitching system, such as what counts as a successful glitch or not and the ability to load existing data into the glitch explorer table. |
| − | == Using the Glitch Explorer - The | + | == Using the Glitch Explorer - The Basics == |
| − | + | Here are a few steps that should be done before using the glitch explorer (example uses the ChipWhisperer Lite): | |
| + | <ol> | ||
| + | <li> | ||
| + | Connect the ChipWhisperer Scope and Target (example: run the <code>connect_cwlite_simpleserial.py</code> script) | ||
| + | [[File: run_connect_script.png|800px]] | ||
| + | </li> | ||
| + | <br> | ||
| + | <li> | ||
| + | Set up the parameters for glitching (example: run the <code>setup_cwlite_glitch.py</code> script) | ||
| + | [[File: run_glitch_script.png|800px]] | ||
| + | </li> | ||
| + | <br> | ||
| + | <li> | ||
| + | Setup the automatic reset aux module (example: run the <code>aux_reset_cw1173.py</code> script) | ||
| + | [[ File: run_reset_aux_script.png|800px]] | ||
| + | <br> | ||
| + | <b>Note: This file may have to be edited if you later have issues with trigger timeouts. The trigger timeouts can usually be fixed by switching the appropriate lines in a copy of the script</b> | ||
| + | <syntaxhighlight lang=python> | ||
| + | # Reset before arming - more stable | ||
| + | aux_list.register(Resetter.resetThenDelay, "before_trace") | ||
| + | # Reset after arming - scope can catch entire reset | ||
| + | #aux_list.register(Resetter.delayThenReset, "after_arm") | ||
| + | </syntaxhighlight> | ||
| + | to | ||
| + | <syntaxhighlight lang=python> | ||
| + | # Reset before arming - more stable | ||
| + | #aux_list.register(Resetter.resetThenDelay, "before_trace") | ||
| + | # Reset after arming - scope can catch entire reset | ||
| + | aux_list.register(Resetter.delayThenReset, "after_arm") | ||
| + | </syntaxhighlight> | ||
| + | <b> Another note: Remember to run this script and disable the other aux module inside the "Aux Settings" tab.</b> | ||
| + | </li> | ||
| + | <br> | ||
| + | <li> | ||
| + | Change the glitch trigger source from manual to external single. Run this command in the python console: | ||
| + | <code>self.scope.glitch.trigger_src = "ext_single"</code> | ||
| + | </li> | ||
| + | <br> | ||
| + | <li> | ||
| + | Register the change_glitch_parameters function as the glitch explorer iterator (example: run the <code>ge_widthoffset_vary.py</code> script). Changes to the step size and range that the glitch explorer covers can be customized by changing variables within this script and running the changed script. | ||
| + | [[File: register_ge_iterator.png | 800px]] | ||
| + | </li> | ||
| + | <br> | ||
| + | <li> | ||
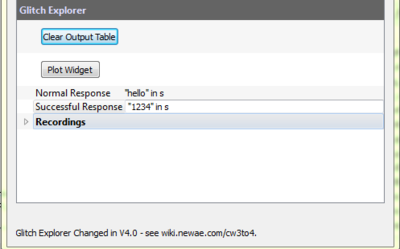
| + | Set the normal and successful outputs (example: using the firmware in glitch-simple, after editing the c to use the glitch1() function rather than the glitch_infinite() function) | ||
| + | [[File: set_responses.png | 400px]] | ||
| + | </li> | ||
| + | <br> | ||
| + | <li> | ||
| + | Open the glitch explorer graph widget by pressing the <b>Plot Widget</b> button inside the Glitch Explorer Window. | ||
| + | </li> | ||
| + | </ol> | ||
| − | |||
| − | + | Now you are ready to click the "Capture M" to start the exploration. </b>If you run into forced trigger issues go back to the previous steps where it was mentioned how to fix the issue.</b> | |
| − | [[ | + | == Using the Glitch Explorer - Advanced == |
| − | + | To get more detailed information of how to use the Glitch Explorer, follow the [[Tutorial A2 Introduction to Glitch Attacks (including Glitch Explorer)|A2]] and [[Tutorial A3 VCC Glitch Attacks|A3]] tutorials. | |
| − | + | If you want to create a script to fully automate this attack, check out the example in <code> chipwhisperer/software/scripting-examples/glitch_explorer_simple.py </code>. | |
| − | + | ||
| − | + | ||
| − | + | ||
| − | + | ||
| − | + | ||
| − | + | ||
| − | + | ||
| − | + | ||
| − | + | ||
| − | + | ||
| − | + | ||
Latest revision as of 05:59, 6 September 2018
For the older V3.x tools, see V3:Glitch_Explorer
The Glitch Explorer allows an automatic exploration of a range of one or more parameter values. It means that the user can test multiple glitch setups at the same time and see the result in a nice scatterplot, highlighting the successful attempts.

The Glitch Explorer Window
The main window of the glitch explorer looks like this:

In top, the output of the system combined with the parameters of the glitch is displayed (the 'output window').
In bottom, you can adjust general parameters of the glitching system, such as what counts as a successful glitch or not and the ability to load existing data into the glitch explorer table.
Using the Glitch Explorer - The Basics
Here are a few steps that should be done before using the glitch explorer (example uses the ChipWhisperer Lite):
-
Connect the ChipWhisperer Scope and Target (example: run the
connect_cwlite_simpleserial.pyscript)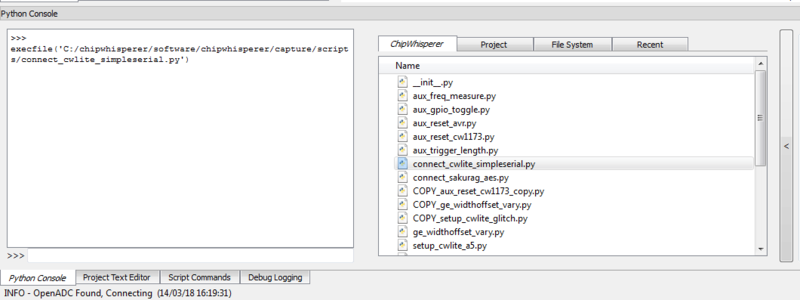
-
Set up the parameters for glitching (example: run the
setup_cwlite_glitch.pyscript)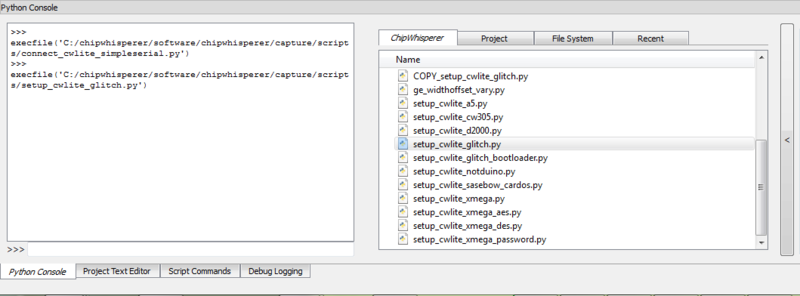
-
Setup the automatic reset aux module (example: run the
aux_reset_cw1173.pyscript)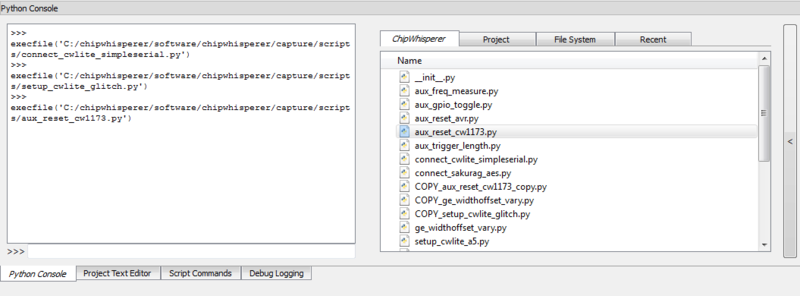
Note: This file may have to be edited if you later have issues with trigger timeouts. The trigger timeouts can usually be fixed by switching the appropriate lines in a copy of the script# Reset before arming - more stable aux_list.register(Resetter.resetThenDelay, "before_trace") # Reset after arming - scope can catch entire reset #aux_list.register(Resetter.delayThenReset, "after_arm")
to
# Reset before arming - more stable
#aux_list.register(Resetter.resetThenDelay, "before_trace")
# Reset after arming - scope can catch entire reset
aux_list.register(Resetter.delayThenReset, "after_arm")
Another note: Remember to run this script and disable the other aux module inside the "Aux Settings" tab.
-
Change the glitch trigger source from manual to external single. Run this command in the python console:
self.scope.glitch.trigger_src = "ext_single" -
Register the change_glitch_parameters function as the glitch explorer iterator (example: run the
ge_widthoffset_vary.pyscript). Changes to the step size and range that the glitch explorer covers can be customized by changing variables within this script and running the changed script.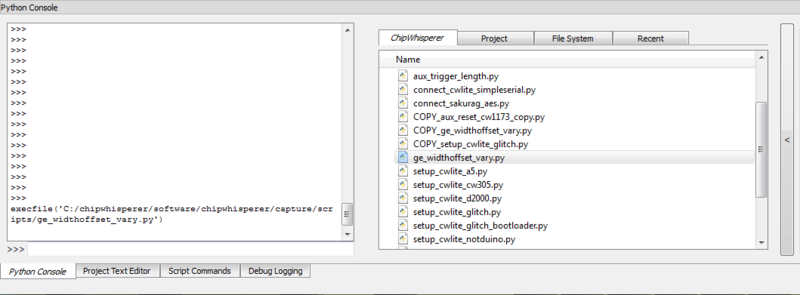
-
Set the normal and successful outputs (example: using the firmware in glitch-simple, after editing the c to use the glitch1() function rather than the glitch_infinite() function)
- Open the glitch explorer graph widget by pressing the Plot Widget button inside the Glitch Explorer Window.


Now you are ready to click the "Capture M" to start the exploration. </b>If you run into forced trigger issues go back to the previous steps where it was mentioned how to fix the issue.</b>