| As of August 2020 the site you are on (wiki.newae.com) is deprecated, and content is now at rtfm.newae.com. |
Difference between revisions of "Tutorial B2 Viewing Instruction Power Differences"
(→Setting Up the Example) |
|||
| Line 22: | Line 22: | ||
<ol style="list-style-type: decimal;"> | <ol style="list-style-type: decimal;"> | ||
| − | <li><p> | + | <li><p>Like with the previous tutorial, you'll need to have a copy of the firmware you want to modify and be able to build for your platform. The instructions are repeated in the drop down menus below, but if you're comfortable with the previous example, feel free to skip them. Alternatively, if you're not too attached to your code, you can just modify your firmware from [[Tutorial B1 Building a SimpleSerial Project]].</p></li> |
| − | + | ||
| − | <p>At this point we want to modify the system to perform a number of operations. We won't actually use the input data. To do so, open the file <code>simpleserial-base.c</code> with a text editor such as Programmer's Notepad (which ships with WinAVR).</p></li> | + | <h2> Building the Basic Example </h2> |
| + | {{CollapsibleSection | ||
| + | |intro = === Building for CWLite with XMEGA Target === | ||
| + | |content= Building for XMEGA}} | ||
| + | |||
| + | {{CollapsibleSection | ||
| + | |intro = === Building for CWLite with Arm Target === | ||
| + | |content= Building for Arm}} | ||
| + | |||
| + | {{CollapsibleSection | ||
| + | |intro = === Building for Other Targets === | ||
| + | |content= Building for Other Targets}} | ||
| + | <h2> Modifying the Basic Example </h2> | ||
| + | |||
| + | <li><p>At this point we want to modify the system to perform a number of operations. We won't actually use the input data. To do so, open the file <code>simpleserial-base.c</code> with a text editor such as Programmer's Notepad (which ships with WinAVR).</p></li> | ||
<li><p>Find the following code block towards the end of the file, which may look different if you just completed [[Tutorial_B1_Building_a_SimpleSerial_Project]].</p> | <li><p>Find the following code block towards the end of the file, which may look different if you just completed [[Tutorial_B1_Building_a_SimpleSerial_Project]].</p> | ||
<source lang="c">/********************************** | <source lang="c">/********************************** | ||
| Line 81: | Line 95: | ||
/* End user-specific code here. * | /* End user-specific code here. * | ||
********************************/</source></li> | ********************************/</source></li> | ||
| − | <li><p>Change the terminal to the directory with your source, and run the same <code>make</code> command you did in | + | <li><p></p></li> |
| + | <li><p>Change the terminal to the directory with your source, and run the same <code>make</code> command you did in earlier to build the system. Remember you can press the up arrow on the keyboard to get recently typed commands in most OSes:</p> | ||
<pre>make PLATFORM=CW303</pre> | <pre>make PLATFORM=CW303</pre> | ||
| − | |||
| − | |||
| − | |||
| − | |||
| − | |||
| − | |||
| − | |||
| − | |||
| − | |||
| − | |||
| − | |||
| − | |||
| − | |||
| − | |||
| − | |||
| − | |||
| − | |||
| − | |||
| − | |||
| − | |||
| − | |||
| − | |||
| − | |||
| − | |||
| − | |||
| − | |||
| − | |||
| − | |||
| − | |||
| − | |||
| − | |||
| − | |||
| − | |||
| − | |||
| − | |||
| − | |||
| − | |||
| − | |||
| − | |||
| − | |||
| − | |||
| − | |||
| − | |||
| − | |||
| − | |||
| − | |||
| − | |||
| − | |||
<li>Following the instructions given in [[Tutorial_B1_Building_a_SimpleSerial_Project]], program the AVR, XMEGA, or STM32 (ARM) with your new code. Note you __do not__ need to close the programming window. If you will be doing frequent modifications to the source code, this can simplify your life since you only need to hit the '''Program''' button in AVRStudio to download new code.</li> | <li>Following the instructions given in [[Tutorial_B1_Building_a_SimpleSerial_Project]], program the AVR, XMEGA, or STM32 (ARM) with your new code. Note you __do not__ need to close the programming window. If you will be doing frequent modifications to the source code, this can simplify your life since you only need to hit the '''Program''' button in AVRStudio to download new code.</li> | ||
<li>Ensure the hardware is setup as in [[Tutorial_B1_Building_a_SimpleSerial_Project]]. If using the CW1002, ensure the SMA cable is also connected as described in the previous tutorial.</li></ol> | <li>Ensure the hardware is setup as in [[Tutorial_B1_Building_a_SimpleSerial_Project]]. If using the CW1002, ensure the SMA cable is also connected as described in the previous tutorial.</li></ol> | ||
Revision as of 07:43, 28 September 2018
This tutorial has been updated for ChipWhisperer 4.0.0 release. If you are using 3.x.x see the "V3" link in the sidebar.
| B2: Viewing Instruction Power Differences | |
|---|---|
| Target Architecture | XMEGA |
| Hardware Crypto | No |
| Software Release | V3 / V4 / V5 |
This tutorial will introduce you to measuring the power consumption of a device under attack. It will demonstrate how you can view the difference between a 'add' instruction and a 'mul' instruction.
Contents
Prerequisites
You should have already completed Tutorial_B1_Building_a_SimpleSerial_Project. This tutorial assumes you are capable of building firmware for the target, programming the code, and connecting to the ChipWhisperer.
Setting Up the Example
Like with the previous tutorial, you'll need to have a copy of the firmware you want to modify and be able to build for your platform. The instructions are repeated in the drop down menus below, but if you're comfortable with the previous example, feel free to skip them. Alternatively, if you're not too attached to your code, you can just modify your firmware from Tutorial B1 Building a SimpleSerial Project.
- We want to use the existing SimpleSerial firmware as a base for our project, but we don't want to edit the existing firmware. Instead, we'll make a new project with a copy of this firmware. Copy the directory of the firmware you want to modify in the
chipwhisperer/hardware/vicitims/firmwareto a new folder. The folder you copy will depend on what tutorial you're doing. Typically, the firmware you want to use is listed above the "Building for ..." drop down menus in this wiki. The name is arbitrary, but for this example, we'll call itsimpleserial-LAB-SPECIFIC-FOLDER(though depending on what firmware and tutorial you're working off of, you may want to call it something different). You must keep it in the same directory, as it will reference other files within that directory for the build process. - Open a terminal with avr-gcc in the path. If using Windows the sidebar on the Installing_ChipWhisperer page - you can either add WinAVR to your system path, or you can run the 'winavr.bat' file suggested.
Change the terminal to the newly copied directory. For example:
Windows:cd c:\chipwhisperer\hardware\victims\firmware\simpleserial-LAB-SPECIFIC-FOLDER
Linux/macOS:cd chipwhisperer/hardware/victims/firmware/simpleserial-LAB-SPECIFIC-FOLDER
Then, run
maketo build the system. Make sure you specify which platform you're using as your target. For example, for the ChipWhisperer Lite target, runmake PLATFORM=CW303
Which should have the following output:
...Bunch of lines removed...
Creating Extended Listing: simpleserial-base.lss
avr-objdump -h -S -z simpleserial-base.elf > simpleserial-base.lss

Creating Symbol Table: simpleserial-base.sym
avr-nm -n simpleserial-base.elf > simpleserial-base.sym

Size after:
AVR Memory Usage
----------------
Device: atxmega128d3

Program:    1524 bytes (1.1% Full)
(.text + .data + .bootloader)

Data:        224 bytes (2.7% Full)
(.data + .bss + .noinit)


Built for platform CW-Lite XMEGA

-------- end --------
- We want to use the existing SimpleSerial firmware as a base for our project, but we don't want to edit the existing firmware. Instead, we'll make a new project with a copy of this firmware. Copy the directory of the firmware you want to modify in the
chipwhisperer/hardware/vicitims/firmwareto a new folder. The folder you copy will depend on what tutorial you're doing. Typically, the firmware you want to use is listed above the "Building for ..." drop down menus in this tutorial. The name is arbitrary, but for this example, we'll call itsimpleserial-LAB-SPECIFIC-FOLDER(though depending on what firmware and tutorial you're working off of, you may want to call it something different). You must keep it in the same directory, as it will reference other files within that directory for the build process. - Open a terminal with arm-none-eabi-gcc in the path. If using Windows the sidebar on the Installing_ChipWhisperer page
Change the terminal to the newly copied directory. For example:
Windows:cd c:\chipwhisperer\hardware\victims\firmware\simpleserial-LAB-SPECIFIC-FOLDER
Linux/macOS:cd chipwhisperer/hardware/victims/firmware/simpleserial-LAB-SPECIFIC-FOLDER
Then, run
maketo build the system. Make sure you specify which platform you're using as your target. For example, for the ChipWhisperer Lite target, runmake PLATFORM=CWLITEARM CRYPTO_TARGET=TINYAES128C
Which should have the following output:
...Bunch of lines removed... Linking: simpleserial-base-CWLITEARM.elf arm-none-eabi-gcc -mcpu=cortex-m4 -I. -mthumb -mfloat-abi=hard -mfpu=fpv4-sp-d16 -fmessage-length=0 -ffunction-sections -gdwarf-2 -DSS_VER=SS_VER_1_1 -DSTM32F303xC -DSTM32F3 -DSTM32 -DDEBUG -DHAL_TYPE=HAL_stm32f3 -DPLATFORM=CWLITEARM -DTINYAES128C -DF_CPU=7372800UL -Os -funsigned-char -funsigned-bitfields -fshort-enums -Wall -Wstrict-prototypes -Wa,-adhlns=objdir/simpleserial-base.o -I.././simpleserial/ -I.././hal -I.././hal/stm32f3 -I.././hal/stm32f3/CMSIS -I.././hal/stm32f3/CMSIS/core -I.././hal/stm32f3/CMSIS/device -I.././hal/stm32f4/Legacy -I.././crypto/ -I.././crypto/tiny-AES128-C -std=gnu99 -MMD -MP -MF .dep/simpleserial-base-CWLITEARM.elf.d objdir/simpleserial-base.o objdir/simpleserial.o objdir/stm32f3_hal.o objdir/stm32f3_hal_lowlevel.o objdir/stm32f3_sysmem.o objdir/aes.o objdir/aes-independant.o objdir/stm32f3_startup.o --output simpleserial-base-CWLITEARM.elf --specs=nano.specs -T .././hal/stm32f3/LinkerScript.ld -Wl,--gc-sections -lm -Wl,-Map=simpleserial-base-CWLITEARM.map,--cref -lm . Creating load file for Flash: simpleserial-base-CWLITEARM.hex arm-none-eabi-objcopy -O ihex -R .eeprom -R .fuse -R .lock -R .signature simpleserial-base-CWLITEARM.elf simpleserial-base-CWLITEARM.hex . Creating load file for EEPROM: simpleserial-base-CWLITEARM.eep arm-none-eabi-objcopy -j .eeprom --set-section-flags=.eeprom="alloc,load" \ --change-section-lma .eeprom=0 --no-change-warnings -O ihex simpleserial-base-CWLITEARM.elf simpleserial-base-CWLITEARM.eep || exit 0 . Creating Extended Listing: simpleserial-base-CWLITEARM.lss arm-none-eabi-objdump -h -S -z simpleserial-base-CWLITEARM.elf > simpleserial-base-CWLITEARM.lss . Creating Symbol Table: simpleserial-base-CWLITEARM.sym arm-none-eabi-nm -n simpleserial-base-CWLITEARM.elf > simpleserial-base-CWLITEARM.sym Size after: text data bss dec hex filename 4588 8 1296 5892 1704 simpleserial-base-CWLITEARM.elf +-------------------------------------------------------- + Built for platform CW-Lite Arm (STM32F3) +--------------------------------------------------------- We want to use the existing SimpleSerial firmware as a base for our project, but we don't want to edit the existing firmware. Instead, we'll make a new project with a copy of this firmware. Copy the directory of the firmware you want to modify in the
chipwhisperer/hardware/vicitims/firmwareto a new folder. The folder you copy will depend on what tutorial you're doing. Typically, the firmware you want to use is listed above the "Building for ..." drop down menus. The name is arbitrary, but for this example, we'll call itsimpleserial-base-lab1(though depending on what firmware and tutorial you're working off of, you may want to call it something different). You must keep it in the same directory, as it will reference other files within that directory for the build process. Change the terminal to the newly copied directory. For example:
Windows:cd c:\chipwhisperer\hardware\victims\firmware\simpleserial-base-lab1
Linux/macOS:cd chipwhisperer/hardware/victims/firmware/simpleserial-base-lab1
Then, run
maketo build the system. Make sure you specify which platform you're using as your target. You can see a list of supported targets by typingmake PLATFORM=. You'll also need to specify aCRYPTO_TARGET. Most targets and tutorials work withTINYAES128C, so if you're unsure, this is usually a reliable option. For example, for the NXP Kinetis K24F target, run:make PLATFORM=CW308_K24F CRYPTO_TARGET=TINYAES128C
Which should have the following output:
...Bunch of lines removed... Linking: simpleserial-base-CW308_K24F.elf arm-none-eabi-gcc -I. -O0 -g -DDEBUG -DCPU_MK24FN1M0VLL12 -DFRDM_K64F -DFREEDOM -w -fno-common -ffunction-sections -fdata-sections -ffreestanding -fno-builtin -mthumb -mapcs -std=gnu99 -mcpu=cortex-m4 -mfloat-abi=hard -mfpu=fpv4-sp-d16 -MMD -MP -static -gdwarf-2 -DSS_VER=SS_VER_1_1 -DHAL_TYPE=HAL_k24f -DPLATFORM=CW308_K24F -DTINYAES128C -DF_CPU=7372800UL -Os -funsigned-char -funsigned-bitfields -fshort-enums -Wall -Wstrict-prototypes -Wa,-adhlns=objdir/simpleserial-base.o -I.././simpleserial/ -I.././hal -I.././hal/k24f -I.././hal/k24f/CMSIS -I.././hal/k24f/Drivers -I.././crypto/ -I.././crypto/tiny-AES128-C -std=gnu99 -MMD -MP -MF .dep/simpleserial-base-CW308_K24F.elf.d objdir/simpleserial-base.o objdir/simpleserial.o objdir/clock_config.o objdir/fsl_adc16.o objdir/fsl_clock.o objdir/fsl_cmp.o objdir/fsl_cmt.o objdir/fsl_common.o objdir/fsl_crc.o objdir/fsl_dac.o objdir/fsl_dmamux.o objdir/fsl_dspi.o objdir/fsl_dspi_edma.o objdir/fsl_edma.o objdir/fsl_ewm.o objdir/fsl_flash.o objdir/fsl_flexbus.o objdir/fsl_flexcan.o objdir/fsl_ftm.o objdir/fsl_gpio.o objdir/fsl_i2c.o objdir/fsl_i2c_edma.o objdir/fsl_llwu.o objdir/fsl_lptmr.o objdir/fsl_mmcau.o objdir/fsl_pdb.o objdir/fsl_pit.o objdir/fsl_pmc.o objdir/fsl_rcm.o objdir/fsl_rnga.o objdir/fsl_rtc.o objdir/fsl_sai.o objdir/fsl_sai_edma.o objdir/fsl_sdhc.o objdir/fsl_sim.o objdir/fsl_smc.o objdir/fsl_sysmpu.o objdir/fsl_uart.o objdir/fsl_uart_edma.o objdir/fsl_vref.o objdir/fsl_wdog.o objdir/k24f_hal.o objdir/system_MK24F12.o objdir/aes.o objdir/aes-independant.o objdir/startup_MK24F12.o --output simpleserial-base-CW308_K24F.elf -Xlinker --gc-sections -Xlinker -static -Xlinker -z -Xlinker muldefs -T .././hal/k24f/MK24FN1M0xxx12_flash.ld --specs=nano.specs --specs=nosys.specs -Wl,--start-group -L .././hal/k24f/ -l:lib_mmcau.a -lm -lc -lgcc -lnosys -Wl,--end-group -Wl,-Map=simpleserial-base-CW308_K24F.map,--cref -lm . Creating load file for Flash: simpleserial-base-CW308_K24F.hex arm-none-eabi-objcopy -O ihex -R .eeprom -R .fuse -R .lock -R .signature simpleserial-base-CW308_K24F.elf simpleserial-base-CW308_K24F.hex . Creating load file for EEPROM: simpleserial-base-CW308_K24F.eep arm-none-eabi-objcopy -j .eeprom --set-section-flags=.eeprom="alloc,load" \ --change-section-lma .eeprom=0 --no-change-warnings -O ihex simpleserial-base-CW308_K24F.elf simpleserial-base-CW308_K24F.eep || exit 0 . Creating Extended Listing: simpleserial-base-CW308_K24F.lss arm-none-eabi-objdump -h -S -z simpleserial-base-CW308_K24F.elf > simpleserial-base-CW308_K24F.lss . Creating Symbol Table: simpleserial-base-CW308_K24F.sym arm-none-eabi-nm -n simpleserial-base-CW308_K24F.elf > simpleserial-base-CW308_K24F.sym Size after: text data bss dec hex filename 11600 120 2388 14108 371c simpleserial-base-CW308_K24F.elf +-------------------------------------------------------- + Built for platform k24f Target +--------------------------------------------------------- We want to use the existing SimpleSerial firmware as a base for our project, but we don't want to edit the existing firmware. Instead, we'll make a new project with a copy of this firmware. Copy the directory of the firmware you want to modify in the
chipwhisperer/hardware/vicitims/firmwareto a new folder. The folder you copy will depend on what tutorial you're doing. Typically, the firmware you want to use is listed above the "Building for ..." drop down menus. The name is arbitrary, but for this example, we'll call itsimpleserial-base-lab1(though depending on what firmware and tutorial you're working off of, you may want to call it something different). You must keep it in the same directory, as it will reference other files within that directory for the build process. Change the terminal to the newly copied directory. For example:
Windows:cd c:\chipwhisperer\hardware\victims\firmware\simpleserial-base-lab1
Linux/macOS:cd chipwhisperer/hardware/victims/firmware/simpleserial-base-lab1
Then, run
maketo build the system. Make sure you specify which platform you're using as your target. You can see a list of supported targets by typingmake PLATFORM=. You'll also need to specify aCRYPTO_TARGET. Most targets and tutorials work withTINYAES128C, so if you're unsure, this is usually a reliable option. For example, for the NXP Kinetis K24F target, run:make PLATFORM=CW308_K24F CRYPTO_TARGET=TINYAES128C
Which should have the following output:
...Bunch of lines removed... Linking: simpleserial-base-CW308_K24F.elf arm-none-eabi-gcc -I. -O0 -g -DDEBUG -DCPU_MK24FN1M0VLL12 -DFRDM_K64F -DFREEDOM -w -fno-common -ffunction-sections -fdata-sections -ffreestanding -fno-builtin -mthumb -mapcs -std=gnu99 -mcpu=cortex-m4 -mfloat-abi=hard -mfpu=fpv4-sp-d16 -MMD -MP -static -gdwarf-2 -DSS_VER=SS_VER_1_1 -DHAL_TYPE=HAL_k24f -DPLATFORM=CW308_K24F -DTINYAES128C -DF_CPU=7372800UL -Os -funsigned-char -funsigned-bitfields -fshort-enums -Wall -Wstrict-prototypes -Wa,-adhlns=objdir/simpleserial-base.o -I.././simpleserial/ -I.././hal -I.././hal/k24f -I.././hal/k24f/CMSIS -I.././hal/k24f/Drivers -I.././crypto/ -I.././crypto/tiny-AES128-C -std=gnu99 -MMD -MP -MF .dep/simpleserial-base-CW308_K24F.elf.d objdir/simpleserial-base.o objdir/simpleserial.o objdir/clock_config.o objdir/fsl_adc16.o objdir/fsl_clock.o objdir/fsl_cmp.o objdir/fsl_cmt.o objdir/fsl_common.o objdir/fsl_crc.o objdir/fsl_dac.o objdir/fsl_dmamux.o objdir/fsl_dspi.o objdir/fsl_dspi_edma.o objdir/fsl_edma.o objdir/fsl_ewm.o objdir/fsl_flash.o objdir/fsl_flexbus.o objdir/fsl_flexcan.o objdir/fsl_ftm.o objdir/fsl_gpio.o objdir/fsl_i2c.o objdir/fsl_i2c_edma.o objdir/fsl_llwu.o objdir/fsl_lptmr.o objdir/fsl_mmcau.o objdir/fsl_pdb.o objdir/fsl_pit.o objdir/fsl_pmc.o objdir/fsl_rcm.o objdir/fsl_rnga.o objdir/fsl_rtc.o objdir/fsl_sai.o objdir/fsl_sai_edma.o objdir/fsl_sdhc.o objdir/fsl_sim.o objdir/fsl_smc.o objdir/fsl_sysmpu.o objdir/fsl_uart.o objdir/fsl_uart_edma.o objdir/fsl_vref.o objdir/fsl_wdog.o objdir/k24f_hal.o objdir/system_MK24F12.o objdir/aes.o objdir/aes-independant.o objdir/startup_MK24F12.o --output simpleserial-base-CW308_K24F.elf -Xlinker --gc-sections -Xlinker -static -Xlinker -z -Xlinker muldefs -T .././hal/k24f/MK24FN1M0xxx12_flash.ld --specs=nano.specs --specs=nosys.specs -Wl,--start-group -L .././hal/k24f/ -l:lib_mmcau.a -lm -lc -lgcc -lnosys -Wl,--end-group -Wl,-Map=simpleserial-base-CW308_K24F.map,--cref -lm . Creating load file for Flash: simpleserial-base-CW308_K24F.hex arm-none-eabi-objcopy -O ihex -R .eeprom -R .fuse -R .lock -R .signature simpleserial-base-CW308_K24F.elf simpleserial-base-CW308_K24F.hex . Creating load file for EEPROM: simpleserial-base-CW308_K24F.eep arm-none-eabi-objcopy -j .eeprom --set-section-flags=.eeprom="alloc,load" \ --change-section-lma .eeprom=0 --no-change-warnings -O ihex simpleserial-base-CW308_K24F.elf simpleserial-base-CW308_K24F.eep || exit 0 . Creating Extended Listing: simpleserial-base-CW308_K24F.lss arm-none-eabi-objdump -h -S -z simpleserial-base-CW308_K24F.elf > simpleserial-base-CW308_K24F.lss . Creating Symbol Table: simpleserial-base-CW308_K24F.sym arm-none-eabi-nm -n simpleserial-base-CW308_K24F.elf > simpleserial-base-CW308_K24F.sym Size after: text data bss dec hex filename 11600 120 2388 14108 371c simpleserial-base-CW308_K24F.elf +-------------------------------------------------------- + Built for platform k24f Target +--------------------------------------------------------At this point we want to modify the system to perform a number of operations. We won't actually use the input data. To do so, open the file
simpleserial-base.cwith a text editor such as Programmer's Notepad (which ships with WinAVR).Find the following code block towards the end of the file, which may look different if you just completed Tutorial_B1_Building_a_SimpleSerial_Project.
/**********************************
 * Start user-specific code here. */
trigger_high();

//16 hex bytes held in 'pt' were sent
//from the computer. Store your response
//back into 'pt', which will send 16 bytes
//back to computer. Can ignore of course if
//not needed

trigger_low();
/* End user-specific code here. *
 ********************************/
Modify it to do some work with no-ops and multiplication instructions:
/**********************************
 * Start user-specific code here. */
trigger_high();

//16 hex bytes held in 'pt' were sent
//from the computer. Store your response
//back into 'pt', which will send 16 bytes
//back to computer. Can ignore of course if
//not needed

asm volatile(
"nop"       "\n\t"
"nop"       "\n\t"
"nop"       "\n\t"
"nop"       "\n\t"
"nop"       "\n\t"
"nop"       "\n\t"
"nop"       "\n\t"
"nop"       "\n\t"
"nop"       "\n\t"
"nop"       "\n\t"
::
);

asm volatile(
"mul r0,r1" "\n\t"
"mul r0,r1" "\n\t"
"mul r0,r1" "\n\t"
"mul r0,r1" "\n\t"
"mul r0,r1" "\n\t"
"mul r0,r1" "\n\t"
"mul r0,r1" "\n\t"
"mul r0,r1" "\n\t"
"mul r0,r1" "\n\t"
"mul r0,r1" "\n\t"
::
);

trigger_low();
/* End user-specific code here. *
 ********************************/
Change the terminal to the directory with your source, and run the same
makecommand you did in earlier to build the system. Remember you can press the up arrow on the keyboard to get recently typed commands in most OSes:make PLATFORM=CW303
- Following the instructions given in Tutorial_B1_Building_a_SimpleSerial_Project, program the AVR, XMEGA, or STM32 (ARM) with your new code. Note you __do not__ need to close the programming window. If you will be doing frequent modifications to the source code, this can simplify your life since you only need to hit the Program button in AVRStudio to download new code.
- Ensure the hardware is setup as in Tutorial_B1_Building_a_SimpleSerial_Project. If using the CW1002, ensure the SMA cable is also connected as described in the previous tutorial.
Building the Basic Example
Building for CWLite with XMEGA Target
You'll need to have installed avr-gcc and avr-libc. You may have already done this by following the installation guide, or if using the ChipWhisperer-VM it comes prepared with avr-gcc already setup. See the Installing_ChipWhisperer guide for details.
Once you have a working compiler (check by typing 'avr-gcc' at the command line - if using Windows you may need to setup a special batch file to provide you with a avr-gcc command prompt).
Ensure that the "Built for platform ___" matches your target device.
=== Building for CWLite with XMEGA Target === You'll need to have installed avr-gcc and avr-libc. You may have already done this by following the installation guide, or if using the ChipWhisperer-VM it comes prepared with avr-gcc already setup. See the Installing_ChipWhisperer guide for details.
Once you have a working compiler (check by typing 'avr-gcc' at the command line - if using Windows you may need to setup a special batch file to provide you with a avr-gcc command prompt).
Ensure that the "Built for platform ___" matches your target device.
Building for CWLite with Arm Target
You'll need to have installed the GNU Embedded Toolchain for ARM. If you haven't yet, see the Installing_ChipWhisperer guide, specifically the Installing ARM Toolchain section, for details.
Once you have a working compiler (check by typing 'arm-none-eabi-gcc' at the command line).
Ensure that the "Built for platform ___" matches your target device.
=== Building for CWLite with Arm Target === You'll need to have installed the GNU Embedded Toolchain for ARM. If you haven't yet, see the Installing_ChipWhisperer guide, specifically the Installing ARM Toolchain section, for details.
Once you have a working compiler (check by typing 'arm-none-eabi-gcc' at the command line).
Ensure that the "Built for platform ___" matches your target device.
Building for Other Targets
Building for other targets typically requires additional programs and tools. Additionally, some targets may have a unique build process, meaning the instructions here will not apply to them. Please see the page for the specific target you want to build for before following these instructions, which can be found under the Hardware Documentation section of the Main Page.
Once you have a working compiler:
Ensure that the "Built for platform ___" matches your target device.
=== Building for Other Targets === Building for other targets typically requires additional programs and tools. Additionally, some targets may have a unique build process, meaning the instructions here will not apply to them. Please see the page for the specific target you want to build for before following these instructions, which can be found under the Hardware Documentation section of the Main Page.
Once you have a working compiler:
Ensure that the "Built for platform ___" matches your target device.
Modifying the Basic Example
Capturing Power Traces
The basic steps to connect to the ChipWhisperer device are described in Tutorial_B1_Building_a_SimpleSerial_Project. They are repeated here as well, however see Tutorial_B1_Building_a_SimpleSerial_Project for pictures & mode details.
- Start ChipWhisperer-Capture
- Under the Python Console tab, find the connect_cwlite_simpleserial.py script and double-click.
- Check there are no errors on the connection.
- Under the Python Console tab, find the setup_cwlite_xmega.py script and double-click.
- Both the Target & Scope should switch to CON and be green circles.
- Open the status monitor (Tools > Encryption Status Monitor).
- Hit the Run 1
 button. You may have to hit it a few times, as the very first serial data is often lost. You should see data populate in the Text Out field of the monitor window. The Text In and Text Out aren't actually used in this example, so you can close the Monitor dialog.
At this point you've completed the same amount of information as the previous tutorial. The following section describes how to setup the analog capture hardware, which is new (to you). The following is entirely done in the Scope Settings tab:

- The ADC Freq should show 29.5 MHz (which is 4x 7.37 MHz), and the DCM Locked checkbox __MUST__ be checked. If the DCM Locked checkbox is NOT checked, try hitting the Reset ADC DCM button again.
At this point you can hit the Capture 1 button, and see if the system works! You should end up with a window looking like this:
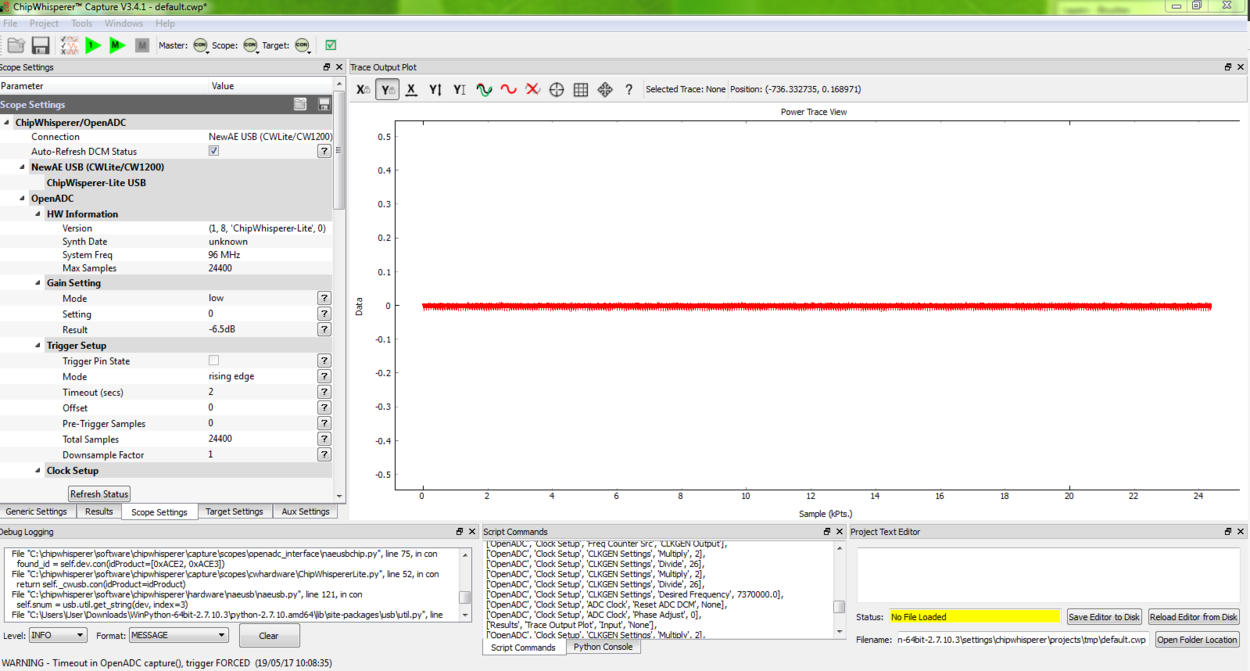
Whilst there is a waveform, you need to adjust the capture settings. There are two main settings of importance, the analog gain and number of samples to capture.


- Under Gain Setting set the Mode to high. Increase the Gain Setting to about 25. You'll be able to adjust this further during experimentations, you may need to increase this depending on your hardware and target device.
- Under Trigger Setup set the Total Samples to 500.
- Try a few more Capture 1 traces, and you should see a 'zoomed-in' waveform.
Modifying the Target
Background on Setup
This tutorial is using either an AtMega328p which is an Atmel AVR device, or AtXMEGA128D4 which is an Atmel XMEGA device. We are comparing the power consumption of two different instructions, the MUL (multiply) instruction and the NOP (no operation) instruction. Some information on these two instructions:
- mul
- Multiples two 8-bit numbers together.
- Takes 2 clock cycles to complete
- Intuitively expect fairly large power consumption due to complexity of operation required
- nop
- Does nothing
- Takes 1 clock cycle to complete
- Intuitively expect low power consumption due to core doing nothing
Note that the capture clock is running at 4x the device clock. Thus a single mul instruction should span 8 samples on our output graph, since it takes 4 samples to cover a complete clock cycle.
Initial Code
The initial code has a power signature something like this (yours will vary based on various physical considerations, and depending if you are using an XMEGA or AVR device):

Note that the 10 mul instructions would be expected to take 80 samples to complete, and the 10 nop instructions should take 40 samples to complete. By modifying the code we can determine exactly which portion of the trace is corresponding to which operations.
Increase number of NOPs
We will then modify the code to have twenty NOP operations in a row instead of ten. The modified code looks like this:
/**********************************
 * Start user-specific code here. */
trigger_high();

asm volatile(
"nop"       "\n\t"
"nop"       "\n\t"
"nop"       "\n\t"
"nop"       "\n\t"
"nop"       "\n\t"
"nop"       "\n\t"
"nop"       "\n\t"
"nop"       "\n\t"
"nop"       "\n\t"
"nop"       "\n\t"
::
);

asm volatile(
"nop"       "\n\t"
"nop"       "\n\t"
"nop"       "\n\t"
"nop"       "\n\t"
"nop"       "\n\t"
"nop"       "\n\t"
"nop"       "\n\t"
"nop"       "\n\t"
"nop"       "\n\t"
"nop"       "\n\t"
::
);

asm volatile(
"mul r0,r1" "\n\t"
"mul r0,r1" "\n\t"
"mul r0,r1" "\n\t"
"mul r0,r1" "\n\t"
"mul r0,r1" "\n\t"
"mul r0,r1" "\n\t"
"mul r0,r1" "\n\t"
"mul r0,r1" "\n\t"
"mul r0,r1" "\n\t"
"mul r0,r1" "\n\t"
::
);

trigger_low();
/* End user-specific code here. *
 ********************************/
Note that the mul operation takes 2 clock cycles on the AVR, and the nop operation takes 1 clock cycles. Thus we expect to now see two areas of the power trace which appear to take approximately the same time. The resulting power trace looks like this:

Pay particular attention to the section between sample number 0 & sample number 180. It is in this section we can compare the two power graphs to see the modified code. We can actually 'see' the change in operation of the device! It would appear the nop is occuring from approximately 10-90, and the mul occuring from 90-170.
Add NOP loop after MUL
Finally, we will add 10 more NOPs after the 10 MULs. The code should look something like this:
/**********************************
 * Start user-specific code here. */
trigger_high();

asm volatile(
"nop"       "\n\t"
"nop"       "\n\t"
"nop"       "\n\t"
"nop"       "\n\t"
"nop"       "\n\t"
"nop"       "\n\t"
"nop"       "\n\t"
"nop"       "\n\t"
"nop"       "\n\t"
"nop"       "\n\t"
::
);

asm volatile(
"nop"       "\n\t"
"nop"       "\n\t"
"nop"       "\n\t"
"nop"       "\n\t"
"nop"       "\n\t"
"nop"       "\n\t"
"nop"       "\n\t"
"nop"       "\n\t"
"nop"       "\n\t"
"nop"       "\n\t"
::
);

asm volatile(
"mul r0,r1" "\n\t"
"mul r0,r1" "\n\t"
"mul r0,r1" "\n\t"
"mul r0,r1" "\n\t"
"mul r0,r1" "\n\t"
"mul r0,r1" "\n\t"
"mul r0,r1" "\n\t"
"mul r0,r1" "\n\t"
"mul r0,r1" "\n\t"
"mul r0,r1" "\n\t"
::
);

asm volatile(
"nop"       "\n\t"
"nop"       "\n\t"
"nop"       "\n\t"
"nop"       "\n\t"
"nop"       "\n\t"
"nop"       "\n\t"
"nop"       "\n\t"
"nop"       "\n\t"
"nop"       "\n\t"
"nop"       "\n\t"
::
);

trigger_low();
/* End user-specific code here. *
 ********************************/
With an output graph that looks like this:

Comparison of All Three
The following graph lines the three options up. One can see where adding loops of different operations shows up in the power consumption.

Clock Phase Adjustment
A final area of interest is the clock phase adjustment. The clock phase adjustment is used to shift the ADC sample clock from the actual device clock by small amounts. This will affect the appearance of the captured waveform, and in more advanced methods is used to improve the measurement.
The phase adjustment is found under the Phase Adjust option of the ADC Clock setting:

To see the effect this has, first consider an image of the power measured by a regular oscilloscope (at 1.25GS/s):

And the resulting waveforms for a variety of different phase shift settings:

The specifics of the capture are highly dependent on each ChipWhisperer board & target platform. The phase shift allows customization of the capture waveform for optimum performance, however what constitutes 'optimum performance' is highly dependent on the specifics of your algorithm.
Conclusion
In this tutorial you have learned how power analysis can tell you the operations being performed on a microcontroller. In future work we will move towards using this for breaking various forms of security on devices.