| As of August 2020 the site you are on (wiki.newae.com) is deprecated, and content is now at rtfm.newae.com. |
Tutorial B3-1 Timing Analysis with Power for Password Bypass
This tutorial will introduce you to breaking devices by determining when a device is performing certain operations. It will use a simple password check, and demonstrate how to perform a basic power analysis.
In addition this example shows you how to drive the ChipWhisperer software with a script, rather than using the GUI. This will be required when attacking new devices which you have not yet added to the core ChipWhisperer software.
Note this is not a prerequisite to the tutorial on breaking AES. You can skip this tutorial if you wish to go ahead with the AES tutorial.
You can also view a 53-min Video Version on YouTube:
Contents
Prerequisites
You should have already completed tutorialtimingsimple to gain a better understanding of the ChipWhisperer interface.
Building the Target Firmware
The target firmware is located in the directory chipwhisperer\hardware\victims\firmware\basic-passwdcheck. Build the firmware using make, once again being careful to ensure you have modified the makefile to select the correct target. You should end up with something like this being printed:
Creating Symbol Table: basic-passwdcheck.sym
avr-nm -n basic-passwdcheck.elf > basic-passwdcheck.sym

Size after:
AVR Memory Usage
----------------
Device: atxmega128d3

Program:    5400 bytes (3.9% Full)
(.text + .data + .bootloader)

Data:        524 bytes (6.4% Full)
(.data + .bss + .noinit)


Built for platform CW-Lite XMEGA

-------- end --------
Manual Communications with the Target
At this point, you should be able to configure the target as in the previous tutorials. Rather than tediously going through the setup process again, we'll simply use one of the scripts built into the ChipWhisperer-Capture software. This will demonstrate how we can use a script as a starting point to simplify our setup.
- Connect your target hardware (ChipWhisperer-Lite or ChipWhisperer-Capture Rev 2 with target board).
- Open the ChipWhisperer-Capture software.
- From the Example Scripts, select one which most closely matches your hardware. For example here I'm using a ChipWhisperer-Lite with the XMEGA target, so will select that script. Note I'm NOT attacking AES, so will need to make some adjustments later. .. image:: /images/tutorials/basic/timingpowerbasic/scriptexample.png
- The system should connect to your hardware. Remember you have not yet reprogrammed the target so won't be communicating with the target program.
- Using the programming tool (such as XMEGA programming dialog), program the file
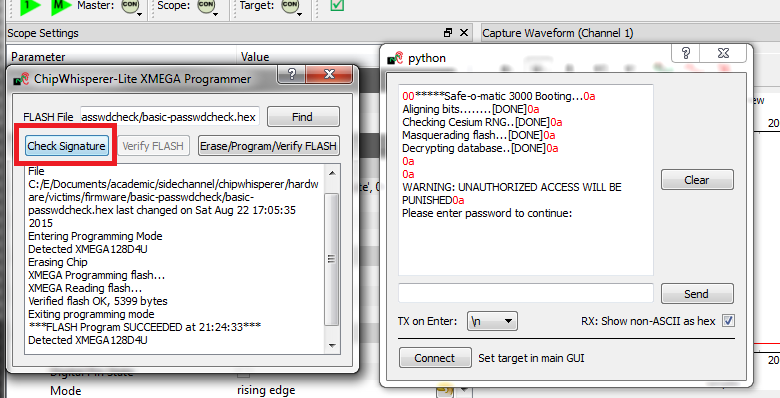
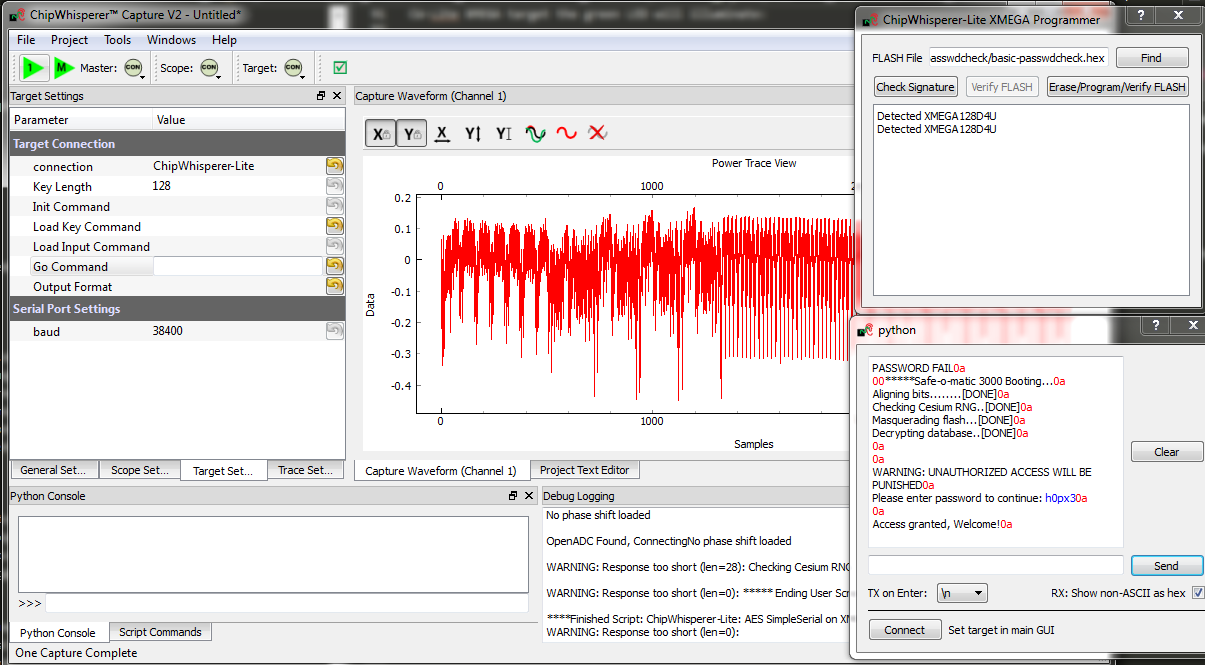
basic-passwdcheck.hexinto the target device. This file is located where you ranmakepreviously. Select Tools --> Open Terminal, and press Connect. You should see a window such as this:
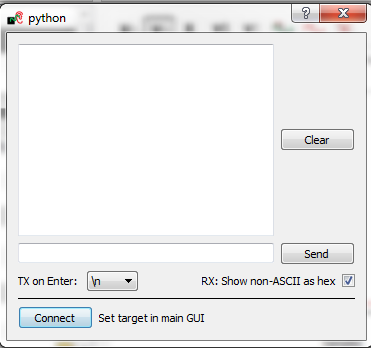
At this point we need to reset the target device. The easiest way to do this is use the programmer interface, and press the Check Signature or Read Signature button. This will reset the target device as part of the signature read operation. You should see some messages come across the terminal emulator window:
- Note a few warnings about the terminal emulator:
- The on-board buffer is fairly small, and can be easily overflowed. You may notice a few longer lines become trunicated if printing is too fast!
- You can uncheck the "Show non-ASCII as hex" to avoid having the
0aprinted in red. The0ais the hex character for a newline. Many protocols use non-ASCII characters, so to help with debugging it is left enabled by default.
We've now got some super-secure system! Let's begin with some exploratory tests - in this case I happened to know the correct password is
h0px3.tip
In real systems, you may often know one of the passwords, which is sufficient to investigate the password checking routines as we will do. You also normally have an ability to reset passwords to default. While the reset procedure would erase any data you care about, the attacker will be able to use this 'sacrificial' device to learn about possible vulnerabilites. So the assumption that we have access to the password is really just saying we have access to a password, and will use that knowledge to break the system in general.
Using the terminal emulator, write the correct password in, and press
<enter>. You should be greeted by a welcome message, and if using the CW-Lite XMEGA target the green LED will illuminate:
- The system enters an infinite loop for any password entry. Thus you must reset the system, use the Programmer Window to again perform a Check Signature or Read Signature operation.
- Enter an incorrect password - notice a different message is printed, and if using the CW-Lite XMEGA target the red LED will come on.


Recording Power Traces
Now that we can communicate with our super-secure system, our next goal is to get a power trace while the target is running. To do this, we'll get the power measurements to trigger after we send our password to the target.
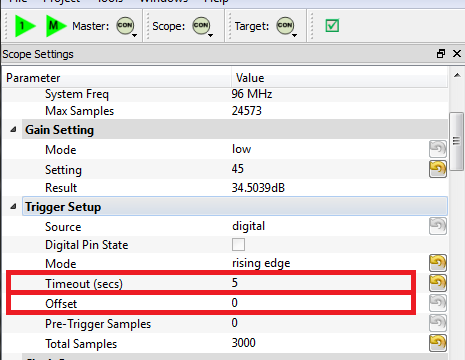
We'll make some changes to the trigger setup of the ChipWhisperer. In particular, ensure you set the following:
- Offset = 0
- Timeout set to 5 seconds or greater (to give yourself time when manually testing)
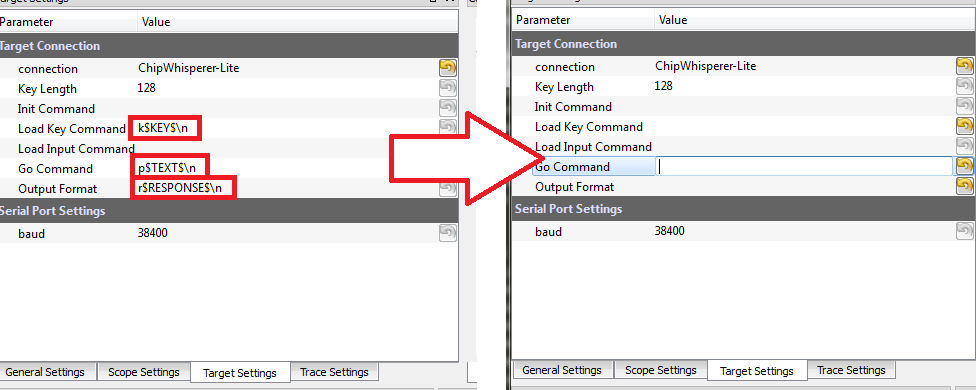
Change to the Target Settings tab, and delete the Command strings. Those strings are used in the AES attack to send a specific command to the target device, for now we will be manually sending data:
Perform the following actions:
- Reset the target device (e.g. by performing the signature check).
- Enter the password
h0px3in the terminal window, but do not yet hit enter. - Press the Capture 1 button, and immediately switch to the terminal emulator window and press
<enter>to send the password.
You must send the password before the timeout occurs -- you can increase the length of the timeout if needed to give yourself more time! If this works you should see the power consumption displayed in the GUI:
Rather than using the manual terminal, let's now use the GUI to automatically send a password try. Switching back to the Target Settings tab, write
h0px3\ninto the Go Command option: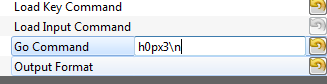
The Go Command is sent right after the scope is armed. In this example it means we can capture the power consumption during the password entry phase.
Now perform the following actions:
- Reset the target device (e.g. by performing the signature check).
- Press the Capture 1 button.
Hopefully this resulted in the same waveform as before! Note the device takes around 1 second to 'boot', so if you are too lightning fast after resetting the device it won't actually be ready to accept the password. You can keep the terminal emulator window open to view the output data.
Play around with the password entered on the Go Command - try all of the following:
h0px3\nh0px4\nh0paa\nhaaaa\na\n
You should notice a distinct change in the password depending how many characters were correct. For example the following shows the difference between passwords of
h0px4(which has 4 correct characters) andh0paa(which has 3 correct characters):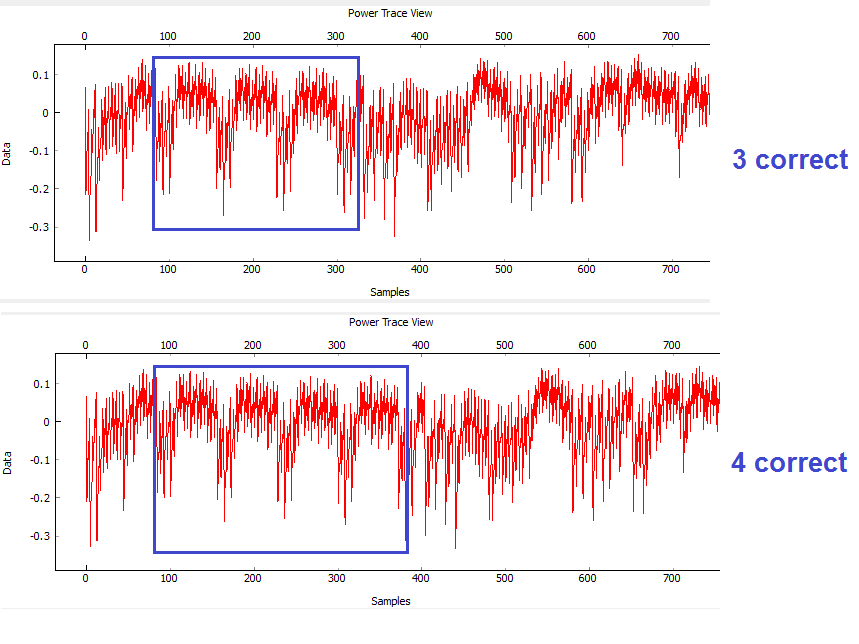


Automatic Resets
The last step before scripting an entire attack is to figure out how to automatically reset the target device before (or after) each capture. There are two ways to do this, and the following steps take you through two examples of how to accomplish this goal.
Reset via Spare IO Lines
TODO - see reset via programming interface for now
Reset via Auxiliary Module
Auxiliary modules are small pieces of code that can perform some extra functions during the capture process. The functions inside these Python modules are run before a capture, before the power measurement is armed, before the measurement is triggered, after a single trace is completed, and after an entire capture is finished. We will use an existing auxiliary module to reset the target chip before arming the measurement so that we don't have to manually reset the device.
- We're going to use the Reset AVR/XMEGA via CW-Lite auxiliary module. Let's get an idea of how this module works:
- Navigate to the auxiliary modules folder (
chipwhisperer\software\chipwhisperer\capture\auxiliary\) and openResetCW1183Read.pyin your choice of text editor. - Find the function definition for
resetDevice(). It contains a line that looks like:
CWCoreAPI.getInstance().getScope().scopetype.cwliteXMEGA.readSignature()
- Look for the lines where this function gets called. You'll find that the function
traceArm()uses it like:
resettiming = self.findParam('resettiming').value()
if resettiming == 'Pre-Arm':
    self.resetDevice()
Effectively, this code will read the target's signature before we arm the power measurement. This means that the target will automatically be reset before capturing a power trace.
- Navigate to the auxiliary modules folder (
- Go back to the ChipWhisperer Capture software. In the Generic Settings tab, switch the Auxiliary Module to Reset AVR/XMEGA via CW-Lite.
- Now, in the Aux Settings tab, we can configure our automatic reset. Make sure the settings are:
- Pre-arm delay: roughly 1200 ms
- Post-arm delay: the default (0 ms) is fine
- Reset timing: Pre-arm (reset the device before we arm the scope)
- Press Capture 1. The target will automatically reset, with the Safe-o-matic 3000 boot sequence appearing in the console. Then, 1 second later, the program will send the password to the target and record a power trace.
- Make a copy of the existing script. You can find it at
chipwhisperer\software\chipwhisperer\capture\scripts, for example the default one is calledcwlite-simpleserialxmega.pyfor the XMEGA device. Copy this to another directory that you will use for the attack. Rename the script something else - for example
cwlite-passwordcrack.py, and open it for editing. You'll notice the following is a main chunk of the code, where the parameters are set:#Example of using a list to set parameters. Slightly easier to copy/paste in this format lstexample = [['CW Extra', 'CW Extra Settings', 'Trigger Pins', 'Target IO4 (Trigger Line)', True], ['CW Extra', 'CW Extra Settings', 'Target IOn Pins', 'Target IO1', 'Serial RXD'], ['CW Extra', 'CW Extra Settings', 'Target IOn Pins', 'Target IO2', 'Serial TXD'], ['OpenADC', 'Clock Setup', 'CLKGEN Settings', 'Desired Frequency', 7370000.0], ['CW Extra', 'CW Extra Settings', 'Target HS IO-Out', 'CLKGEN'], ['OpenADC', 'Clock Setup', 'ADC Clock', 'Source', 'CLKGEN x4 via DCM'], ['OpenADC', 'Trigger Setup', 'Total Samples', 3000], ['OpenADC', 'Trigger Setup', 'Offset', 1500], ['OpenADC', 'Gain Setting', 'Setting', 45], ['OpenADC', 'Trigger Setup', 'Mode', 'rising edge'], #Final step: make DCMs relock in case they are lost ['OpenADC', 'Clock Setup', 'ADC Clock', 'Reset ADC DCM', None], ]Those parameters come from the Scripting Parameters tab. Switch over to it and notice how when you change the text for example, it tells you the required parameter name to do this via the API call:
Note that commands run via the script are also printed, so you can see where the values being set are coming from too. At this point close the ChipWhisperer-Capture window, as we will confirm the script still works.
Run the new script (which doesn't have any changes yet). You may have to open a console with Python in the path:
- If you installed WinPython, run the WinPython Console from your WinPython installation directory.
- If using the VMWare image of a Linux machine, this should just be a regular console
- Open ChipWhisperer-Capture regularly.
- Run the ChipWhisperer script that you used previously.
- Select Tools-->Config CW Firmware
- Under the "FPGA .zip (Release)", hit the "Find" button. Point the system to the file
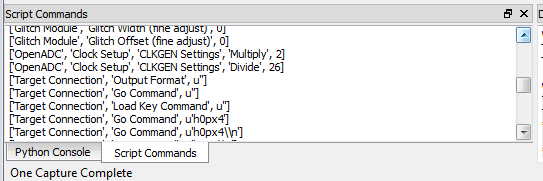
chipwhisperer/hardware/capture/chipwhisperer-lite/cwlite_firmware.zipon your filesystem. Note by default there is a relative path. - Once again on the Target Settings tab, delete the various commands. Note the resulting Script Commands which you will need to enter to achieve this same goal.
- Close ChipWhisperer-Capture.
Edit the script, first find the line setting the Trigger Offset:
['OpenADC', 'Trigger Setup', 'Offset', 1500],
And set this to 0, which we were using previously:
['OpenADC', 'Trigger Setup', 'Offset', 0],
Next, append the required commands to clear the simpleserial commands:
#Example of using a list to set parameters. Slightly easier to copy/paste in this format
lstexample = [['CW Extra', 'CW Extra Settings', 'Trigger Pins', 'Target IO4 (Trigger Line)', True],
              ...BUNCH MORE COMMANDS HERE HAVE BEEN REMOVED...
              #Final step: make DCMs relock in case they are lost
              ['OpenADC', 'Clock Setup', 'ADC Clock', 'Reset ADC DCM', None],

              #Append your commands here
              ['Target Connection', 'Load Key Command', u''],
              ['Target Connection', 'Go Command', u''],
              ['Target Connection', 'Output Format', u''],
              ]
Next, we are going to "hack in" the Auxiliary module. While the following isn't great Python code, the idea is to demonstrate how we can rapidly iterate with the combination of GUI to explore options, and the script to write them into place. First, add the imports to the start of the Python script:
from time import sleep
from chipwhisperer.capture.auxiliary.AuxiliaryTemplate import AuxiliaryTemplate
Find the section of the file that sends the previous commands to the hardware. You will see a line like the following:
#Download all hardware setup parameters
for cmd in lstexample: cap.setParameter(cmd)
We will then hack in the script we tested previously, which will insert our custom Auxiliary module:
#Download all hardware setup parameters
for cmd in lstexample: cap.setParameter(cmd)

def reset_device():
    cap.scope.scopetype.cwliteXMEGA.readSignature()
    sleep(0.8)

class resetClass(AuxiliaryTemplate):
  def traceDone(self):
   reset_device()

rc = resetClass()
cap.auxChanged(rc)
Note we changed the references to "self" to "cap", as we are no longer running from within the Capture environment. Otherwise we have used the ability of Python to declare classes inside of functions to avoid needing to think about how to properly declare everything.
Finally, we will set the password. You can enter the password in the Capture Target Settings tab, and see the following sort of call would set the appropriate password:
cap.setParameter(['Target Connection', 'Go Command', u'h0px3\\n'])
Note the newline is actually escaped, to set the text equivalent of what will be printed. This will result in an actual newline going out across the serial port.
Set that command at some point after your call to
cap.auxChanged(). Close any open ChipWhisperer-Capture windows, and run the script as before. You should connect to the target, and be able to press Capture 1 and see the correct waveform.Next, we will automatically start attacking the system. You needed to figure out where we will look to determine if the password check is working. Looking at an example of the power when 0 and 1 bytes are correct, we can see a good point that appears to shift forward in time:
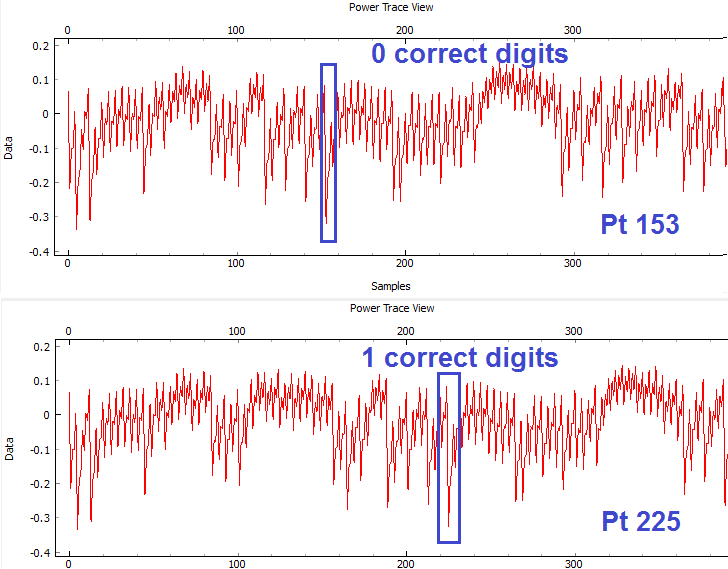
This point corresponds to an offset of 153 samples, and a delta for each character of 72 points. Note the specific point will change for different hardware, and may also change if you use different versions of avr-gcc to compile the target code. The example code here was compiled with WinAVR 20100110, which has avr-gcc 4.3.3. If you view the video version of this tutorial the point numbers are different for example, so be sure to check what they are for your specific system.
Let's start with cracking just the first character, assuming it's a lowercase alphanumeric character:
trylist = "abcdefghijklmnopqrstuvwyx0123456789" for c in trylist: cap.setParameter(['Target Connection', 'Go Command', u'%c\\n'%c]) cap.capture1() #TODO: Check data to see if successful?? print "Try = %c"%c #Call to pe() causes GUI to process outstanding events, useful if you are calling API directly pe()- We haven't yet pragmatically tested the results, but run the script anyway (to kill it, you'll have to use Ctrl-C on the terminal window). You should notice a distinct change of the power signature when it runs through "Try = h".
We can access
cap.scope.datapointsto get the data points. Let's print that point of interest (again change the point for your specific setup):for c in trylist: cap.setParameter(['Target Connection', 'Go Command', u'%c\\n'%c]) cap.capture1() #TODO: Check data to see if successful?? print "Try = %c"%c print cap.scope.datapoints[153] #Call to pe() causes GUI to process outstanding events, useful if you are calling API directly pe()Running that example, you can see we can use a simple threshold to detect the correct password. Finally use the following paying careful attention that you first:
- Check the offset and delta values (here they are 153 and 72)
- Note that the "Go Command" has been modified to send the known password characters, otherwise it won't work in a progressive manner.
The following is a sample code you can replace the previous with:
password = "" for i in range(0,5): print "***CHARACTER %d***"%i for c in trylist: cap.setParameter(['Target Connection', 'Go Command', password + "%c\\n"%c]) cap.capture1() print "Try = %c"%c #print cap.scope.datapoints[153 + i*72] if cap.scope.datapoints[153 + i*72] > -0.2: print "****CHARACTER %d = %c****"%(i, c) password += c break elif c == "9": print "****CHARACTER %d FAILED****"%(i) password += "?" #Call to pe() causes GUI to process outstanding events, useful if you are calling API directly pe() print password- The current script doesn't look for the "WELCOME" message when the password is OK. That is an extension that allows it to crack any size password.
- If there was a lock-out on a wrong password, the system would ignore it, as it resets the target after every attempt.
Now, confirm that you can try different passwords (in Target Settings) and see how the power trace changes when your password has 0, 1, 2... correct characters.
Scripting Communications

Run the script withpython cwlite-passwordcrack.py. If the script errors out, it might be that the location of the FPGA bitstream is stored in relative terms. To fix this perform the following:

That's it! You should have successfully cracked a password using the timing attack. Some notes on this method:
* The target device has a finite start-up time, which slows down the attack. If you wish, remove some of the printf()'s from the target code, recompile and reprogram, and see how quickly you can do this attack.