| As of August 2020 the site you are on (wiki.newae.com) is deprecated, and content is now at rtfm.newae.com. |
Difference between revisions of "Tutorial P1 Using a Custom Trigger"
| (One intermediate revision by the same user not shown) | |||
| Line 7: | Line 7: | ||
<p> | <p> | ||
| − | This tutorial can only be completed using the [[CW1200_ChipWhisperer-Pro]]. The ChipWhisperer software and its prerequisites should be installed. If not, this is the page for you: [[Installing ChipWhisperer]]. This tutorial is an extension of [[Tutorial B1 Building a SimpleSerial Project]] and [[Tutorial B5 Breaking AES (Straightforward)]], which should be completed first for better understanding. | + | This tutorial can only be completed using the [[CW1200_ChipWhisperer-Pro]]. The ChipWhisperer software and its prerequisites should be installed and the [[CW1200_ChipWhisperer-Pro]] and hardware should be connected to each other and your computer. If not, this is the page for you: [[Installing ChipWhisperer]]. This tutorial is an extension of [[Tutorial B1 Building a SimpleSerial Project]] and [[Tutorial B5 Breaking AES (Straightforward)]], which should be completed first for better understanding. |
</p> | </p> | ||
| Line 66: | Line 66: | ||
</syntaxhighlight> | </syntaxhighlight> | ||
</li> | </li> | ||
| + | <li> | ||
| + | Save this code, and then find the <code>makefile</code> file and open it in a text editor of your choice. Find this piece of code near the top: | ||
| + | <pre> | ||
| + | # Target file name (without extension). | ||
| + | # This is the base name of the compiled .hex file. | ||
| + | TARGET = simpleserial-aes | ||
| + | |||
| + | # List C source files here. | ||
| + | # Header files (.h) are automatically pulled in. | ||
| + | SRC += simpleserial-aes.c | ||
| + | </pre> | ||
| + | Change the <code>TARGET = simpleserial-aes</code> line to <code>TARGET = simpleserial-aes-stream</code> and the <code>SRC += simpleserial-aes.c</code> line to <code>SRC += simpleserial-aes-stream.c</code> | ||
| + | </li> | ||
| + | <li> | ||
| + | Open your command line in the <code>simpleserial-aes-stream</code> directory and run the <code>make</code> command for the correct target. For example: for the XMEGA run <code>make PLATFORM=CW303</code>. This will create a <code>.hex</code> file in the same directory. This step requires avr-gcc to be set-up and added to your system path. If you have not done this go back to [[Installing ChipWhisperer]] under the <b>Required Tools</b> dropdown. | ||
| + | </li> | ||
| + | <li> | ||
| + | Next open the ChipWhisperer software. Hopefully you know how to do this by now. | ||
| + | </li> | ||
| + | <li> | ||
| + | Run the <code>Project>Example Scripts>ChipWhisperer-Lite: AES SimpleSerial on XMEGA</code> script. We will modify some of the settings. | ||
| + | </li> | ||
| + | The modifications to the settings will allow us the use stream mode while manually sending a plain text for encryption. We will then look at the stream data and identify where the encryption takes place and what it looks like. | ||
| + | <li> | ||
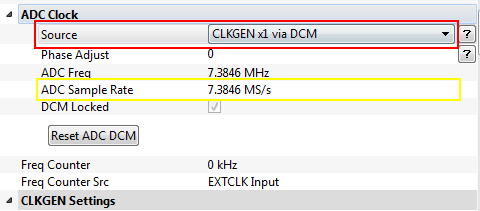
| + | Under the <b>Scope Settings</b> find the <b>ADC Clock</b> section. Here change the <b>Source</b> setting to <code>CLKGEN x1 via DCM</code>. The <b>ADC Sample Rate</b> field should auto-populate to <b>7.3846 MS/s</b> or a number approximately equal. If the sampling rate is above 10 MS/s the streaming mode will not work as the buffer in the FPGA will overflow. | ||
| + | <br> | ||
| + | [[File:ADC Clock.PNG]] | ||
| + | </li> | ||
| + | <li> | ||
| + | Under the <b>Scope Settings</b> find the <b>Trigger Setup</b> section. Enable <b>Stream Mode</b>. The <b>Mode</b> field needs to be set to <code>low</code> so the sample capture starts right away because the target does not set the trigger line to high anymore during encryption. | ||
| + | </li> | ||
| + | <li> | ||
| + | Under the same section change the <b>Total Samples</b> field to <code>11000000</code>. This will give use a window of approximately 1.5 seconds to send a plain text and capture the power measurements during encryption. | ||
| + | </li> | ||
| + | Note: The <b>Timeout (secs)</b> field needs to be set greater than the time it needs to stream the samples and a little additional time to allow for hardware communication. For example: 11 million samples take about 1.5 seconds at the sampling rate of 7.3MS/s so this field should be set to <code>2</code> seconds. You can set it higher if needed. | ||
| + | |||
</ol> | </ol> | ||
Revision as of 06:59, 24 May 2017
This page is in progress
This tutorial will explore the ChipWhisperer Pro's custom trigger and stream features.
Prerequisites
This tutorial can only be completed using the CW1200_ChipWhisperer-Pro. The ChipWhisperer software and its prerequisites should be installed and the CW1200_ChipWhisperer-Pro and hardware should be connected to each other and your computer. If not, this is the page for you: Installing ChipWhisperer. This tutorial is an extension of Tutorial B1 Building a SimpleSerial Project and Tutorial B5 Breaking AES (Straightforward), which should be completed first for better understanding.
Introduction
Unique to the CW1200_ChipWhisperer-Pro's more advanced FPGA, the stream feature allows continuous power measurement data streaming, removing the upper limit (due to a smaller FPGA) of total samples possible. This allows to you to continuously stream data for a time period in which you can manually send data to the target to record the power response. You can later find the subsection of sample points in the streamed power trace that correspond to the encryption of data. You can now use a subsection of 128 sample points to create a custom trigger using the sum of differences (TODO: link to subsequent section). This eliminates the need for the target to have a code that signals the ChipWhisperer when encryption begins. The subset of points for triggering is chosen by you, so anything is possible... We will explore one possibility in this tutorial.
Building the Target Code
We will begin by modifying the simpleserial-aes.c code with a editor of your choice.
- Navigate to the ChipWhisperer installation directory and find the
simpleserial-aesfolder, the folder is in the...\chipwhisperer\hardware\victims\firmwaredirectory. The beginning of the file path may be different depending on the installation directory. -
Copy the
simpleserial-aesfolder into the same directory and rename it as you see fit. For example:simpleserial-aes-stream. -
Now open the
simpleserial-aes-streamfolder and rename thesimpleserial-aes.cfile to match the directory name change. For example:simpleserial-aes-stream.c -
Open the
simpleserial-aes-stream.cfile in the text editor of your choice and find this section of the code near the top./********************************** * Start user-specific code here. */ uint8_t get_pt(uint8_t* pt) { trigger_high(); aes_indep_enc(pt); /* encrypting the data block */ trigger_low(); simpleserial_put('r', 16, pt); return 0x00; } /* End user-specific code here. * ********************************/
-
Modify this code by commenting out the
trigger_high();andtrigger_low();to remove the signal produced by the target to tell the ChipWhisperer it is starting the encryption process. Your c code should look like this:/********************************** * Start user-specific code here. */ uint8_t get_pt(uint8_t* pt) { //trigger_high(); aes_indep_enc(pt); /* encrypting the data block */ //trigger_low(); simpleserial_put('r', 16, pt); return 0x00; } /* End user-specific code here. * ********************************/
-
Save this code, and then find the
makefilefile and open it in a text editor of your choice. Find this piece of code near the top:# Target file name (without extension). # This is the base name of the compiled .hex file. TARGET = simpleserial-aes # List C source files here. # Header files (.h) are automatically pulled in. SRC += simpleserial-aes.c
Change the
TARGET = simpleserial-aesline toTARGET = simpleserial-aes-streamand theSRC += simpleserial-aes.cline toSRC += simpleserial-aes-stream.c -
Open your command line in the
simpleserial-aes-streamdirectory and run themakecommand for the correct target. For example: for the XMEGA runmake PLATFORM=CW303. This will create a.hexfile in the same directory. This step requires avr-gcc to be set-up and added to your system path. If you have not done this go back to Installing ChipWhisperer under the Required Tools dropdown. - Next open the ChipWhisperer software. Hopefully you know how to do this by now.
-
Run the
Project>Example Scripts>ChipWhisperer-Lite: AES SimpleSerial on XMEGAscript. We will modify some of the settings. -
Under the Scope Settings find the ADC Clock section. Here change the Source setting to
CLKGEN x1 via DCM. The ADC Sample Rate field should auto-populate to 7.3846 MS/s or a number approximately equal. If the sampling rate is above 10 MS/s the streaming mode will not work as the buffer in the FPGA will overflow.
-
Under the Scope Settings find the Trigger Setup section. Enable Stream Mode. The Mode field needs to be set to
lowso the sample capture starts right away because the target does not set the trigger line to high anymore during encryption. -
Under the same section change the Total Samples field to
11000000. This will give use a window of approximately 1.5 seconds to send a plain text and capture the power measurements during encryption.
The modifications to the settings will allow us the use stream mode while manually sending a plain text for encryption. We will then look at the stream data and identify where the encryption takes place and what it looks like.

Note: The Timeout (secs) field needs to be set greater than the time it needs to stream the samples and a little additional time to allow for hardware communication. For example: 11 million samples take about 1.5 seconds at the sampling rate of 7.3MS/s so this field should be set to 2 seconds. You can set it higher if needed.