| As of August 2020 the site you are on (wiki.newae.com) is deprecated, and content is now at rtfm.newae.com. |
CW1173 ChipWhisperer-Lite/Quick-Start Guide
You can see a Video of the quickstart guide, which will take you through all the setup items discussed here:
 _
_
Connection Quick-Start
- Install Python and Dependancies
- Windows:
- Install Python distribution (such as WinPython), see Installing_WinPython
Using the Python Command Prompt, use pip to install the following:
pip install pyside
pip install configobj
pip install pyusb
pip install pyqtgraph
What is included in releases varies. If you get a message saying it is already installed you can simply continue with this tutorial.
- Linux:
Python should come pre-installed. If so you'll also need to install the following from your package manager:
- pyside
- configobj
- scipy
- numpy
For example the following shows the install command for Ubuntu:
sudo apt-get install python2.7 python2.7-dev python2.7-libs python-numpy python-scipy python-pyside python-configobj python-setuptools python-pip
Some packages may require installation via 'pip', as they are not always in your package manager repo:
$pip install pyusb
$pip install pyqtgraph
- Mac OS-X:
- Install homebrew, pyside, libusb, along with required Python modules.
- See MacOSX_Installation for full details.
Download and install ChipWhisperer
- Download the latest release linked from ChipWhisperer.com
- Unzip the file somewhere. Generally 'somewhere' will become your ChipWhisperer working directory. These examples assume you've chosen
C:\chipwhispereras your working directory. Open a Python terminal (again if using WinPython be sure to run the specific Python command prompt), and run the following, adjusting paths as needed to refelct your working directory:
cd c:\chipwhisperer\openadc\controlsw\python
python setup.py develop
cd c:\chipwhisperer\software
python setup.py develop
If you wish to confirm the installation worked, you can run ChipWhispererAnalyzer in the same terminal:
cd c:\chipwhisperer\software\chipwhisperer
python CWAnalyzer.pyw
- Connect ChipWhisperer-Lite, install USB Drivers:
- Windows:
- Plug micro-USB cable into ChipWhisperer-Lite
- If the "New Hardware Found" wizard doesn't prompt you for drivers, go to the control panel and find the "ChipWhisperer-Lite" device, and select "Update Drivers".
- You can find drivers in
c:\chipwhisperer\hardware\capture\chipwhisperer-lite\. You will likely need to extract them from thecwlite_usb_driver.zipfile. If so simply extract them somewhere (i.e. your desktop), and then point the new hardware found wizard to that location.
- Linux:
Driver installation is not required, but if you do not update the 'udev' system, you will be unable to run ChipWhisperer-Capture as a regular user. To update the udev system, first make sure the ChipWhisperer-Lite is Make a file called
/etc/udev/rules.d/99-cwlite.rules. The contents of this file should be:# allow users to claim the device SUBSYSTEM=="usb", ATTRS{idVendor}=="2b3e", ATTRS{idProduct}=="ace2", MODE="0664", GROUP="plugdev"Add your username to the plugdev group:
$ sudo usermod -a -G plugdev YOUR-USERNAME
And reset the udev system:
$ sudo udevadm control --reload-rules
- Finally log out & in again for the group change to take effect.
- Connect the micro-USB cable
- MAC:
- No special installation required - must ensure you have installed libusb via homebrew (see instructions at MacOSX_Installation).
Run ChipWhisperer-Capture. This can be done from one of three ways:
- Double-click on
CWCapture.pywin thechipwhisperer\softwarefolder. You must have installed Python into your path for this to work. - run
python CWCapture.pywfrom thechipwhisperer\softwarefolder using a command prompt with Python in the path. - run
python CWCaptureGUI.pyfrom thechipwhisperer\software\chipwhisperer\capture\uidirectory.
The last option is the most reliable, in that it should always work on all platforms. If it doesn't start look for possible missing modules or other useful errors.
hint
The first time you run ChipWhisperer-Capture or -Analyzer, the default setup of the screen is somewhat insane. You can drag windows around or close them to make it look more like the demos here. See the Video quickstart guide as well for details of that.
- Double-click on
From the "Scripts" directory, run the
ChipWhisperer-Lite: AES SimpleSerial on XMEGAscript: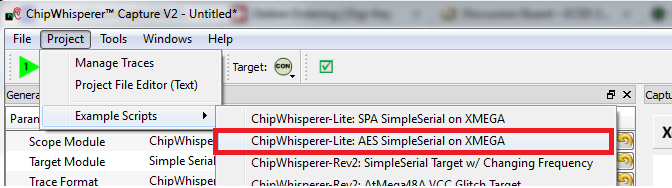
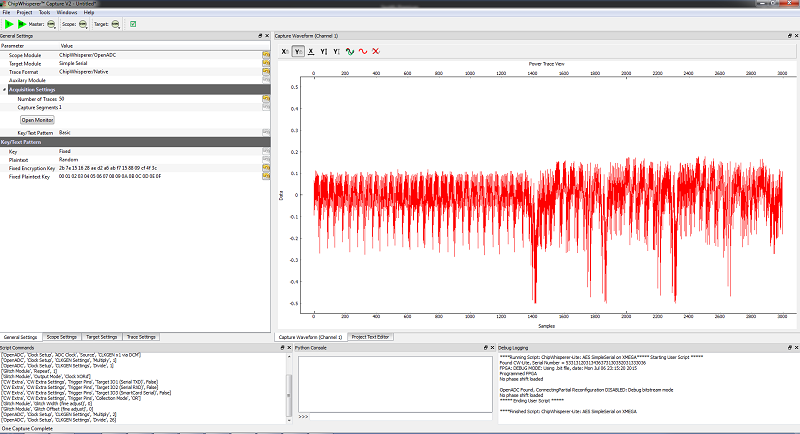
This should connect to the ChipWhisperer-Lite, program the FPGA, and run a few captures. Your screen should look something like this now:
If the previous step fails, you may need to set the path for the "firmware". This is done by going to the "Tools" menu and selecting the "Config CW Firmware" option. Note on MAC OS X a special command is required instead sometimes, see MacOSX_Installation.
From there, hit the "FIND" button beside the "FPGA .zip (Release)" option. Point it to the file located at
chipwhisperer/hardware/capture/chipwhisperer-lite/cwlite_firmware.zipon your filesystem.- Your ChipWhisperer-Lite is now connected. See the next section for details of the demo attack.


Capture and Attack Quickstart
- See Tutorial_B5_Breaking_AES_(Straightforward)for details. Note the hardware setup is slightly different -- but you can skip to step 5.5.3, and should be able to pick up from there. Be sure to use the
ChipWhisperer-Lite: AES SimpleSerial on XMEGAscript instead of the one referenced in step 5.5.3.
Important Bugs/Caveats
The following includes various things that might trip you up:
- If you save the project before running the capture, you can specify any directory. Traces will be copied to the appropriate location during capture.
- If you save the project after running the capture, you must save the project to the same directory that "default-data-dir" exists in. This is normally the folder from where you invoked the Python GUI.
- There are a few warnings/exceptions that come up (i.e. divide-by-zero). Generally just keep going and see if things are still working. A number of those are on the TODO list to fix but I didn't get around to it yet.
- The "Total Ops" window which checks for proper AES operation requires PyCrypto to be installed.
- By default the XMEGA device was programmed with a partial AES implementation only. This is done to avoid any crypto export issues. This does not affect your side-channel analysis, but be aware the returned value might not appear to be correct (since only the first couple rounds of AES occurred).