| As of August 2020 the site you are on (wiki.newae.com) is deprecated, and content is now at rtfm.newae.com. |
Difference between revisions of "Tutorial A6 Replication of Ilya Kizhvatov's XMEGA® Attack"
(→Building/Programming the XMEGA Target) |
|||
| (20 intermediate revisions by 2 users not shown) | |||
| Line 13: | Line 13: | ||
== Setting up the Hardware == | == Setting up the Hardware == | ||
| − | This tutorial | + | This tutorial can use either the [[CW1173_ChipWhisperer-Lite]], [[CW1200_ChipWhisperer-Pro]], or [[CW1002_ChipWhisperer_Capture_Rev2]] hardware along with the [[CW301_Multi-Target]] board. Note that you '''don't need hardware''' to complete the tutorial. Instead you can download [https://www.assembla.com/spaces/chipwhisperer/wiki/Example_Captures example traces from the ChipWhisperer Site], just look for the traces titled ''XMEGA: AES128 Hardware Accelerator (ChipWhisperer Tutorial #A6)''. |
| + | |||
| + | '''NOTE: The ChipWhisperer-Lite Target Board contains an XMEGA device, but this device DOES NOT contain the hardware crypto engine. Only the CW301 Multi-Target board contains an XMEGA with a hardware AES engine.''' | ||
This example uses the XMEGA Device. You can see instructions for programming in the [[Installing ChipWhisperer]] section, this tutorial assumes you have the programmer aspect working. | This example uses the XMEGA Device. You can see instructions for programming in the [[Installing ChipWhisperer]] section, this tutorial assumes you have the programmer aspect working. | ||
| − | The Multi-Target board should be plugged into the ChipWhisperer Capture | + | The Multi-Target board should be plugged into the ChipWhisperer Capture via the 20-pin target cable. The ''VOUT'' SMA connector is wired to the ''LNA'' input on the ChipWhisperer-Capture Rev2 front panel. The hardware setup is slightly different for the ChipWhisperer-Lite/Pro and older Capture-Rev2: |
| − | + | === Using ChipWhisperer-Lite / ChipWhisperer-Pro === | |
| + | |||
| + | # 20-Pin Header connects Multi-Target to Capture Hardware | ||
| + | # VOUT Connects to SMA Cable | ||
| + | # SMA Cable connects to 'LNA' on CHA input | ||
| + | |||
| + | Jumpers on the Multi-Target Victim board are as follows: | ||
| + | |||
| + | [[File:xmegajumpers_cwlite.jpg]] | ||
| + | |||
| + | # NO jumpers mounted in AVR Portion (JP1,JP4-6,JP28) or SmartCard Portion. Note if your multi-target board does not have JP28, the TRIG jumper for the AVR, you will have to remove the AVR from the socket. | ||
| + | # 3.3V IO Level (JP20 set to INT.) | ||
| + | # FPGAOUT is routed to XTAL1 pin of XMEGA (requires jumper wire to JP4/JP15). | ||
| + | # The 7.37 MHz oscillator is not connected (JP18) | ||
| + | # The TXD & RXD jumpers are set on the XMEGA portion (JP5, JP6) | ||
| + | # The TRIG jumper is set on the XMEGA portion (JP13) | ||
| + | # The PWR jumper is set on the XMEGA portion (JP14) | ||
| + | # Power measurement taken from VCC shunt (JP12) | ||
| + | |||
| + | === Using Capture Rev 2 === | ||
| + | |||
| + | # 20-Pin Header connects Multi-Target to Capture Hardware | ||
# VOUT Connects to SMA Cable | # VOUT Connects to SMA Cable | ||
# SMA Cable connects to 'LNA' on CHA input | # SMA Cable connects to 'LNA' on CHA input | ||
# USB-Mini connects to side (NB: Confirm jumper settings in next section first) | # USB-Mini connects to side (NB: Confirm jumper settings in next section first) | ||
| − | + | ||
Jumpers on the Multi-Target Victim board are as follows: | Jumpers on the Multi-Target Victim board are as follows: | ||
| − | + | [[File:xmegajumpers.jpg|image]] | |
# NO jumpers mounted in AVR Portion (JP1,JP4-6,JP28) or SmartCard Portion. Note if your multi-target board does not have JP28, the TRIG jumper for the AVR, you will have to remove the AVR from the socket. | # NO jumpers mounted in AVR Portion (JP1,JP4-6,JP28) or SmartCard Portion. Note if your multi-target board does not have JP28, the TRIG jumper for the AVR, you will have to remove the AVR from the socket. | ||
| Line 38: | Line 61: | ||
For more information on these jumper settings see the XMEGA section of [[CW301_Multi-Target]]. | For more information on these jumper settings see the XMEGA section of [[CW301_Multi-Target]]. | ||
| − | + | ||
=== Building/Programming the XMEGA Target === | === Building/Programming the XMEGA Target === | ||
| + | |||
| + | Once you have one of the above setups working, you need to program the device. We'll first double-check the communication using our classic software AES, then enable the hardware crypto module. | ||
As described in [[Installing ChipWhisperer]], you'll need to configure the AVR-GCC compiler. Assuming you have this setup, you can run <code>make</code> in the directory <code>chipwhisperer\hardware\victims\firmware\simpleserial-aes</code>. Before doing that, edit the <code>makefile</code> to select the CW301 XMEGA target. This is done by uncommenting the "CW301_XMEGA" platform define as follows: | As described in [[Installing ChipWhisperer]], you'll need to configure the AVR-GCC compiler. Assuming you have this setup, you can run <code>make</code> in the directory <code>chipwhisperer\hardware\victims\firmware\simpleserial-aes</code>. Before doing that, edit the <code>makefile</code> to select the CW301 XMEGA target. This is done by uncommenting the "CW301_XMEGA" platform define as follows: | ||
| Line 60: | Line 85: | ||
AVR Memory Usage | AVR Memory Usage | ||
---------------- | ---------------- | ||
| − | Device: | + | Device: atxmega16a4 |
Program: 3100 bytes (2.2% Full) | Program: 3100 bytes (2.2% Full) | ||
| Line 73: | Line 98: | ||
-------- end --------</pre> | -------- end --------</pre> | ||
| − | Using | + | Using the XMEGA Programmer, program the XMega16A4 device (it is connected to the programmer built into the ChipWhisperer) with the resulting simpleserial.hex file. |
| − | === | + | === Capturing Traces === |
| − | + | ==== CW-Capture Lite/Pro Specific Setup ==== | |
| − | + | ||
| − | + | ||
| − | + | The following are specific instructions only for the ChipWhisperer-Lite or -Pro: | |
| − | + | ||
| − | + | # From the Project menu select the Example Scripts and then ChipWhisperer-Lite: AES SimpleSerial on XMEGA | |
| − | + | # This should connect to the target board & run a few encryptions. You should check the "Encryption Status Manager" along with viewing the resulting power measurement. | |
| − | + | # Jump to the generic instructions (skip the CWC-Rev2 instructions next). | |
| − | + | ||
| − | < | + | ==== CW-Capture Rev2 Specific Setup ==== |
| − | + | ||
| − | + | The following are specific instructions only for the ChipWhisperer-Capture Rev 2: | |
| − | + | ||
| − | + | #From the ''Project'' menu select the ''Example Scripts'' and then ''ChipWhisperer-Rev2: SimpleSerial Target'' | |
| − | + | #: [[File:runscript.png|image]] | |
| − | + | #The script will automatically connect to the capture hardware and run 2 example traces. They will not yet work on the XMega as additional setup is required. You must switch the RX/TX pins: | |
| − | + | #:[[File:xmegarxtx.png|image]] | |
| − | + | #Run a 'Capture 1', you should confirm the encryption algorithm is working: | |
| − | + | #:[[File:capture1_working.png|image]] | |
| − | + | #Jump to the generic capture instructions (next) | |
| − | + | ||
| − | + | ==== Trace Capture Instructions ==== | |
| − | + | ||
| + | #Switch from software to hardware crypto. To do this you'll have to change the <code>makefile</code> for the project. | ||
| + | #: In the makefile, add a define for <code>HWCRYPTO=1</code>: | ||
| + | <pre>#Multi-Target Board, XMEGA Device | ||
| + | PLATFORM = CW301_XMEGA | ||
| + | #Optional - use hardware crypto | ||
| + | CDEFS += -DHWCRYPTO=1</pre> | ||
| + | #Build a new hex-file, and program the file in. | ||
| + | #Run a few 'capture 1' traces, and confirm (using the Encryption Status Manager) that the encryption was successful. | ||
| + | #Finally, set the offset to 1500, and number of samples to only 1000: | ||
| + | #:[[File:slength.png|image]] | ||
| + | #Confirm you now get something like this with a 'capture 1': | ||
| + | #:[[File:capture1_fullworking.png|image]] | ||
| + | |||
| + | To complete the tutorial, follow these steps: | ||
| + | #Switch to the ''General Settings'' tab | ||
| + | #Change the number of traces to 3000. | ||
| + | #Hit the ''Capture Many'' button (M in a green triangle) to start the capture process. | ||
| + | #You will see each new trace plotted in the waveform display. | ||
| + | #Wait until the capture is complete. | ||
| + | #Finally save this project using the ''File --> Save Project'' option, give it any name you want. | ||
== Analyzing of Power Traces == | == Analyzing of Power Traces == | ||
| Line 122: | Line 167: | ||
<blockquote><p>'''warning'''</p> | <blockquote><p>'''warning'''</p> | ||
<dl> | <dl> | ||
| − | <dt>The API calling parameters changed | + | <dt>The API calling parameters changed a number of times. If using version 0.10 or older, either see the documentation that</dt> |
| − | <dd><p>is present in the 'doc' directory (which will always correspond to your release), or see Appendix B for the full attack script.</p></dd></dl> | + | <dd><p>is present in the 'doc' directory (which will always correspond to your release), or see Appendix B-2/B-1 for the full attack script.</p></dd></dl> |
</blockquote> | </blockquote> | ||
<p>The following defines the required functions to implement, you should refer to the academic paper for details of the correlation model:</p> | <p>The following defines the required functions to implement, you should refer to the academic paper for details of the correlation model:</p> | ||
| Line 153: | Line 198: | ||
<pre>self.attack.setPointRange((0,996)) | <pre>self.attack.setPointRange((0,996)) | ||
self.attack.setAbsoluteMode(False) | self.attack.setAbsoluteMode(False) | ||
| − | + | </pre></li> | |
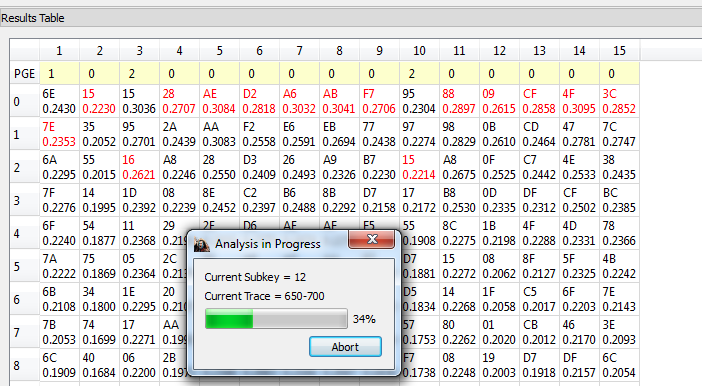
<li><p>Run ''Start Attack'' as before! Wait for the attack to complete, which should show the key (except for the first byte) being recovered:</p> | <li><p>Run ''Start Attack'' as before! Wait for the attack to complete, which should show the key (except for the first byte) being recovered:</p> | ||
<p>[[File:analysisrunning.png|image]]</p></li> | <p>[[File:analysisrunning.png|image]]</p></li> | ||
| Line 162: | Line 207: | ||
<p>You can also use the 'GUI Override' on the byte highlighting to change the highlighted byte.</p></li></ol> | <p>You can also use the 'GUI Override' on the byte highlighting to change the highlighted byte.</p></li></ol> | ||
| − | == Appendix A: Full Attack Script == | + | == Appendix A: Full Attack Script for Current Release == |
| − | Here is the full attack script for | + | <pre> |
| + | # Based on Ilya Kizhvatov's work, published as "Side Channel Analysis of AVR XMEGA Crypto Engine" | ||
| + | from chipwhisperer.common.api.CWCoreAPI import CWCoreAPI | ||
| + | from chipwhisperer.common.scripts.base import UserScriptBase | ||
| + | # Imports from Preprocessing | ||
| + | import chipwhisperer.analyzer.preprocessing as preprocessing | ||
| + | # Imports from Attack | ||
| + | from chipwhisperer.analyzer.attacks.cpa import CPA | ||
| + | from chipwhisperer.analyzer.attacks.cpa_algorithms.progressive import CPAProgressive | ||
| + | import chipwhisperer.analyzer.attacks.models.AES128_8bit | ||
| + | # Imports from utilList | ||
| + | from chipwhisperer.analyzer.attacks.models.AES128_8bit import getHW | ||
| + | |||
| + | class AESXMega(object): | ||
| + | numSubKeys = 16 | ||
| + | |||
| + | @staticmethod | ||
| + | def leakage(pt, ct, guess, bnum, setting, state): | ||
| + | #In real life would recover this one at a time, in our case we know entire full key, so we cheat to make | ||
| + | #the iterations easier | ||
| + | knownkey = [0x2b, 0x7e, 0x15, 0x16, 0x28, 0xae, 0xd2, 0xa6, 0xab, 0xf7, 0x15, 0x88, 0x09, 0xcf, 0x4f, 0x3c] | ||
| + | |||
| + | s1 = pt[bnum-1] ^ knownkey[bnum-1] | ||
| + | s2 = pt[bnum] ^ guess | ||
| + | |||
| + | #We subtract 8 as way measurements are taken a higher current results in a lower voltage. Normally this | ||
| + | #doesn't matter due to use of absolute values. In this attack we do not use absolute mode, so we simply | ||
| + | #"flip" the expected hamming weight, which results in the correlation changing signs. | ||
| + | return 8-getHW(s1 ^ s2) | ||
| + | |||
| + | class UserScript(UserScriptBase): | ||
| + | name = "Auto-generated" | ||
| + | description = "Auto-generated Attack Script" | ||
| + | def __init__(self, api): | ||
| + | UserScriptBase.__init__(self, api) | ||
| + | self.initProject() | ||
| + | self.initPreprocessing() | ||
| + | self.initAnalysis() | ||
| + | self.initReporting() | ||
| + | |||
| + | def initProject(self): | ||
| + | pass | ||
| + | |||
| + | def initPreprocessing(self): | ||
| + | self.traces = self.api.project().traceManager() | ||
| + | |||
| + | def initAnalysis(self): | ||
| + | self.attack = CPA() | ||
| + | self.attack.setTraceSource(self.traces, blockSignal=True) | ||
| + | self.attack.setAnalysisAlgorithm(CPAProgressive,AESXMega,None) | ||
| + | self.attack.setTraceStart(0) | ||
| + | self.attack.setTracesPerAttack(3000) | ||
| + | self.attack.setIterations(1) | ||
| + | self.attack.setReportingInterval(50) | ||
| + | self.attack.setTargetBytes([1, 2, 3, 4, 5, 6, 7, 8, 9, 10, 11, 12, 13, 14, 15]) | ||
| + | self.attack.setPointRange((0,995)) | ||
| + | self.attack.setAbsoluteMode(False) | ||
| + | |||
| + | def initReporting(self): | ||
| + | # Configures the attack observers (usually a set of GUI widgets) | ||
| + | self.api.getResults("Attack Settings").setAnalysisSource(self.attack) | ||
| + | self.api.getResults("Correlation vs Traces in Attack").setAnalysisSource(self.attack) | ||
| + | self.api.getResults("Output vs Point Plot").setAnalysisSource(self.attack) | ||
| + | self.api.getResults("PGE vs Trace Plot").setAnalysisSource(self.attack) | ||
| + | self.api.getResults("Results Table").setAnalysisSource(self.attack) | ||
| + | self.api.getResults("Save to Files").setAnalysisSource(self.attack) | ||
| + | self.api.getResults("Trace Output Plot").setTraceSource(self.traces) | ||
| + | self.api.getResults("Trace Recorder").setTraceSource(self.traces) | ||
| + | |||
| + | def run(self): | ||
| + | self.attack.processTraces() | ||
| + | |||
| + | if __name__ == '__main__': | ||
| + | import chipwhisperer.analyzer.ui.CWAnalyzerGUI as cwa | ||
| + | from chipwhisperer.common.utils.parameter import Parameter | ||
| + | Parameter.usePyQtGraph = True # Comment if you don't need the GUI | ||
| + | api = CWCoreAPI() # Instantiate the API | ||
| + | app = cwa.makeApplication("Analyzer") # Comment if you don't need the GUI | ||
| + | gui = cwa.CWAnalyzerGUI(api) # Comment if you don't need the GUI | ||
| + | gui.show() # Comment if you don't need the GUI | ||
| + | api.runScriptClass(UserScript) # Run UserScript through the API | ||
| + | app.exec_() # Comment if you don't need the GUI | ||
| + | </pre> | ||
| + | |||
| + | == Appendix B-1: Full Attack Script for older (< 3.1.x) == | ||
| + | |||
| + | Here is the full attack script for older releases - '''DO NOT attempt to use with a current release (3.1.8 or later)'''. | ||
<pre># Based on Ilya Kizhvatov's work, published as "Side Channel Analysis of AVR XMEGA Crypto Engine" | <pre># Based on Ilya Kizhvatov's work, published as "Side Channel Analysis of AVR XMEGA Crypto Engine" | ||
| Line 223: | Line 354: | ||
def doAnalysis(self): | def doAnalysis(self): | ||
self.attack.doAttack()</pre> | self.attack.doAttack()</pre> | ||
| − | |||
| − | Here is the full attack script: | + | == Appendix B-2: Full Attack Script for 0.09 or Older Releases == |
| + | |||
| + | Here is the full attack script for VERY old releases: | ||
<pre># Based on Ilya Kizhvatov's work, published as "Side Channel Analysis of AVR XMEGA Crypto Engine" | <pre># Based on Ilya Kizhvatov's work, published as "Side Channel Analysis of AVR XMEGA Crypto Engine" | ||
| Line 294: | Line 426: | ||
def doAnalysis(self): | def doAnalysis(self): | ||
self.attack.doAttack()</pre> | self.attack.doAttack()</pre> | ||
| + | |||
== Disclaimers == | == Disclaimers == | ||
Atmel and XMEGA are registered trademarks or trademarks of Atmel Corporation or its subsidiaries, in the US and/or other countries. | Atmel and XMEGA are registered trademarks or trademarks of Atmel Corporation or its subsidiaries, in the US and/or other countries. | ||
| + | |||
| + | == Links == | ||
{{Template:Tutorials}} | {{Template:Tutorials}} | ||
| + | [[Category:Tutorials]] | ||
Latest revision as of 10:50, 1 May 2018
This tutorial will demonstrate how the ChipWhisperer system can be used to replicate published academic research findings. In this case we will attempt to recreate an attack published by Dr. Ilya Kizhvatov, which was performed against the AES implementation in the Atmel® XMEGA® device.
If using hardware-accelerated cryptography in your design, it is useful to understand possible vulnerabilities to side-channel power analysis attacks. It must be strongly cautioned that there are many published attacks against other hardware crypto accelerators: the XMEGA® device is likely about as secure as any other general-purpose hardware crypto accelerator (i.e. one without explicit side-channel resistance).
Within the Atmel® product line some devices do mention side-channel analysis resistance. Thus when designing an embedded product, it's up to the designer to understand why they should care about side-channel analysis resistance, and to select an appropriate device if they need to defend against such an attack.
Contents
Background
As a reference, you will need a copy of Dr. Kizhvatov's paper entitled "Side Channel Analysis of AVR XMEGA Crypto Engine", published in the Proceedings of the 4th Workshop on Embedded Systems Security. If you have access to the ACM Digital Library (most likely because you are part of a university), you can read this paper on the ACM Digital Library.
Otherwise, you can read this paper as part of Chapter 4 of Dr. Kizhvatov's PhD Thesis, starting around page 77 of that PDF file.
Setting up the Hardware
This tutorial can use either the CW1173_ChipWhisperer-Lite, CW1200_ChipWhisperer-Pro, or CW1002_ChipWhisperer_Capture_Rev2 hardware along with the CW301_Multi-Target board. Note that you don't need hardware to complete the tutorial. Instead you can download example traces from the ChipWhisperer Site, just look for the traces titled XMEGA: AES128 Hardware Accelerator (ChipWhisperer Tutorial #A6).
NOTE: The ChipWhisperer-Lite Target Board contains an XMEGA device, but this device DOES NOT contain the hardware crypto engine. Only the CW301 Multi-Target board contains an XMEGA with a hardware AES engine.
This example uses the XMEGA Device. You can see instructions for programming in the Installing ChipWhisperer section, this tutorial assumes you have the programmer aspect working.
The Multi-Target board should be plugged into the ChipWhisperer Capture via the 20-pin target cable. The VOUT SMA connector is wired to the LNA input on the ChipWhisperer-Capture Rev2 front panel. The hardware setup is slightly different for the ChipWhisperer-Lite/Pro and older Capture-Rev2:
Using ChipWhisperer-Lite / ChipWhisperer-Pro
- 20-Pin Header connects Multi-Target to Capture Hardware
- VOUT Connects to SMA Cable
- SMA Cable connects to 'LNA' on CHA input
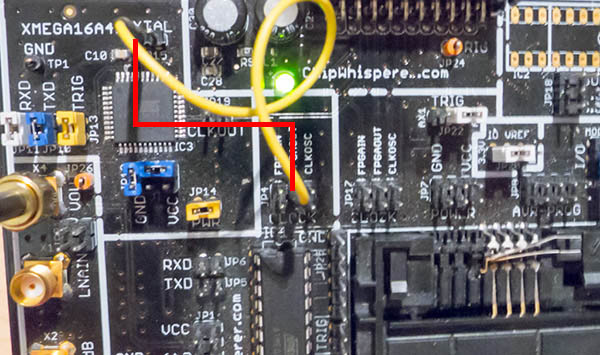
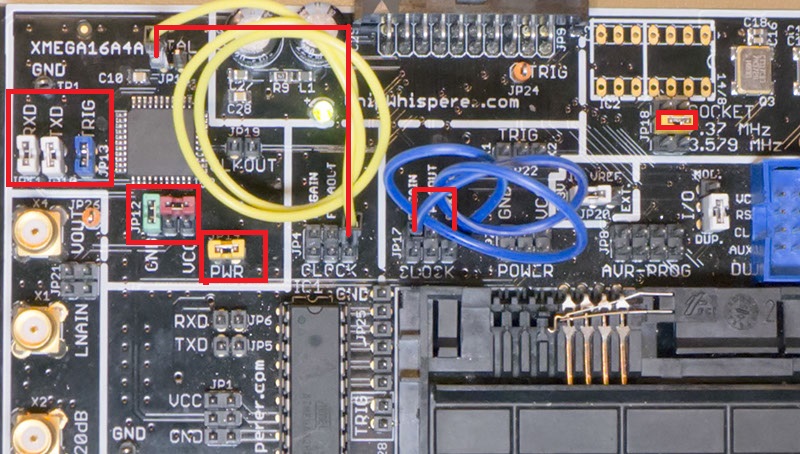
Jumpers on the Multi-Target Victim board are as follows:
- NO jumpers mounted in AVR Portion (JP1,JP4-6,JP28) or SmartCard Portion. Note if your multi-target board does not have JP28, the TRIG jumper for the AVR, you will have to remove the AVR from the socket.
- 3.3V IO Level (JP20 set to INT.)
- FPGAOUT is routed to XTAL1 pin of XMEGA (requires jumper wire to JP4/JP15).
- The 7.37 MHz oscillator is not connected (JP18)
- The TXD & RXD jumpers are set on the XMEGA portion (JP5, JP6)
- The TRIG jumper is set on the XMEGA portion (JP13)
- The PWR jumper is set on the XMEGA portion (JP14)
- Power measurement taken from VCC shunt (JP12)
Using Capture Rev 2
- 20-Pin Header connects Multi-Target to Capture Hardware
- VOUT Connects to SMA Cable
- SMA Cable connects to 'LNA' on CHA input
- USB-Mini connects to side (NB: Confirm jumper settings in next section first)
Jumpers on the Multi-Target Victim board are as follows:
- NO jumpers mounted in AVR Portion (JP1,JP4-6,JP28) or SmartCard Portion. Note if your multi-target board does not have JP28, the TRIG jumper for the AVR, you will have to remove the AVR from the socket.
- 3.3V IO Level (JP20 set to INT.)
- The 7.37 MHz oscillator is selected as the CLKOSC source (JP18)
- The CLKOSC is routed to the FPGAIN pin (requires jumper wire on JP17), along with routed to XTAL1 pin of XMEGA (requires jumper wire to JP4/JP15).
- The TXD & RXD jumpers are set on the XMEGA portion (JP5, JP6)
- The TRIG jumper is set on the XMEGA portion (JP13)
- The PWR jumper is set on the XMEGA portion (JP14)
- Power measurement taken from VCC shunt (JP12)
For more information on these jumper settings see the XMEGA section of CW301_Multi-Target.
Building/Programming the XMEGA Target
Once you have one of the above setups working, you need to program the device. We'll first double-check the communication using our classic software AES, then enable the hardware crypto module.
As described in Installing ChipWhisperer, you'll need to configure the AVR-GCC compiler. Assuming you have this setup, you can run make in the directory chipwhisperer\hardware\victims\firmware\simpleserial-aes. Before doing that, edit the makefile to select the CW301 XMEGA target. This is done by uncommenting the "CW301_XMEGA" platform define as follows:
#Multi-Target Board, AVR Device (ATMega328P)
#PLATFORM = CW301_AVR

#Multi-Target Board, XMEGA Device
PLATFORM = CW301_XMEGA

#CW-Lite XMEGA Target Device (XMEGA128D4)
#PLATFORM = CW303

#NOTDUINO Kit (ATMega328P)
#PLATFORM = CW304
Running
makeshould give you an output indicating the Multi-Target board was used:
Size after:
AVR Memory Usage
----------------
Device: atxmega16a4

Program:    3100 bytes (2.2% Full)
(.text + .data + .bootloader)

Data:        352 bytes (4.3% Full)
(.data + .bss + .noinit)


Built for platform Multi-Target Board, XMEGA Target

-------- end --------
Using the XMEGA Programmer, program the XMega16A4 device (it is connected to the programmer built into the ChipWhisperer) with the resulting simpleserial.hex file.
Capturing Traces
CW-Capture Lite/Pro Specific Setup
The following are specific instructions only for the ChipWhisperer-Lite or -Pro:
- From the Project menu select the Example Scripts and then ChipWhisperer-Lite: AES SimpleSerial on XMEGA
- This should connect to the target board & run a few encryptions. You should check the "Encryption Status Manager" along with viewing the resulting power measurement.
- Jump to the generic instructions (skip the CWC-Rev2 instructions next).
CW-Capture Rev2 Specific Setup
The following are specific instructions only for the ChipWhisperer-Capture Rev 2:
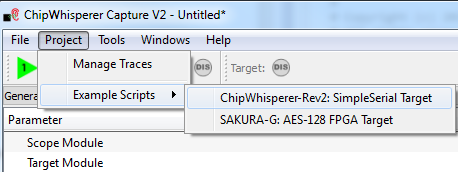
- From the Project menu select the Example Scripts and then ChipWhisperer-Rev2: SimpleSerial Target
- The script will automatically connect to the capture hardware and run 2 example traces. They will not yet work on the XMega as additional setup is required. You must switch the RX/TX pins:
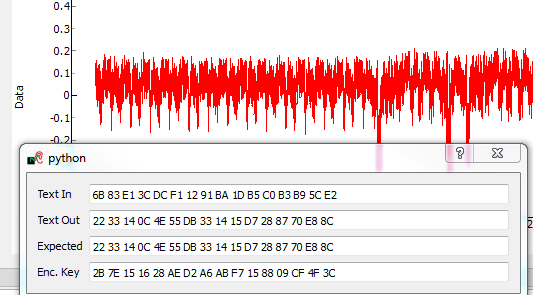
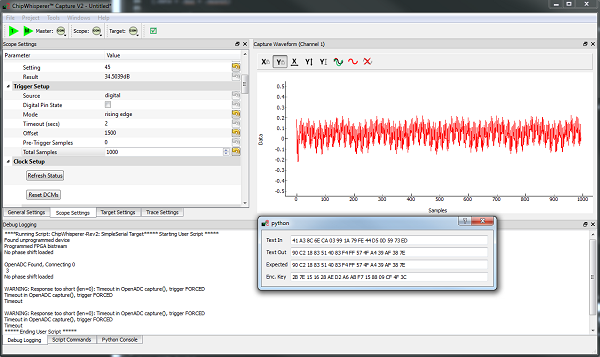
- Run a 'Capture 1', you should confirm the encryption algorithm is working:
- Jump to the generic capture instructions (next)
Trace Capture Instructions
- Switch from software to hardware crypto. To do this you'll have to change the
makefilefor the project.- In the makefile, add a define for
HWCRYPTO=1:
- In the makefile, add a define for
#Multi-Target Board, XMEGA Device
PLATFORM = CW301_XMEGA
#Optional - use hardware crypto
CDEFS += -DHWCRYPTO=1
- Build a new hex-file, and program the file in.
- Run a few 'capture 1' traces, and confirm (using the Encryption Status Manager) that the encryption was successful.
- Finally, set the offset to 1500, and number of samples to only 1000:
- Confirm you now get something like this with a 'capture 1':
To complete the tutorial, follow these steps:
- Switch to the General Settings tab
- Change the number of traces to 3000.
- Hit the Capture Many button (M in a green triangle) to start the capture process.
- You will see each new trace plotted in the waveform display.
- Wait until the capture is complete.
- Finally save this project using the File --> Save Project option, give it any name you want.
Analyzing of Power Traces
As in the Tutorial A5 Breaking AES-256 Bootloader tutorial, we will be using the Python script file to override the provided HW model. This will allow us to implement the model given by Kizhvatov for performing the CPA attack.
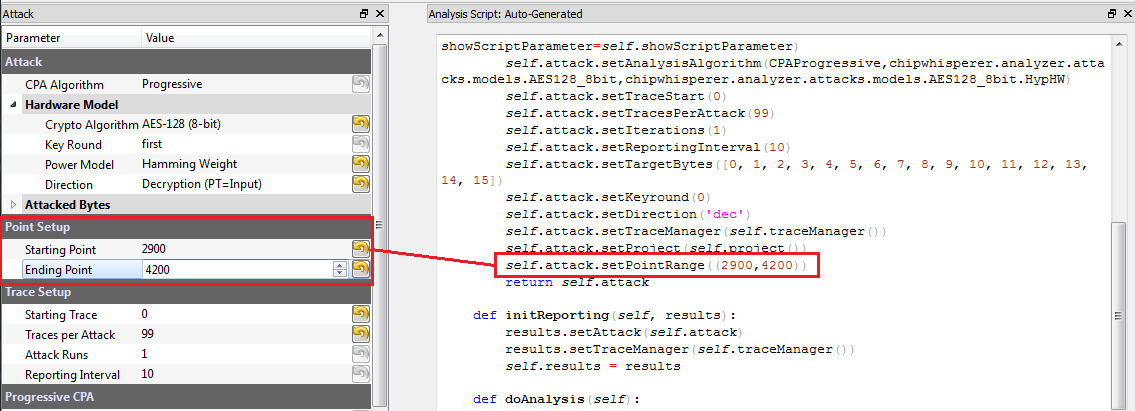
Remember that when you change settings in the GUI, the system is actually just automatically adjusting the attack script. You could modify the attack script directly instead of changing GUI settings. Every time you touch the GUI the autogenerated script is overwritten however, so it would be easy to lose your changes. As an example here is how setting the point range maps to an API call:
We will first automatically configure a script, and then use that as the base for our full attack.
- Open the Analyzer software
- From the File --> Open Project option, navigate to the .cwp file containing the capture of the power usage. This can be either the aes128_xmega_hardware.cwp file downloaded, or the capture you performed.
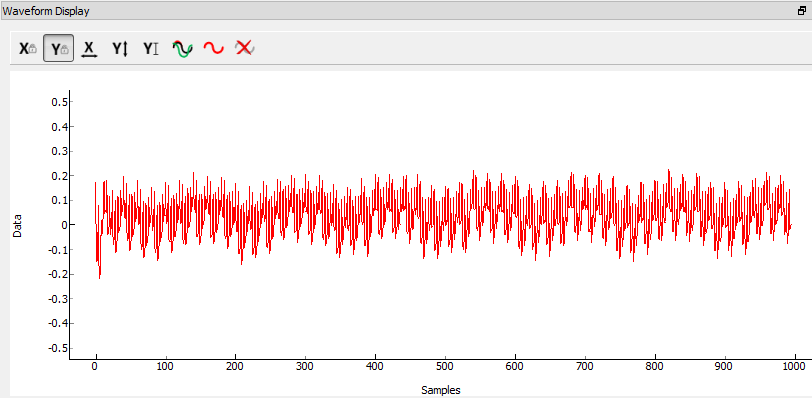
View the trace data as before, which should look something like this:
- Set the 'Reporting Interval' to 50 or 100. We can change this later through the script.
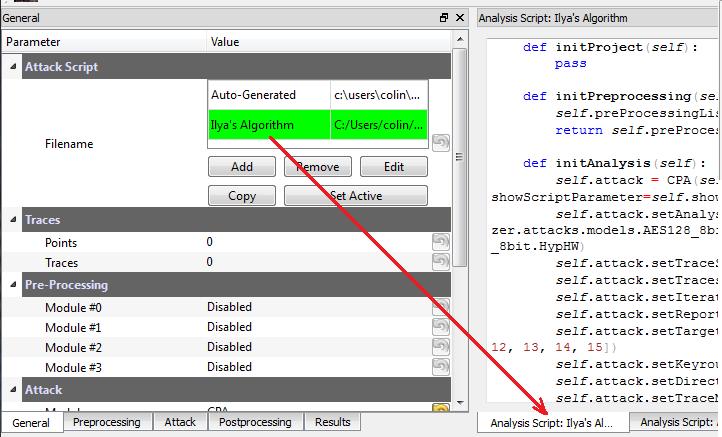
We are now ready to insert the custom data into the attack module. On the General tab, make a copy of the auto-generated script. Do so by clicking on the autogenerated row, hit Copy, save the file somewhere. Double-click on the description of the new file and give it a better name. Finally hit Set Active after clicking on your new file. The result should look like this:
You can now edit the custom script file using the built-in editor OR with an external editor. In this example the file would be
C:\Users\Colin\AppData\Local\Temp\cw_testilya.py.warning
- The API calling parameters changed a number of times. If using version 0.10 or older, either see the documentation that
is present in the 'doc' directory (which will always correspond to your release), or see Appendix B-2/B-1 for the full attack script.
The following defines the required functions to implement, you should refer to the academic paper for details of the correlation model:
# Imports from chipwhisperer.analyzer.attacks.models.AES128_8bit import getHW class AESXMega(object): numSubKeys = 16 @staticmethod def leakage(pt, ct, guess, bnum, setting, state): #In real life would recover this one at a time, in our case we know entire full key, so we cheat to make #the iterations easier knownkey = [0x2b, 0x7e, 0x15, 0x16, 0x28, 0xae, 0xd2, 0xa6, 0xab, 0xf7, 0x15, 0x88, 0x09, 0xcf, 0x4f, 0x3c] s1 = pt[bnum-1] ^ knownkey[bnum-1] s2 = pt[bnum] ^ guess #We subtract 8 as way measurements are taken a higher current results in a lower voltage. Normally this #doesn't matter due to use of absolute values. In this attack we do not use absolute mode, so we simply #"flip" the expected hamming weight, which results in the correlation changing signs. return 8-getHW(s1 ^ s2)- Add the above function to your custom script file.
Change the
setAnalysisAlgorithmto use your custom functions by making the following call, see the full script in the Appendix:self.attack.setAnalysisAlgorithm(CPAProgressive,AESXMega,None)
Adjust the attack bytes to NOT attack the first byte, as our hacked script will not work with it:
self.attack.setTargetBytes([1, 2, 3, 4, 5, 6, 7, 8, 9, 10, 11, 12, 13, 14, 15])
We want to disable 'absolute mode', where by default the absolute value of the CPA attack is taken. We can do this by adding a call to self.attack.setAbsoluteMode(False) before the return statement, for example:
self.attack.setPointRange((0,996))
self.attack.setAbsoluteMode(False)
Run Start Attack as before! Wait for the attack to complete, which should show the key (except for the first byte) being recovered:
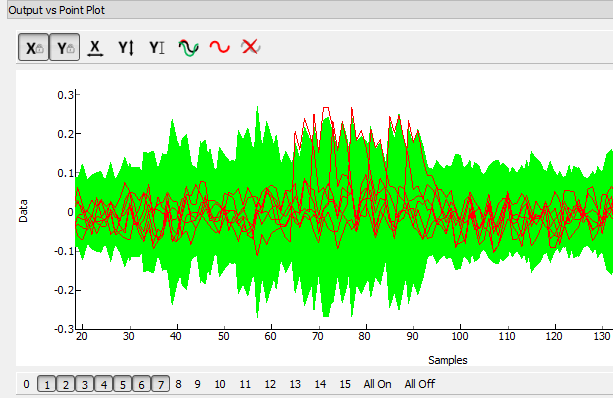
At this point you can also look at the output values, which one can compare to the shape of the values published in the paper:
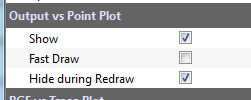
For more detailed plotting, turn off the 'Fast Draw' option:
You can also use the 'GUI Override' on the byte highlighting to change the highlighted byte.
Appendix A: Full Attack Script for Current Release
# Based on Ilya Kizhvatov's work, published as "Side Channel Analysis of AVR XMEGA Crypto Engine"
from chipwhisperer.common.api.CWCoreAPI import CWCoreAPI
from chipwhisperer.common.scripts.base import UserScriptBase
# Imports from Preprocessing
import chipwhisperer.analyzer.preprocessing as preprocessing
# Imports from Attack
from chipwhisperer.analyzer.attacks.cpa import CPA
from chipwhisperer.analyzer.attacks.cpa_algorithms.progressive import CPAProgressive
import chipwhisperer.analyzer.attacks.models.AES128_8bit
# Imports from utilList
from chipwhisperer.analyzer.attacks.models.AES128_8bit import getHW

class AESXMega(object):
    numSubKeys = 16

    @staticmethod
    def leakage(pt, ct, guess, bnum, setting, state):
        #In real life would recover this one at a time, in our case we know entire full key, so we cheat to make
        #the iterations easier
        knownkey = [0x2b, 0x7e, 0x15, 0x16, 0x28, 0xae, 0xd2, 0xa6, 0xab, 0xf7, 0x15, 0x88, 0x09, 0xcf, 0x4f, 0x3c]

        s1 = pt[bnum-1] ^ knownkey[bnum-1]
        s2 = pt[bnum] ^ guess

        #We subtract 8 as way measurements are taken a higher current results in a lower voltage. Normally this
        #doesn't matter due to use of absolute values. In this attack we do not use absolute mode, so we simply
        #"flip" the expected hamming weight, which results in the correlation changing signs.
        return 8-getHW(s1 ^ s2)

class UserScript(UserScriptBase):
    name = "Auto-generated"
    description = "Auto-generated Attack Script"
    def __init__(self, api):
        UserScriptBase.__init__(self, api)
        self.initProject()
        self.initPreprocessing()
        self.initAnalysis()
        self.initReporting()

    def initProject(self):
        pass

    def initPreprocessing(self):
        self.traces = self.api.project().traceManager()

    def initAnalysis(self):
        self.attack = CPA()
        self.attack.setTraceSource(self.traces, blockSignal=True)
        self.attack.setAnalysisAlgorithm(CPAProgressive,AESXMega,None)
        self.attack.setTraceStart(0)
        self.attack.setTracesPerAttack(3000)
        self.attack.setIterations(1)
        self.attack.setReportingInterval(50)
        self.attack.setTargetBytes([1, 2, 3, 4, 5, 6, 7, 8, 9, 10, 11, 12, 13, 14, 15])
        self.attack.setPointRange((0,995))
        self.attack.setAbsoluteMode(False)

    def initReporting(self):
        # Configures the attack observers (usually a set of GUI widgets)
        self.api.getResults("Attack Settings").setAnalysisSource(self.attack)
        self.api.getResults("Correlation vs Traces in Attack").setAnalysisSource(self.attack)
        self.api.getResults("Output vs Point Plot").setAnalysisSource(self.attack)
        self.api.getResults("PGE vs Trace Plot").setAnalysisSource(self.attack)
        self.api.getResults("Results Table").setAnalysisSource(self.attack)
        self.api.getResults("Save to Files").setAnalysisSource(self.attack)
        self.api.getResults("Trace Output Plot").setTraceSource(self.traces)
        self.api.getResults("Trace Recorder").setTraceSource(self.traces)

    def run(self):
        self.attack.processTraces()

if __name__ == '__main__':
    import chipwhisperer.analyzer.ui.CWAnalyzerGUI as cwa
    from chipwhisperer.common.utils.parameter import Parameter
    Parameter.usePyQtGraph = True            # Comment if you don't need the GUI
    api = CWCoreAPI()                        # Instantiate the API
    app = cwa.makeApplication("Analyzer")    # Comment if you don't need the GUI
    gui = cwa.CWAnalyzerGUI(api)             # Comment if you don't need the GUI
    gui.show()                               # Comment if you don't need the GUI
    api.runScriptClass(UserScript)           # Run UserScript through the API
    app.exec_()                              # Comment if you don't need the GUI
Appendix B-1: Full Attack Script for older (< 3.1.x)
Here is the full attack script for older releases - DO NOT attempt to use with a current release (3.1.8 or later).
# Based on Ilya Kizhvatov's work, published as "Side Channel Analysis of AVR XMEGA Crypto Engine"
from chipwhisperer.common.autoscript import AutoScriptBase
#Imports from Preprocessing
import chipwhisperer.analyzer.preprocessing as preprocessing
#Imports from Capture
from chipwhisperer.analyzer.attacks.CPA import CPA
from chipwhisperer.analyzer.attacks.CPAProgressive import CPAProgressive
import chipwhisperer.analyzer.attacks.models.AES128_8bit
# Imports
from chipwhisperer.analyzer.attacks.models.AES128_8bit import getHW

class AESXMega(object):
    numSubKeys = 16

    @staticmethod
    def leakage(pt, ct, guess, bnum, setting, state):
        #In real life would recover this one at a time, in our case we know entire full key, so we cheat to make
        #the iterations easier
        knownkey = [0x2b, 0x7e, 0x15, 0x16, 0x28, 0xae, 0xd2, 0xa6, 0xab, 0xf7, 0x15, 0x88, 0x09, 0xcf, 0x4f, 0x3c]

        s1 = pt[bnum-1] ^ knownkey[bnum-1]
        s2 = pt[bnum] ^ guess

        #We subtract 8 as way measurements are taken a higher current results in a lower voltage. Normally this
        #doesn't matter due to use of absolute values. In this attack we do not use absolute mode, so we simply
        #"flip" the expected hamming weight, which results in the correlation changing signs.
        return 8-getHW(s1 ^ s2)

class userScript(AutoScriptBase):
    preProcessingList = []
    def initProject(self):
        pass

    def initPreprocessing(self):
        self.preProcessingList = []
        return self.preProcessingList

    def initAnalysis(self):
        self.attack = CPA(self.parent, console=self.console, showScriptParameter=self.showScriptParameter)
        self.attack.setAnalysisAlgorithm(CPAProgressive,AESXMega,None)
        self.attack.setTraceStart(0)
        self.attack.setTracesPerAttack(2999)
        self.attack.setIterations(1)
        self.attack.setReportingInterval(500)
        self.attack.setTargetBytes([0, 1, 2, 3, 4, 5, 6, 7, 8, 9, 10, 11, 12, 13, 14, 15])
        self.attack.setTraceManager(self.traceManager())
        self.attack.setProject(self.project())
        self.attack.setPointRange((0,996))
        return self.attack

    def initReporting(self, results):
        results.setAttack(self.attack)
        results.setTraceManager(self.traceManager())
        self.results = results

    def doAnalysis(self):
        self.attack.doAttack()
Appendix B-2: Full Attack Script for 0.09 or Older Releases
Here is the full attack script for VERY old releases:
# Based on Ilya Kizhvatov's work, published as "Side Channel Analysis of AVR XMEGA Crypto Engine"
from chipwhisperer.common.autoscript import AutoScriptBase
#Imports from Preprocessing
import chipwhisperer.analyzer.preprocessing as preprocessing
#Imports from Capture
from chipwhisperer.analyzer.attacks.CPA import CPA
from chipwhisperer.analyzer.attacks.CPAProgressive import CPAProgressive
import chipwhisperer.analyzer.attacks.models.AES128_8bit
#Imports from utilList

# Imports
from chipwhisperer.analyzer.attacks.models.AES128_8bit import getHW

def AES128_HD_ILYA(pt, ct, key, bnum):
    """Given either plaintext or ciphertext (not both) + a key guess, return hypothetical hamming weight of result"""

    #In real life would recover this one at a time, in our case we know entire full key, so we cheat to make
    #the iterations easier
    knownkey = [0x2b, 0x7e, 0x15, 0x16, 0x28, 0xae, 0xd2, 0xa6, 0xab, 0xf7, 0x15, 0x88, 0x09, 0xcf, 0x4f, 0x3c]

    if pt != None:
        s1 = pt[bnum-1] ^ knownkey[bnum-1]
        s2 = pt[bnum] ^ key

        #We subtract 8 as way measurements are taken a higher current results in a lower voltage. Normally this
        #doesn't matter due to use of absolute values. In this attack we do not use absolute mode, so we simply
        #"flip" the expected hamming weight, which results in the correlation changing signs.

        return 8-getHW(s1 ^ s2)

    elif ct != None:
        raise ValueError("Only setup for encryption attacks")
    else:
        raise ValueError("Must specify PT or CT")

class userScript(AutoScriptBase):
    preProcessingList = []
    def initProject(self):
        pass

    def initPreprocessing(self):
        self.preProcessingList = []
        return self.preProcessingList

    def initAnalysis(self):
        self.attack = CPA(self.parent, console=self.console, showScriptParameter=self.showScriptParameter)
        self.attack.setAnalysisAlgorithm(CPAProgressive,chipwhisperer.analyzer.attacks.models.AES128_8bit,AES128_HD_ILYA)
        self.attack.setTraceStart(0)
        self.attack.setTracesPerAttack(2999)
        self.attack.setIterations(1)
        self.attack.setReportingInterval(50)
        self.attack.setTargetBytes([1, 2, 3, 4, 5, 6, 7, 8, 9, 10, 11, 12, 13, 14, 15])
        self.attack.setKeyround(0)
        self.attack.setDirection('enc')
        self.attack.setTraceManager(self.traceManager())
        self.attack.setProject(self.project())
        self.attack.setPointRange((0,996))
        self.attack.setAbsoluteMode(False)
        return self.attack

    def initReporting(self, results):
        results.setAttack(self.attack)
        results.setTraceManager(self.traceManager())
        self.results = results

    def doAnalysis(self):
        self.attack.doAttack()
Disclaimers
Atmel and XMEGA are registered trademarks or trademarks of Atmel Corporation or its subsidiaries, in the US and/or other countries.
