| As of August 2020 the site you are on (wiki.newae.com) is deprecated, and content is now at rtfm.newae.com. |
Difference between revisions of "Tutorial A5 Breaking AES-256 Bootloader"
(Added template) |
(→Details of AES-256 CBC: Fixed broken link) |
||
| Line 54: | Line 54: | ||
[[File:aes256_cbc.png|image]] | [[File:aes256_cbc.png|image]] | ||
| − | Specifics of the AES-256 Decryption algorithm are given below, where this AES-256 implementation was written by [ | + | Specifics of the AES-256 Decryption algorithm are given below, where this AES-256 implementation was written by [http://www.literatecode.com/ Ilya O. Levin]: |
<pre>aes_addRoundKey_cpy(buf, ctx->deckey, ctx->key); | <pre>aes_addRoundKey_cpy(buf, ctx->deckey, ctx->key); | ||
Revision as of 05:14, 2 June 2016
THIS TUTORIAL IS INCOMPLETE AND STILL BEING UPDATED
This tutorial will take you through a complete attack on an encrypted bootloader using AES-256. This demonstrates how to using side-channel power analysis on practical systems, along with discussing how to perform custom scripts along with custom analysis scripts.
Whilst the tutorial assumes you will be performing the entire capture of traces along with the attack, it is possible to download the traces if you don't have the hardware, in which case skip section #Setting up the Hardware and #Capturing the Traces.
Contents
- 1 Background
- 2 Setting up the Hardware
- 3 Capturing the Traces
- 4 Analyzing of Power Traces for Key
- 5 Analysis of Encrypted Files
- 6 Analysis of Power Traces for IV
- 7 Timing Attacks for Signature
- 8 Appendix A Capture Script
- 9 Appendix B AES-256 14th Round Key Script
- 10 Appendix C AES-256 13th Round Key Script
- 11 Appendix D AES-256 IV Attack Script
Background
Bootloader Design
Communications Protocol
The communications protocol operates over a serial port at 115200 baud rate. The bootloader is always waiting for new data to be sent in this example; in real life one would typically force the bootloader to enter through a command sequence.
Commands sent to the bootloader look as follows:
+------+------+------+ ... +------+------+------+------+
| 0x00 |   Encrypted Block (16 Bytes)    |   CRC-16    |
+------+------+------+ ... +------+------+------+------+
The CRC uses the 16-bit CRC-CCITT polynomial (0x1021). The LSB of the calculated CRC-16 is sent first, followed by the MSB. The bootloader responds with a single byte indicating if the CRC-16 was OK or not:
+------+
- CRC-OK: | 0xA1 |
+------+
+------+
- CRC Failed: | 0xA4 |
+------+
Encrypted Block
In this design each encrypted block is always 16 bytes long. In practical bootloaders a number of encrypted blocks might be sent as part of one message. To generate an encrypted block, the data is split into 12-byte chunks:
+------+------+------+------+ ...  +------+------+------+------+------+
|   Flash Data (many bytes)                                           |
+------+------+------+------+ ...  +------+------+------+------+------+

+------+------+ ...  +------+  +------+------+ ...  +------+  +---...
|   12 Bytes of Data        |  |   12 Bytes of Data        |  | 12...
+------+------+ ...  +------+  +------+------+ ...  +------+  +---...
Each 12-byte chunk gets a 4-byte signature prepended to it. When the bootloader decrypts a chunk of data, it can verify the signature is as expected. This signature verification is required to ensure the correct encryption key was used, and the system is not just decrypting garbage:
+------+------+------+------+------+ ... +------+------+
|   Signature (4 Bytes)     | Up to 12 Bytes of Data   |
+------+------+------+------+------+ ... +------+------+
Each of these blocks is then encrypted with AES-256 in CBC mode, discussed next.
Details of AES-256 CBC
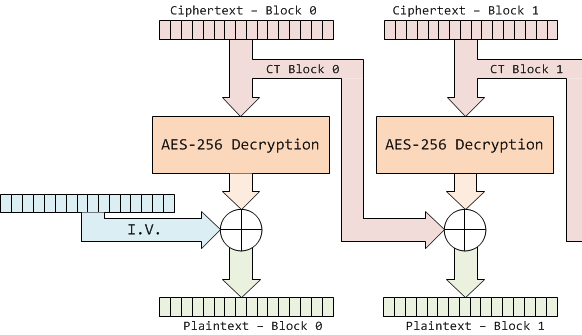
The system is using the AES algorithm in Cipher Block Chaining (CBC) mode. In general one avoids using encryption 'as-is' (i.e. Electronic Code Book), since it means any piece of plaintext always maps to the same piece of ciphertext. Cipher Block Chaining ensures that if you encrypted the same thing a bunch of times it would always encrypt to a new piece of ciphertext.
You can see another reference on the design of the encryption side, we'll be only talking about the decryption side here. In this case AES-256 CBC mode is used as follows, where the details of the AES-256 Decryption block will be discussed in detail later.
Specifics of the AES-256 Decryption algorithm are given below, where this AES-256 implementation was written by Ilya O. Levin:
aes_addRoundKey_cpy(buf, ctx->deckey, ctx->key);
aes_shiftRows_inv(buf);
aes_subBytes_inv(buf);

for (i = 14, rcon = 0x80; --i;)
{
    if( ( i & 1 ) )
    {
        aes_expandDecKey(ctx->key, &rcon);
        aes_addRoundKey(buf, &ctx->key[16]);
    }
    else aes_addRoundKey(buf, ctx->key);
    aes_mixColumns_inv(buf);
    aes_shiftRows_inv(buf);
    aes_subBytes_inv(buf);
}
aes_addRoundKey( buf, ctx->key);
In an AES-128 implementation there is ten rounds (after 'initially' applying the key), each round applied to the 16-byte state of the AES. With AES-256 the state is still 16 bytes, but is applied over 14 rounds (after initially applying the first part of the key).
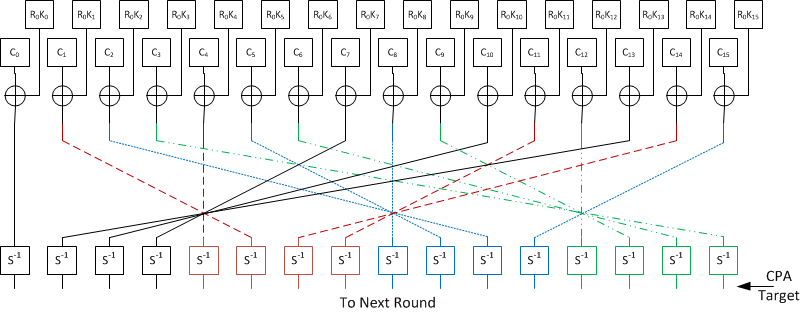
In AES-128 we can target the first output of the S-Box, which is sufficient to recover the entire encryption key. For AES-256 we can recover 16 bytes of the encryption key, as shown in the following figure of the initial setup of the decryption algorithm:
This corresponds to the first 3 lines of source code in the AES-256 decryption algorithm:
aes_addRoundKey_cpy(buf, ctx->deckey, ctx->key);
aes_shiftRows_inv(buf);
aes_subBytes_inv(buf);
As the AES-256 key is 32 bytes, we need to extend the attack to one more AES round. Looking back at the next part of the source code, this corresponds to the first round through this loop:
for (i = 14, rcon = 0x80; --i;)
  {
      if( ( i & 1 ) )
      {
          aes_expandDecKey(ctx->key, &rcon);
          aes_addRoundKey(buf, &ctx->key[16]);
      }
      else aes_addRoundKey(buf, ctx->key);
      aes_mixColumns_inv(buf);
      aes_shiftRows_inv(buf);
      aes_subBytes_inv(buf);
      //Attack will focus on state of 'buf' at this
      //point in time
  }
  aes_addRoundKey( buf, ctx->key);
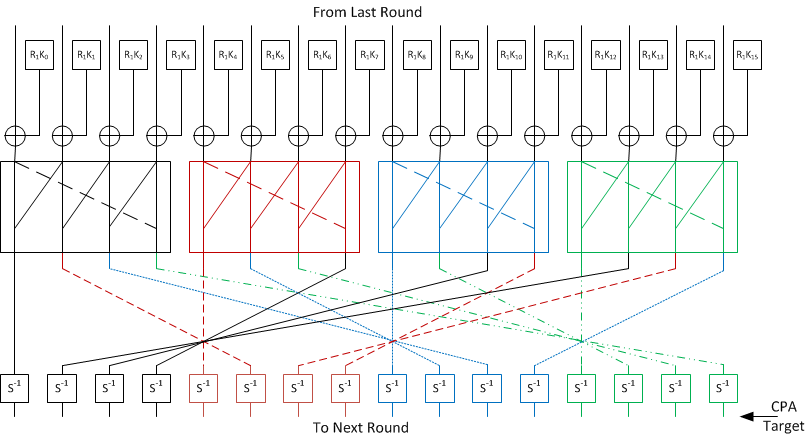
Which is shown in this figure:
The critical difference between the initial round and this round is the addition of the mixcols operation. This operation takes four bytes of input and generates four bytes of output - any change in a single byte will result in a change of all four bytes of output!
It would at first appear we need to perform a guess over 4 bytes instead of 1 byte. This would be a considerably more complicated operation! We can consider writing that last step as an equation:
The MixCols() operation is a linear function, meaning for example the following applies:
Which means instead of determining the encryption key, we can determine the encryption key modified by the inverse MixCols.
Once we fully determine the encryption key we can perform the MixCol and ShiftRow operation to determine the correct key.
Performing the complete AES-256 side channel analysis attack will thus require the following steps:
- Perform a standard attack (as in AES-128 decryption) to determine the first 16 bytes of the key, corresponding to the 14th round encryption key.
- Using the known 14th round key, calculate the hypothetical outputs of each S-Box from the 13th round using the ciphertext processed by the 14th round, and determine the 16 bytes of the 13th round key manipulated by inverse mixcols.
- Perform the mixcol and shift-row operation on the hypothetical key determined above, which will be the 13th round key.
- Using the AES-256 key schedule, reverse the 13th and 14th round keys to determine the original AES-256 encryption key.
Setting up the Hardware
This tutorial uses the CW1002_ChipWhisperer_Capture_Rev2 hardware along with the CW301_Multi-Target board. Note that you don't need hardware to complete the tutorial. Instead you can download example traces from the ChipWhisperer Site, just look for the traces titled AVR: AES256 Bootloader (ChipWhisperer Tutorial #A5).
This example uses the Atmel AVR in 28-pin DIP programmed with a demo bootloader. You can see instructions for programming in the Installing ChipWhisperer section, this tutorial assumes you have the programmer aspect working.
The Multi-Target board should be plugged into the ChipWhisperer Capture Rev2 via the 20-pin target cable. The VOUT SMA connector is wired to the LNA input on the ChipWhisperer-Capture Rev2 front panel. The general hardware setup is as follows:
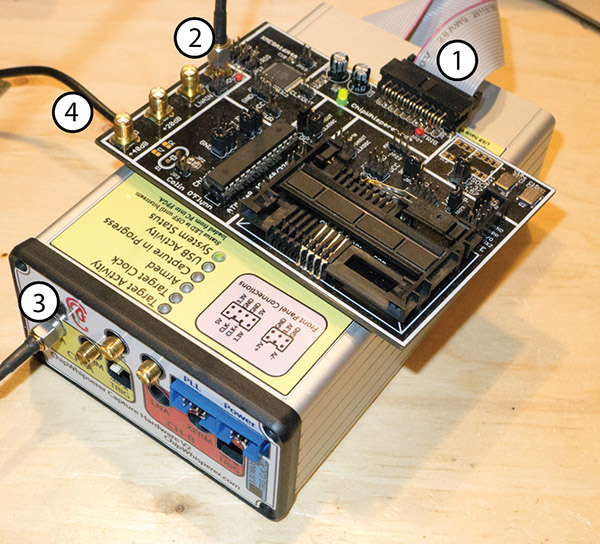
- 20-Pin Header connects Multi-Target to Capture Hardware
- VOUT Connects to SMA Cable
- SMA Cable connects to 'LNA' on CHA input
- USB-Mini connects to side (NB: Confirm jumper settings in next section first)
Jumpers on the Multi-Target Victim board are as follows:
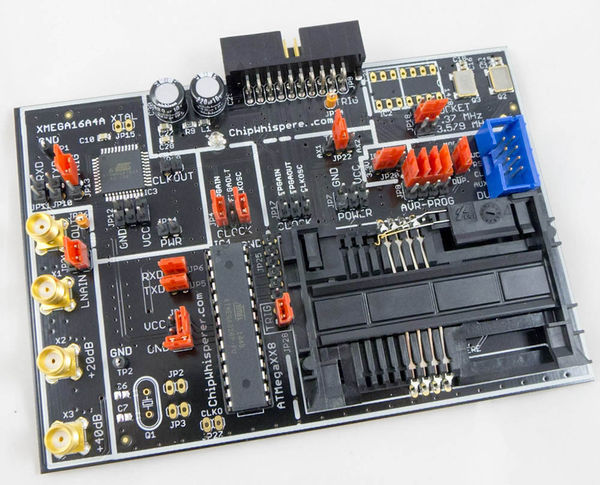
- NO jumpers mounted in XMEGA Portion or SmartCard Portion (JP10-JP15, JP19, JP7-JP8, JP17)
- 3.3V IO Level (JP20 set to INT.)
- The 7.37 MHz oscillator is selected as the CLKOSC source (JP18)
- The CLKOSC is connected to the AVR CLock Network, along with connected to the FPGAIN pin (JP4)
- The TXD & RXD jumpers are set (JP5, JP6)
- Power measurement taken from VCC shunt (JP1)
- The TRIG jumper is set (JP28) (NOTE: Early revisions of the multi-target board do not have the TRIG jumper and you can ingore this).
For more information on these jumper settings see CW301_Multi-Target .
Building/Programming the Bootloader
TODO
Capturing the Traces
It is assumed that you've already followed the guide in Installing ChipWhisperer. Thus it is assumed you are able to communicate with the ChipWhisperer Capture Rev2 hardware (or whatever capture hardware you are using). Note in particular you must have configured the FPGA bitstream in the ChipWhisperer-Capture software, all part of the description in the Installing ChipWhisperer guide.
Communication with the Bootloader
Running the Capture
Capturing the traces will requires a special capture script. This capture script is given in #Appendix A Capture Script. Running this script will start the ChipWhisperer capture system up with the bootloader communications module inserted. Your attack should look like this:
- Run the python program given in #Appendix A Capture Script
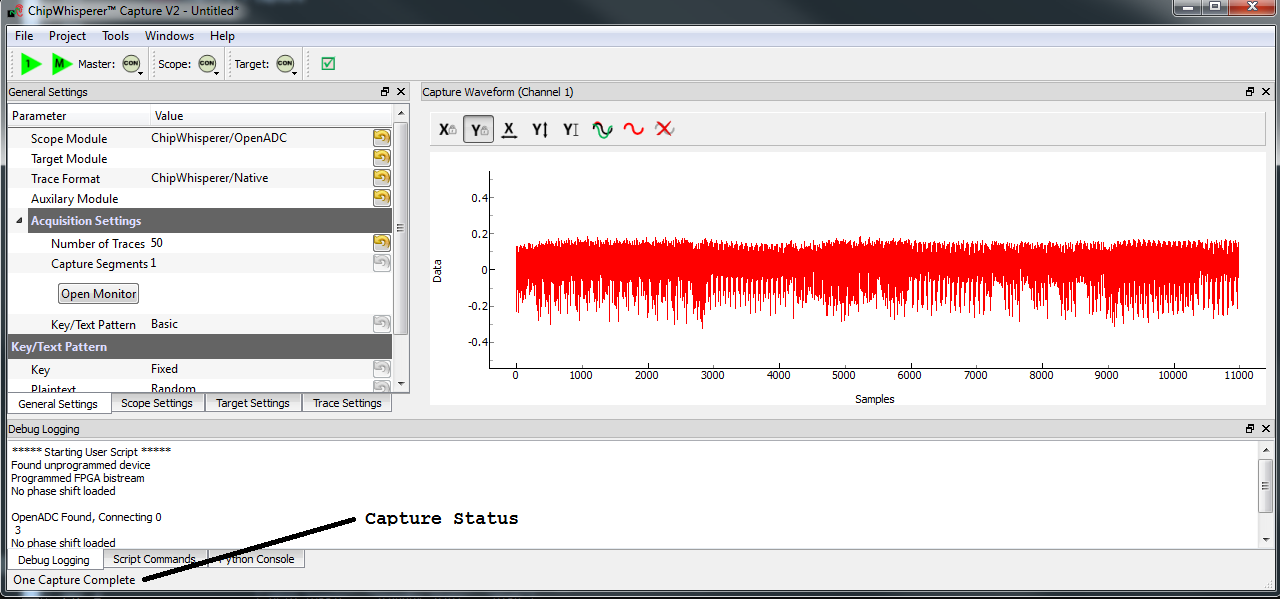
The ChipWhisperer will automatically connect to the bootloader. You should see a window that looks like this, where the every time you run a 'Capture 1' the status will update. If you see another status such as CRC Error or no response, something is not working:
To complete the tutorial, follow these steps:
- Switch to the General Settings tab
- Change the number of traces, you should need about 100 traces to break AES.
- Hit the Capture Many button (M in a green triangle) to start the capture process.
- You will see each new trace plotted in the waveform display.
- You'll see the trace count in the status bar. Once it says Trace 100 done (assuming you requested 100 traces) the capture process is complete.
- Finally save this project using the File --> Save Project option, give it any name you want.
Analyzing of Power Traces for Key
warning
- The API calling parameters changed in release 0.10 of the ChipWhisperer software. If using 0.09 release or older, see the documentation that
- is present in the 'doc' directory (which will always correspond to your release).
14th Round Key using GUI
- Open the Analyzer software
- From the File --> Open Project option, navigate to the .cwp file containing the 13th and 14th round power usage. This can be either the aes256_round1413_key0_100.cwp file downloaded, or the capture you performed.
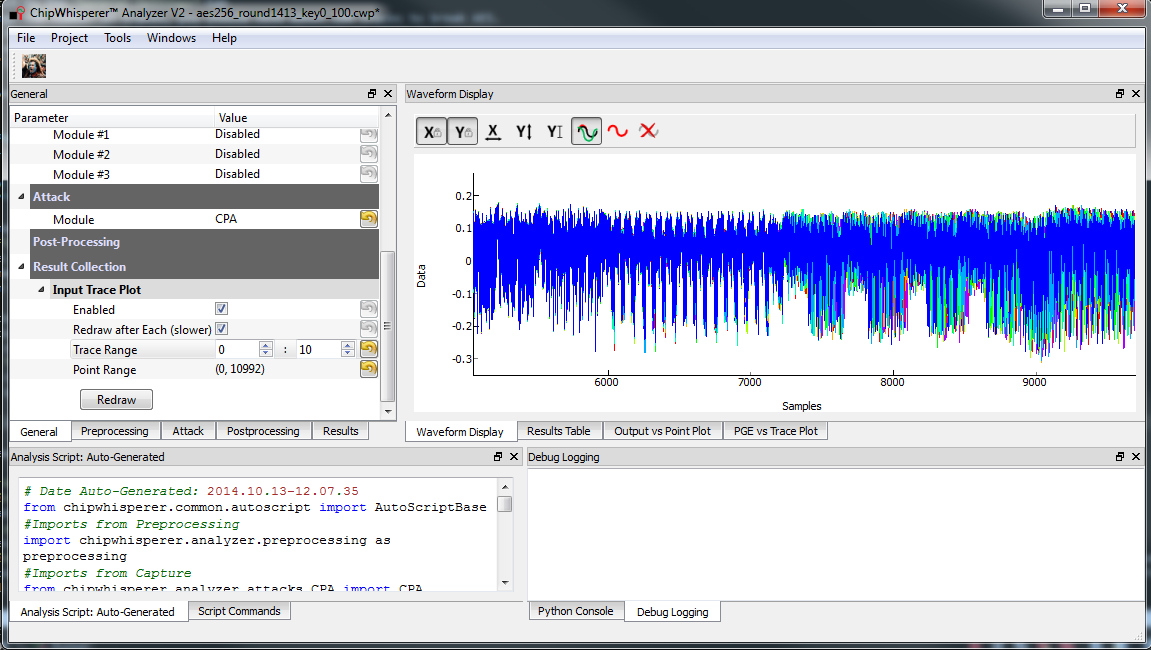
If you wish to view the trace data, follow these steps:
- Switch to the Waveform Display tab
- Switch to the General parameter setting tab
- You can choose to plot a specific range of traces
- Hit the Redraw button when you change the trace plot range
- You can right-click on the waveform to change options, or left-click and drag to zoom
- Use the toolbar to quickly reset the zoom back to original
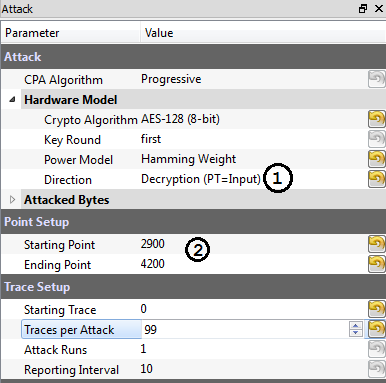
You can view or change the attack options on the Attack parameter settings tab:
- On the Hardware Model settings, ensure you select Decryption
- The Point Setup makes the attack faster by looking over a more narrow range of points. Often you might have to characterize your device to determine the location of specific attack points of interest, although you can use the range of 2900 to 4200 here for a faster attack. The default range of all the points will work fine too!
- The saved traces do not have the known encryption key stored in them. If you want to have the correct encryption key highlighted in red, switch to the Results tab and set the override key as
ea 79 79 20 c8 71 44 7d 46 62 5f 51 85 c1 3b cb. Finally run the attack by switching to the Results Table tab and then hitting the Attack button:
If you adjusted the Reporting Interval to a smaller number such as 5, you'll see the progression of attack results as more traces are used. If you have enabled the GUI override you should see the correct bytes highlighted in red, as below:
If you haven't enabled the GUI override, the wrong bytes are highlighted (since it uses some other default key). However the most likely bytes as a result of the attack are still the top bytes, the red highlighting is purely decorative. Notice the large jump in correlation between the correct guess and wrong guess:
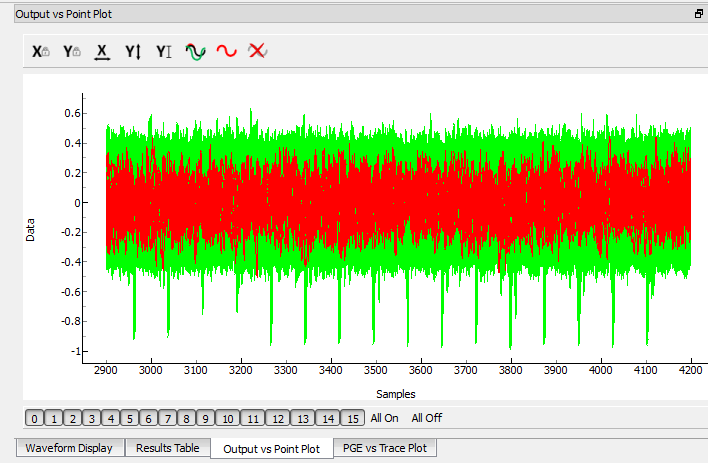
You can also switch to the Output vs Point Plot window to see where exactly the data was recovered:
- Switch to the Output vs Point Plot tab
- Turn on one of the bytes to see results.
- The known correct guess for the key is highlighted in red. If you did not enable the 'override' feature the wrong bytes are highlighted, as the system does not know the correct key. By viewing the spikes you can see where the attack succeeded.
14th Round Key using Script
TODO - see 13th round details.
13th Round Key
Attacking the 13th round key requires the use of a script. We cannot configure the system through the GUI, as we have no built-in model for the second part of the AES-256 algorithm. This will demonstrate how we can insert custom models into the system. See #Appendix B AES-256 14th Round Key Script for complete script used here.
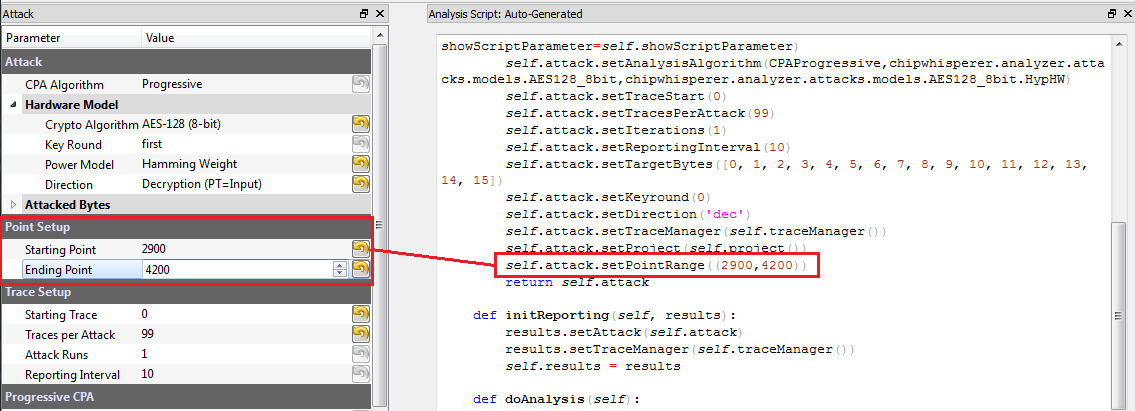
Remember that when you change settings in the GUI, the system is actually just automatically adjusting the attack script. You could modify the attack script directly instead of changing GUI settings. Every time you touch the GUI the autogenerated script is overwritten however, so it would be easy to lose your changes. As an example here is how setting the point range maps to an API call:
We will first automatically configure a script, and then use that as the base for our full attack.
- Open the Analyzer software
- From the File --> Open Project option, navigate to the .cwp file containing the 13th and 14th round power usage. This can be either the aes256_round1413_key0_100.cwp file downloaded, or the capture you performed.
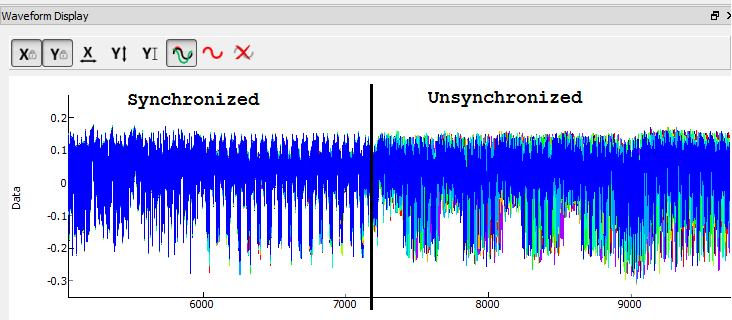
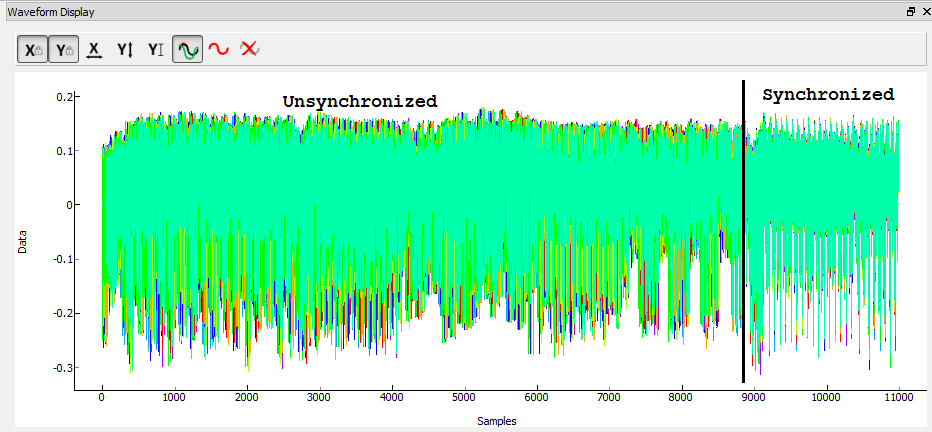
View the trace data as before, and notice how the data becomes unsynchronized. This is due to the prescense of a non-constant AES implementation. There is actually a timing attack in this AES implementation, but we ignore that for now!
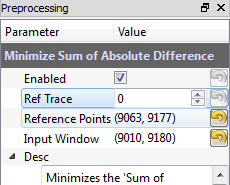
- Enable the Resync: Sum of Difference module:
- Configure the reference points to (9063, 9177) and the input window to (9010, 9080):
- Redraw the traces, confirm we now have synchronization on the second half:
- We will again set the AES mode to Decryption. Under the Attack tab on the Hardware Model settings, ensure you select Decryption
We are now ready to insert the custom data into the attack module. On the General tab, make a copy of the auto-generated script. Do so by clicking on the autogenerated row, hit Copy, save the file somewhere. Double-click on the description of the new file and give it a better name. Finally hit Set Active after clicking on your new file. The result should look like this:
- You can now edit the custom script file using the built-in editor OR with an external editor. In this example the file would be
C:\Users\Colin\AppData\Local\Temp\testaes256.py.
The following defines the required functions for our AES-256 attack on the 2nd part of the decryption key (i.e. the 13th round key):
# Imports for AES256 Attack
from chipwhisperer.analyzer.attacks.models.AES128_8bit import getHW
from chipwhisperer.analyzer.models.aes.funcs import sbox, inv_sbox, inv_shiftrows, inv_mixcolumns, inv_subbytes

class AES256Attack(object):
    numSubKeys = 16

    @staticmethod
    def leakage(textin, textout, guess, bnum, setting, state):
        if setting == 13:
           knownkey = [0xea, 0x79, 0x79, 0x20, 0xc8, 0x71, 0x44, 0x7d, 0x46, 0x62, 0x5f, 0x51, 0x85, 0xc1, 0x3b, 0xcb]
           xored = [knownkey[i] ^ textin[i] for i in range(0, 16)]
           block = xored
           block = inv_shiftrows(block)
           block = inv_subbytes(block)
           block = inv_mixcolumns(block)
           block = inv_shiftrows(block)
           result = block
           return getHW(inv_sbox((result[bnum] ^ guess)))
You can look back at the C code of the AES-256 decryption to see how this is implementing the decryption code. Note that because of the Inverse MixCols operation, we need the entire input ciphertext, and cannot use just a single byte of the input ciphertext.
- Add the above function to your custom script file.
Change the
setAnalysisAlgorithmto use your custom functions byt making the following call:self.attack.setAnalysisAlgorithm(CPAProgressive, AES256Attack, 13)
Check you have set the attack direction to decryption, and you can reduce the point range to speed up your attack. Simply ensure you have the following lines in the script:
#... some more lines ... self.attack.setDirection('dec') #... some more lines ... self.attack.setPointRange((8000,10990)) #... some more lines ...- Note you can check #Appendix C AES-256 13th Round Key Script for the complete contents of that file, and just copy/paste the complete contents.
Run Start Attack as before! Wait for the attack to complete, and you will determine the 13th round key:
Remember the key we determined was actually the key passed through inverse mixcols and inverse shiftrows. This means we need to pass the key through shiftrows and mixcols to remove the effect of those two functions, and determine the normal 13th round key. This can be done via the interactive Python console:
>>> from chipwhisperer.analyzer.models.aes.funcs import shiftrows,mixcolumns
>>> knownkey = [0xC6, 0xBD, 0x4E, 0x50, 0xAB, 0xCA, 0x75, 0x77, 0x79, 0x87, 0x96, 0xCA, 0x1C, 0x7F, 0xC5, 0x82]
>>> key = shiftrows(knownkey)
>>> key = mixcolumns(key)
>>> print " ".join(["%02x" % i for i in key])
c6 6a a6 12 4a ba 4d 04 4a 22 03 54 5b 28 0e 63
At this point we have the 13th round key: c6 6a a6 12 4a ba 4d 04 4a 22 03 54 5b 28 0e 63
13th and 14th Round Keys to Initial Key
If you remember that AES decryption is just AES encryption performed in reverse, this means the two keys we recovered are the 13th and 14th round encryption keys. AES keys are given as an 'initial' key which is expanded to all round keys. In the case of AES-256 this initial key is directly used by the initial setup and 1st round of the algorithm.
For this reason the initial key is referred to as the 0/1 Round Key in this tutorial, and the key we've found is the 13/14 Round Key. Writing out the key we do know gives us this:
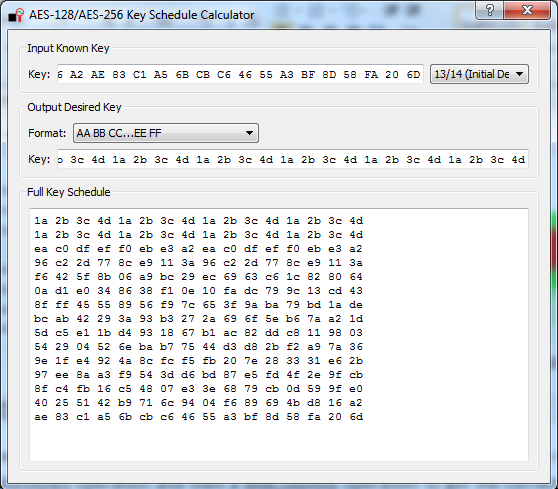
c6 6a a6 12 4a ba 4d 04 4a 22 03 54 5b 28 0e 63 ea 79 79 20 c8 71 44 7d 46 62 5f 51 85 c1 3b cb
You can use the the AES key scheduling tool built into ChipWhisperer to reverse this key:
The tool is accessible from the Tools menu. Copy and paste the 32-byte known key into the input text line. Tell the tool this is the 13/14 round key, and it will automatically display the complete key schedule along with the initial encryption key.
You should find the initial encryption key is:
94 28 5d 4d 6d cf ec 08 d8 ac dd f6 be 25 a4 99 c4 d9 d0 1e c3 40 7e d7 d5 28 d4 09 e9 f0 88 a1
Analysis of Encrypted Files
TODO
Analysis of Power Traces for IV
TODO
Example:
#Imports for IV Attack
from Crypto.Cipher import AES

def initPreprocessing(self):
    self.preProcessingResyncSAD0 = preprocessing.ResyncSAD.ResyncSAD(self.parent)
    self.preProcessingResyncSAD0.setEnabled(True)
    self.preProcessingResyncSAD0.setReference(rtraceno=0, refpoints=(6300,6800), inputwindow=(6000,7200))
    self.preProcessingResyncSAD1 = preprocessing.ResyncSAD.ResyncSAD(self.parent)
    self.preProcessingResyncSAD1.setEnabled(True)
    self.preProcessingResyncSAD1.setReference(rtraceno=0, refpoints=(4800,5100), inputwindow=(4700,5200))
    self.preProcessingList = [self.preProcessingResyncSAD0,self.preProcessingResyncSAD1,]
    return self.preProcessingList

class AESIVAttack(object):
   numSubKeys = 16

   @staticmethod
   def leakage(textin, textout, guess, bnum, setting, state):
       knownkey = [0x94, 0x28, 0x5D, 0x4D, 0x6D, 0xCF, 0xEC, 0x08, 0xD8, 0xAC, 0xDD, 0xF6, 0xBE, 0x25, 0xA4, 0x99,
                   0xC4, 0xD9, 0xD0, 0x1E, 0xC3, 0x40, 0x7E, 0xD7, 0xD5, 0x28, 0xD4, 0x09, 0xE9, 0xF0, 0x88, 0xA1]
       knownkey = str(bytearray(knownkey))
       ct = str(bytearray(textin))

       aes = AES.new(knownkey, AES.MODE_ECB)
       pt = aes.decrypt(ct)
       return getHW(bytearray(pt)[bnum] ^ guess)
Timing Attacks for Signature
Appendix A Capture Script
The following:
#!/usr/bin/python
# -*- coding: utf-8 -*-
#
# Copyright (c) 2013-2014, NewAE Technology Inc
# All rights reserved.
#
# Authors: Colin O'Flynn
#
# Find this and more at newae.com - this file is part of the chipwhisperer
# project, http://www.assembla.com/spaces/chipwhisperer
#
#    This file is part of chipwhisperer.
#
#    chipwhisperer is free software: you can redistribute it and/or modify
#    it under the terms of the GNU General Public License as published by
#    the Free Software Foundation, either version 3 of the License, or
#    (at your option) any later version.
#
#    chipwhisperer is distributed in the hope that it will be useful,
#    but WITHOUT ANY WARRANTY; without even the implied warranty of
#    MERCHANTABILITY or FITNESS FOR A PARTICULAR PURPOSE.  See the
#    GNU Lesser General Public License for more details.
#
#    You should have received a copy of the GNU General Public License
#    along with chipwhisperer.  If not, see <http://www.gnu.org/licenses/>.
#=================================================
#
#
#
# This example captures data using the ChipWhisperer Rev2 capture hardware.
# The target is a SimpleSerial board attached to the ChipWhisperer.
#
# Data is saved into both a project file and a MATLAB array
#

#Setup path
import sys

import time

#Import the ChipWhispererCapture module
import chipwhisperer.capture.ChipWhispererCapture as cwc
from chipwhisperer.capture.targets.TargetTemplate import TargetTemplate
from chipwhisperer.capture.targets.SimpleSerial import SimpleSerial_ChipWhisperer

#Check for PySide
try:
    from PySide.QtCore import *
    from PySide.QtGui import *
except ImportError:
    print "ERROR: PySide is required for this program"
    sys.exit()

import thread

import scipy.io as sio

exitWhenDone=False

def pe():
    QCoreApplication.processEvents()

# Class Crc
#############################################################
# These CRC routines are copy-pasted from pycrc, which are:
# Copyright (c) 2006-2013 Thomas Pircher <tehpeh@gmx.net>
#
class Crc(object):
    """
    A base class for CRC routines.
    """

    def __init__(self, width, poly):
        """The Crc constructor.

        The parameters are as follows:
            width
            poly
            reflect_in
            xor_in
            reflect_out
            xor_out
        """
        self.Width = width
        self.Poly = poly


        self.MSB_Mask = 0x1 << (self.Width - 1)
        self.Mask = ((self.MSB_Mask - 1) << 1) | 1

        self.XorIn = 0x0000
        self.XorOut = 0x0000

        self.DirectInit = self.XorIn
        self.NonDirectInit = self.__get_nondirect_init(self.XorIn)
        if self.Width < 8:
            self.CrcShift = 8 - self.Width
        else:
            self.CrcShift = 0

    def __get_nondirect_init(self, init):
        """
        return the non-direct init if the direct algorithm has been selected.
        """
        crc = init
        for i in range(self.Width):
            bit = crc & 0x01
            if bit:
                crc ^= self.Poly
            crc >>= 1
            if bit:
                crc |= self.MSB_Mask
        return crc & self.Mask


    def bit_by_bit(self, in_data):
        """
        Classic simple and slow CRC implementation.  This function iterates bit
        by bit over the augmented input message and returns the calculated CRC
        value at the end.
        """
        # If the input data is a string, convert to bytes.
        if isinstance(in_data, str):
            in_data = [ord(c) for c in in_data]

        register = self.NonDirectInit
        for octet in in_data:
            for i in range(8):
                topbit = register & self.MSB_Mask
                register = ((register << 1) & self.Mask) | ((octet >> (7 - i)) & 0x01)
                if topbit:
                    register ^= self.Poly

        for i in range(self.Width):
            topbit = register & self.MSB_Mask
            register = ((register << 1) & self.Mask)
            if topbit:
                register ^= self.Poly

        return register ^ self.XorOut

class BootloaderTarget(TargetTemplate):
    paramListUpdated = Signal(list)

    def setupParameters(self):
        self.ser = SimpleSerial_ChipWhisperer()
        self.keylength = 16
        self.input = ""
        self.crc = Crc(width=16, poly=0x1021)

    def setOpenADC(self, oadc):
        try:
            self.ser.setOpenADC(oadc)
        except:
            pass

    def setKeyLen(self, klen):
        """ Set key length in BITS """
        self.keylength = klen / 8

    def keyLen(self):
        """ Return key length in BYTES """
        return self.keylength


    def paramList(self):
        return []

    def con(self):
        self.ser.con()
        self.ser.flush()

    def dis(self):
        self.close()

    def close(self):
        if self.ser != None:
            self.ser.close()
            self.ser = None
        return

    def init(self):
        pass

    def setModeEncrypt(self):
        return

    def setModeDecrypt(self):
        return

    def loadEncryptionKey(self, key):
        pass

    def loadInput(self, inputtext):
        self.input = inputtext

    def isDone(self):
        return True

    def readOutput(self):
        #No actual output
        return [0] * 16

    def go(self):
        # Starting byte is 0x00
        message = [0x00]

        # Append 16 bytes of data
        message.extend(self.input)

        # Append 2 bytes of CRC for input only (not including 0x00)
        crcdata = self.crc.bit_by_bit(self.input)

        message.append(crcdata >> 8)
        message.append(crcdata & 0xff)

        # Write message
        for i in range(0, 5):
            self.ser.flush()
            self.ser.write(message)
            time.sleep(0.1)
            data = self.ser.read(1)

            if len(data) > 0:
                resp = ord(data[0])

                if resp == 0xA4:
                    # Encryption run OK
                    break

                if resp != 0xA1:
                    raise IOError("Bad Response %x" % resp)

        if len(data) > 0:
            if resp != 0xA4:
                raise IOError("Failed to communicate, last response: %x" % resp)
        else:
            raise IOError("Failed to communicate, no response")

    def checkEncryptionKey(self, kin):
        return kin

class userScript(QObject):

    def __init__(self, capture):
        super(userScript, self).__init__()
        self.capture = capture


    def run(self):
        cap = self.capture

        #User commands here
        print "***** Starting User Script *****"

        tbootloader = BootloaderTarget()

        cap.setParameter(['Generic Settings', 'Scope Module', 'ChipWhisperer/OpenADC'])
        cap.setParameter(['Generic Settings', 'Trace Format', 'ChipWhisperer/Native'])

        cap.target.setDriver(tbootloader)

        #Load FW (must be configured in GUI first)
        cap.FWLoaderGo()

        #NOTE: You MUST add this call to pe() to process events. This is done automatically
        #for setParameter() calls, but everything else REQUIRES this
        pe()

        cap.doConDis()

        pe()

        #Example of using a list to set parameters. Slightly easier to copy/paste in this format
        lstexample = [['CW Extra', 'CW Extra Settings', 'Trigger Pins', 'Front Panel A', False],
                      ['CW Extra', 'CW Extra Settings', 'Trigger Pins', 'Target IO4 (Trigger Line)', True],
                      ['CW Extra', 'CW Extra Settings', 'Clock Source', 'Target IO-IN'],
                      ['OpenADC', 'Clock Setup', 'ADC Clock', 'Source', 'EXTCLK x4 via DCM'],
                      ['OpenADC', 'Trigger Setup', 'Total Samples', 11000],
                      ['OpenADC', 'Trigger Setup', 'Offset', 0],
                      ['OpenADC', 'Gain Setting', 'Setting', 45],
                      ['OpenADC', 'Trigger Setup', 'Mode', 'rising edge'],
                      #Final step: make DCMs relock in case they are lost
                      ['OpenADC', 'Clock Setup', 'ADC Clock', 'Reset ADC DCM', None],

                      ['Generic Settings', 'Auxilary Module', 'Toggle FPGA-GPIO Pins'],
                      ['GPIO Toggle', 'Standby State', 'High'],
                      ['GPIO Toggle', 'Post-Toggle Delay', 150],
                      ['GPIO Toggle', 'Toggle Length', 100],
                      ]

        # For IV: offset = 70000

        #Download all hardware setup parameters
        for cmd in lstexample: cap.setParameter(cmd)

        #Let's only do a few traces
        cap.setParameter(['Generic Settings', 'Acquisition Settings', 'Number of Traces', 50])

        #Throw away first few
        cap.capture1()
        pe()
        cap.capture1()
        pe()

        print "***** Ending User Script *****"


if __name__ == '__main__':
    #Make the application
    app = cwc.makeApplication()

    #If you DO NOT want to overwrite/use settings from the GUI version including
    #the recent files list, uncomment the following:
    #app.setApplicationName("Capture V2 Scripted")

    #Get main module
    capture = cwc.ChipWhispererCapture()

    #Show window - even if not used
    capture.show()

    #NB: Must call processEvents since we aren't using proper event loop
    pe()
    # Call user-specific commands
    usercommands = userScript(capture)

    usercommands.run()

    app.exec_()

    sys.exit()
Appendix B AES-256 14th Round Key Script
NB: This script works for 0.10 release or later, see local copy in doc/html directory of chipwhisperer release if you need earlier versions
Full attack script, copy/paste into a file then add as active attack script:
# AES-256 14th Round Key Attack
from chipwhisperer.common.autoscript import AutoScriptBase
#Imports from Preprocessing
import chipwhisperer.analyzer.preprocessing as preprocessing
#Imports from Capture
from chipwhisperer.analyzer.attacks.CPA import CPA
from chipwhisperer.analyzer.attacks.CPAProgressive import CPAProgressive
import chipwhisperer.analyzer.attacks.models.AES128_8bit
#Imports from utilList

class userScript(AutoScriptBase):
    preProcessingList = []
    def initProject(self):
        pass

    def initPreprocessing(self):
        self.preProcessingList = []
        return self.preProcessingList

    def initAnalysis(self):
        self.attack = CPA(self.parent, console=self.console, showScriptParameter=self.showScriptParameter)
        self.attack.setAnalysisAlgorithm(CPAProgressive,chipwhisperer.analyzer.attacks.models.AES128_8bit,chipwhisperer.analyzer.attacks.models.AES128_8bit.LEAK_HW_INVSBOXOUT_FIRSTROUND)
        self.attack.setTraceStart(0)
        self.attack.setTracesPerAttack(99)
        self.attack.setIterations(1)
        self.attack.setReportingInterval(10)
        self.attack.setTargetBytes([0, 1, 2, 3, 4, 5, 6, 7, 8, 9, 10, 11, 12, 13, 14, 15])
        self.attack.setTraceManager(self.traceManager())
        self.attack.setProject(self.project())
        self.attack.setPointRange((0,10992))
        return self.attack

    def initReporting(self, results):
        results.setAttack(self.attack)
        results.setTraceManager(self.traceManager())
        self.results = results

    def doAnalysis(self):
        self.attack.doAttack()
Appendix C AES-256 13th Round Key Script
NB: This script works for 0.10 release or later, see local copy in doc/html directory of chipwhisperer release if you need earlier versions
Full attack script, copy/paste into a file then add as active attack script:
# AES-256 13th Round Key Script
from chipwhisperer.common.autoscript import AutoScriptBase
#Imports from Preprocessing
import chipwhisperer.analyzer.preprocessing as preprocessing
#Imports from Capture
from chipwhisperer.analyzer.attacks.CPA import CPA
from chipwhisperer.analyzer.attacks.CPAProgressive import CPAProgressive
import chipwhisperer.analyzer.attacks.models.AES128_8bit
# Imports from utilList

# Imports for AES256 Attack
from chipwhisperer.analyzer.attacks.models.AES128_8bit import getHW
from chipwhisperer.analyzer.models.aes.funcs import sbox, inv_sbox, inv_shiftrows, inv_mixcolumns, inv_subbytes

class AES256Attack(object):
   numSubKeys = 16

   @staticmethod
   def leakage(textin, textout, guess, bnum, setting, state):
       if setting == 13:
          knownkey = [0xea, 0x79, 0x79, 0x20, 0xc8, 0x71, 0x44, 0x7d, 0x46, 0x62, 0x5f, 0x51, 0x85, 0xc1, 0x3b, 0xcb]
          xored = [knownkey[i] ^ textin[i] for i in range(0, 16)]
          block = xored
          block = inv_shiftrows(block)
          block = inv_subbytes(block)
          block = inv_mixcolumns(block)
          block = inv_shiftrows(block)
          result = block
          return getHW(inv_sbox((result[bnum] ^ guess)))

class userScript(AutoScriptBase):
   preProcessingList = []
   def initProject(self):
       pass

   def initPreprocessing(self):
       self.preProcessingResyncSAD0 = preprocessing.ResyncSAD.ResyncSAD(self.parent)
       self.preProcessingResyncSAD0.setEnabled(True)
       self.preProcessingResyncSAD0.setReference(rtraceno=0, refpoints=(9063,9177), inputwindow=(9010,9180))
       self.preProcessingList = [self.preProcessingResyncSAD0,]
       return self.preProcessingList

   def initAnalysis(self):
       self.attack = CPA(self.parent, console=self.console, showScriptParameter=self.showScriptParameter)
       self.attack.setAnalysisAlgorithm(CPAProgressive, AES256Attack, 13)
       self.attack.setTraceStart(0)
       self.attack.setTracesPerAttack(100)
       self.attack.setIterations(1)
       self.attack.setReportingInterval(25)
       self.attack.setTargetBytes([0, 1, 2, 3, 4, 5, 6, 7, 8, 9, 10, 11, 12, 13, 14, 15])
       self.attack.setTraceManager(self.traceManager())
       self.attack.setProject(self.project())
       self.attack.setPointRange((8000,10990))
       return self.attack

   def initReporting(self, results):
       results.setAttack(self.attack)
       results.setTraceManager(self.traceManager())
       self.results = results

   def doAnalysis(self):
       self.attack.doAttack()
Appendix D AES-256 IV Attack Script
NB: This script works for 0.10 release or later, see local copy in doc/html directory of chipwhisperer release if you need earlier versions
Full attack script, copy/paste into a file then add as active attack script:
#IV Attack Script
from chipwhisperer.common.autoscript import AutoScriptBase
#Imports from Preprocessing
import chipwhisperer.analyzer.preprocessing as preprocessing
#Imports from Capture
from chipwhisperer.analyzer.attacks.CPA import CPA
from chipwhisperer.analyzer.attacks.CPAProgressive import CPAProgressive
import chipwhisperer.analyzer.attacks.models.AES128_8bit
# Imports from utilList

# Imports for AES256 Attack
from chipwhisperer.analyzer.attacks.models.AES128_8bit import getHW

#Imports for IV Attack
from Crypto.Cipher import AES

class AESIVAttack(object):
   numSubKeys = 16

   @staticmethod
   def leakage(textin, textout, guess, bnum, setting, state):
       knownkey = [0x94, 0x28, 0x5D, 0x4D, 0x6D, 0xCF, 0xEC, 0x08, 0xD8, 0xAC, 0xDD, 0xF6, 0xBE, 0x25, 0xA4, 0x99,
                   0xC4, 0xD9, 0xD0, 0x1E, 0xC3, 0x40, 0x7E, 0xD7, 0xD5, 0x28, 0xD4, 0x09, 0xE9, 0xF0, 0x88, 0xA1]
       knownkey = str(bytearray(knownkey))
       ct = str(bytearray(textin))

       aes = AES.new(knownkey, AES.MODE_ECB)
       pt = aes.decrypt(ct)
       return getHW(bytearray(pt)[bnum] ^ guess)

class userScript(AutoScriptBase):
    preProcessingList = []
    def initProject(self):
        pass

    def initPreprocessing(self):
        self.preProcessingResyncSAD0 = preprocessing.ResyncSAD.ResyncSAD(self.parent)
        self.preProcessingResyncSAD0.setEnabled(True)
        self.preProcessingResyncSAD0.setReference(rtraceno=0, refpoints=(6300,6800), inputwindow=(6000,7200))
        self.preProcessingResyncSAD1 = preprocessing.ResyncSAD.ResyncSAD(self.parent)
        self.preProcessingResyncSAD1.setEnabled(True)
        self.preProcessingResyncSAD1.setReference(rtraceno=0, refpoints=(4800,5100), inputwindow=(4700,5200))
        self.preProcessingList = [self.preProcessingResyncSAD0,self.preProcessingResyncSAD1,]
        return self.preProcessingList

    def initAnalysis(self):
        self.attack = CPA(self.parent, console=self.console, showScriptParameter=self.showScriptParameter)
        self.attack.setAnalysisAlgorithm(CPAProgressive, AESIVAttack, None)
        self.attack.setTraceStart(0)
        self.attack.setTracesPerAttack(100)
        self.attack.setIterations(1)
        self.attack.setReportingInterval(25)
        self.attack.setTargetBytes([0, 1, 2, 3, 4, 5, 6, 7, 8, 9, 10, 11, 12, 13, 14, 15])
        self.attack.setTraceManager(self.traceManager())
        self.attack.setProject(self.project())
        self.attack.setPointRange((4800,6500))
        return self.attack

    def initReporting(self, results):
        results.setAttack(self.attack)
        results.setTraceManager(self.traceManager())
        self.results = results

    def doAnalysis(self):
        self.attack.doAttack()
